Command entry:
Select a NURBS object.


Modify panel
Modifier stack display
Curve sub-object level
Select a NURBS curve on surface sub-object.
CV Curve On Surface or Point Curve On Surface rollout
Edit button
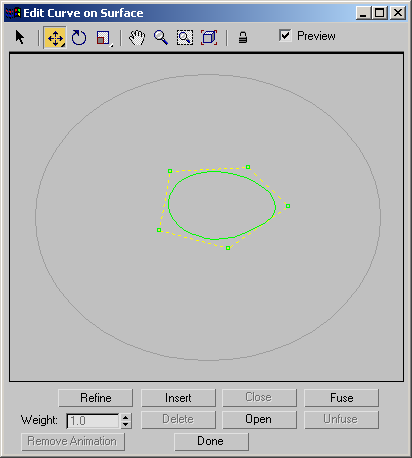
This dialog lets you edit curves on surfaces as you edit regular curves in a viewport. The main part of the dialog is a two-dimensional
view of the surface. The controls provide typical curve editing functions.
This is a modeless dialog. You can use the main 3ds Max window while Edit Curve On Surface remains open. However, if you select a different kind of curve or a sub-object that isn't
a curve, the dialog closes.
You can edit multiple CV on surface or Point on surface curves, but you can’t edit both types of curves at the same time.
The point whose surface you first click is shown as a blue square in the dialog as well as in viewports. As you draw the curve,
it appears interactively in viewports and a blue asterisk (*) shows the current mouse location on the surface.
While you are creating a curve, you can press Backspace to remove the last point or CV you created, and then previous points or CVs in reverse order.
Interface
Toolbar
The toolbar above the surface image provides selection, transform and viewing controls. These controls work the way their
analogs do in the main 3ds Max viewports. The toolbar is disabled while you create a new curve on surface.
-
 Select
-
Selects one or more points. Drag a window to select multiple points.
-
 Move
Move
-
Moves the selected points.
Move is a flyout. The alternative buttons constrain texture points to move either vertically or horizontally.
-
 Rotate
-
Rotates the selected points.
-
 Scale
Scale
-
Scales the selected points. This is a flyout that lets you choose between uniform scale, nonuniform scale in the surface's
U dimension, or nonuniform scale in the surface’s V dimension.
-
 Pan
Pan
-
-
 Zoom
Zoom
-
Zooms in or out on the surface view.
-
 Zoom Window
-
Zooms to a window you drag on the surface view.
-
 Zoom Extents
-
Zooms to the extents of the surface.
-
 Lock Selection
-
Locks the active selection set. You can turn this on to keep from accidentally selecting other points or CVs while you’re
transforming a selection set.
- Preview
-
When on (the default), edits you make in the dialog are also shown in viewports.
Curve on Surface Image
Below the toolbar is a 2D image of the curve. This image shows the points or CVs of the curve, allowing you to edit it as
you edit sub-objects in viewports.
If you right-click while in the image, a pop-up menu lets you switch between Select, Move, Rotate, and Scale. This is an alternative
to using the toolbar.
If your mouse has a middle button, you can use it to pan in this window.
Buttons and Weight
These controls are comparable to editing controls on the rollouts for point sub-objects. (The Open button works differently.)
These controls are disabled while you create a new curve on surface.
- Refine
-
Adds points to the curve. This does not change curvature. For point curves, the curvature can change, but only slightly.
- Insert
-
(Not available for point curves on surfaces.)
- Close
-
- Fuse
-
- Weight
-
(Not available for point curves on surfaces.)
- Delete
-
Deletes the selected points.
- Open
-
Opens the curve by unfusing the points where the curve was originally closed.
- Unfuse
-
Unfuses the selected points.
- Remove Animation
-
Removes animation controllers from the selected points or CVs.