This topic describes the controls that are common to point and CV curves. A rollout labeled Curve Common contains the curve sub-object controls for NURBS models.
 select one or more curves.
The sub-object selection tools are the same as for other kinds of sub-objects. You can also press the H key when the Keyboard Shortcut Override toggle is on. See Sub-Object Selection.
The Selection group box, described under "Interface" later in this topic, provides additional options for selecting curves.
 (Select And Move) or another transform and then drag in a viewport to transform the selection.
The shape of the model changes as you interactively transform the curves.
To Shift+Clone curve sub-objects:
The Sub-Object Clone Options dialog is displayed. This dialog provides various ways to clone the curves, some of which reduce relational dependencies to improve performance.
To use the keyboard to select curve sub-objects:
You can select curve sub-objects using the Ctrl key and the arrow keys. The arrows traverse the sub-objects in the order they were created. To do so, follow these steps:
 (Keyboard Shortcut Override Toggle).
 (Curve) sub-object level, set the selection controls to select curves individually.
Click or drag to select curves.
(Curve) sub-object level, set the selection controls to select curves individually.
Click or drag to select curves.
At the Curve sub-object level, the left and right arrow keys move forward and backward through individual curves in the order they were created. The up and down arrows are equivalent to left and right.
You can also use the H keyboard shortcut (while the Keyboard Shortcut Override Toggle is on) to display a dialog and select curves by name. Ctrl+H displays only the names of curves directly beneath the mouse cursor.
To turn a CV curve into a point curve:
Select the curve sub-object, and then click Make Fit.
The Make Point Curve dialog is displayed. This dialog asks how many points the new point curve should have.
Reducing the number of points can change the shape of the curve.
If the selected curve is already a point curve, you can use Make Fit to change the number of points it has.
To select a first vertex on the curve:
Select the curve sub-object, turn on Make First, and then click a location on the curve.
If the curve is closed and there is a vertex where you click, this vertex becomes the first vertex. If the curve is closed and there is no vertex where you click, a new vertex is created at the location you click. It becomes the new first vertex, and the curve's points or CVs adapt to maintain the curvature.
If the curve is open, the first vertex must be one of the endpoints (by default, it is the first you created). The Make First button has no effect, but you can use Reverse to change the curve's direction.
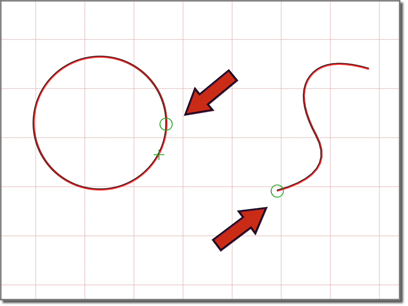
The small circle indicates the first vertex.
To turn a curve that lies on a surface into a Point Curve on Surface:
Select the curve sub-object, and then click Make COS.
Make COS is unavailable unless the curve already lies on a surface; for example, it is a U Iso curve.
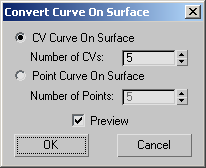
Choose CV Curve on Surface to create a CV curve, or Point Curve on Surface to create a point curve. The Number of CVs or Number of Points values let you specify the complexity and accuracy of the new curve on surface. If Preview is on, the new curve is previewed in viewports. This can help you choose the number.
Select a curve sub-object and then click Reverse. 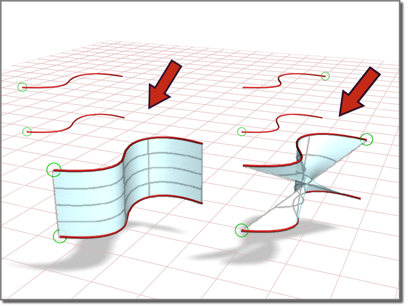
Reversing a curve affects the blend surface that depends on it.
The Join Curve dialog is displayed. This dialog gives you a choice of methods for joining the curves. Whichever method you choose, the two original curves are replaced by a single curve.
The curve is split into two independent curve sub-objects. Two coincident (but independent) points or CVs are created at the location you clicked: each is the endpoint of one part of the original curve.
If the curve is a closed curve, Break creates a single curve object, with its new start and end points at the location you clicked. The new start and end points are coincident but independent.
Select the curve and then click Close.
3ds Max closes the curve by adding a segment between the curve's endpoints. The curvature of the new segment blends the curvature of the previous end segments.
Closing a curve does not add points or CVs. The curve retains its original number of points or CVs, and increases its number of segments by one.
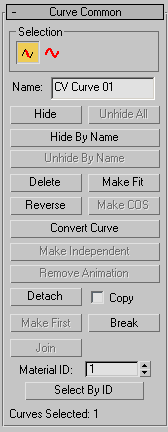
The controls on this rollout apply to all curve types. Depending on the type of curve, an additional rollout is displayed with controls specific to that type of curve.
The selection buttons for curve sub-objects let you select either individual curves, or curves that are connected in space.
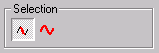
Curve sub-object selection controls
Single Curve All Connected Curves
Turns a CV curve into a point curve. This displays the Make Point Curve dialog, which lets you set the number of points.
For a point curve, this button lets you change the number of points in the curve.
Reverses the order of the CVs or points in a curve, so that the first vertex becomes the last, and the last becomes the first.
The first point or CV is significant when you use the NURBS curve like a spline: as a loft path or shape, as a path constraint path, or as a motion trajectory. For these purposes, the first vertex of the curve is significant. If the curve is a closed curve, you can use Make First to set the curve's first vertex.
The direction of the curve also determines the initial direction of normals on surfaces based on this curve.
This button is enabled only for the following kinds of curves:
This displays a Make Curve on Surface dialog, which turns the selected curve into a CV or point curve on surface. Once converted, you can edit the new curve on surface using the curve on surface controls, including the Edit Curve on Surface dialog.
If the curve is already a curve on surface, this button lets you change it from a point to CV curve on surface, or vice versa.
The new Curve on Surface preserves the trimming of the original curve.
Click to display the Convert Curve dialog. This dialog provides a more general way to convert a CV curve to a point curve, or a point curve to a CV curve. It also lets you adjust a number of other curve parameters.
Detaches the selected curve sub-object from the NURBS model, making it a new top-level NURBS curve object. The Detach dialog is displayed, which lets you name the new curve. The new object is no longer part of the original NURBS model.
To create a new top-level NURBS curve that is a copy of the selected curve, turn on Copy before you click Detach.
For a closed curve, lets you choose a position that becomes the first vertex of the curve.
The first point or CV is significant when you use the NURBS curve like a spline: as a loft path or shape, as a path constraint path, or as a motion trajectory. For these purposes, the first vertex of the curve is significant. If the curve is a closed curve, you can use Make First to set the curve's first vertex.
Joins two curve sub-objects together. After you have joined the curves in a viewport, the Join Curves dialog is displayed. This dialog lets you choose the method for joining the two curves.
Lets you assign a material ID value to the curve. If the curve is renderable, material IDs let you assign a material to the curve using a Multi/Sub-Object material. In addition, the Select by ID button lets you select a curve or multiple curves by specifying a material ID number. Can range from 1 to 100. Default=1.
Displays a Select by Material ID dialog.
This additional rollout is displayed when a CV curve is selected.
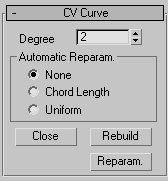
Sets the degree of the curve. The higher the degreevalue, the greater the continuity. The lower the degree, the more discontinuous the curve segments become. The degree can't be less than one or greater than the number allowed by the number of CVs in the curve. Degree 3 curves are adequate to represent continuous curves, and are stable and well behaved. Default=3.
Setting the degree greater than 3 isn't recommended because higher-degree curves are slower to calculate and less stable numerically. Higher-degree curves are supported primarily to be compatible with models created using other surface modeling programs.
The number of CVs in a CV curve must be at least one greater than the curve's degree.
Automatic Reparameterization group
The controls in this group box let you specify automatic reparameterization. They are similar to the controls in the Reparameterize dialog, with the addition that all choices except for None tell 3ds Max to reparameterize the curve automatically; that is, whenever you edit it by moving CVs, refining, and so on.
Chooses the chord-length algorithm for reparameterization.
Chord-length reparameterization spaces knots (in parameter space) based on the square root of the length of each curve segment.
Displays the Rebuild CV Curve dialog, which lets you specify how to rebuild the curve. Rebuilding the curve can change its appearance.
Displays the Reparameterize dialog. Reparameterizing a curve changes the curve's parameter space to provide a better relation between control point locations and the shape of the curve.

 Modify panel
 Expand the NURBS object's hierarchy.
  The Lock Selection Set button is useful when you transform NURBS curve sub-objects. You can make a selection in one viewport,
click Lock Selection Set (or press the
The Lock Selection Set button is useful when you transform NURBS curve sub-objects. You can make a selection in one viewport,
click Lock Selection Set (or press the