To achieve highly detailed modeling effects, you can directly transform, modify, and align the geometry of objects at the sub-object level.
Sub-objects are the pieces that make up objects, such as vertices and faces. You can also access and transform the sub-object components of modifiers.
The particular geometry or gizmo available at sub-object level depends on the object type or modifier. For details on sub-objects for each object type, see Edit Modifiers and Editable Objects. For information on modifier sub-objects, see the topic for the modifier in question.
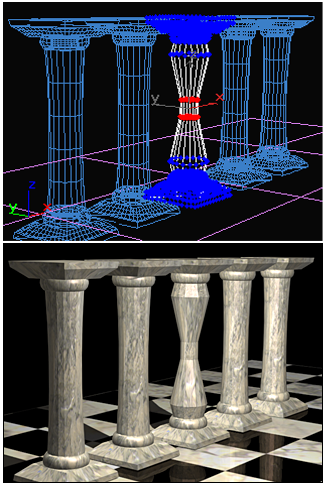
In a row of column sub-objects, a single column has been modified at the sub-object level.
Play this to see some examples of sub-object editing:
In selecting sub-object geometry, you use standard techniques:
Following is a general procedure in setting up an object for sub-object selection. See Edit Modifiers and Editable Objects for more information.
 (the plus-sign icon to the left of the name of the modifier or editable object). This expands the object's hierarchy, showing
the names of the sub-object levels at which you can work.
(the plus-sign icon to the left of the name of the modifier or editable object). This expands the object's hierarchy, showing
the names of the sub-object levels at which you can work.
Once you’ve made a sub-object selection, you can use the Spacebar to lock the selection while you’re working with it.
Storing Sub-Object Selection Sets
With any surface format (mesh, poly, and so on), you can store separate selections for each sub-object level: vertex, edge, and so on (there is overlap in some cases, such as poly edge and border). These selection sets are saved with the file. With sub-object selections, you have these options:
In modeling a character head, for example, you might have a number of different vertex selections for forehead, nose, and chin. Such selections can be difficult to re-create, so using named sets gives you easy access to the original selection when you want to rework a particular area.
Once you make a sub-object selection of geometry, you can do any of the following:
Transforming a Sub-Object Selection
Using an editable mesh, poly, patch, or spline, you can directly transform any sub-object selection. However, “Select” modifiers like Mesh Select and Spline Select enable only selection.
To transform a sub-object selection made with a Select modifier:
Using Shift+transform with a selection of vertices or faces displays the Clone Part Of Mesh dialog. This lets you choose whether to clone to a separate object or an element. Click the desired option, optionally giving the cloned object a new name, then click OK.
When you work with an editable mesh, you can directly transform and animate a sub-object selection. In effect, the selection works like any other object.


