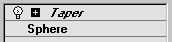
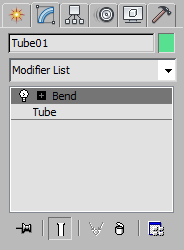
The modifier stack controls appear near the top of the Modify panel, just below the Modifier List. The modifier stack ("stack" for short) contains the accumulated history of an object, including its creation parameters and the modifiers applied to it. At the bottom of the stack is the original object. Above the object are the modifiers, in order from bottom to top. This is the order in which modifiers are applied to the object's geometry.
Object with two modifiers applied to it in the stack
Instances and References in the Modifier Stack Display
In the modifier stack display, objects and modifiers appear in normal type unless they are an instance or a reference. Here is how instances and references appear in the stack display:


Top: Plain object displayed in plain text
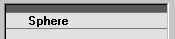
Bottom: Object instance displayed in boldface
Top: Pipeline displayed in plain text
Bottom: Pipeline instance displayed in boldface
Top: Instanced modifier displayed in italic (modifier applied to two objects)
Bottom: Instanced modifier in an instanced pipeline displayed in italic and boldface

Top: Object reference shows a bar in the pipe
Bottom: Modifier applied to reference is not bold, as it is unique to this reference
 The Make Unique button makes a pipeline or a modifier instance unique. When you highlight the base object and then click Make Unique, the whole
pipeline becomes unique. When you highlight a bold modifier and then click Make Unique, this also makes the pipeline unique.
If the modifier is an instanced modifier that belongs to an instanced pipeline (it appears in boldface and italic), clicking Make Unique makes the modifier unique but not the entire pipeline (the modifier's name is no longer italic,
but it is still bold). For more information see How Instanced Modifiers Work and Transforms, Modifiers, and Object Data Flow.
The Make Unique button makes a pipeline or a modifier instance unique. When you highlight the base object and then click Make Unique, the whole
pipeline becomes unique. When you highlight a bold modifier and then click Make Unique, this also makes the pipeline unique.
If the modifier is an instanced modifier that belongs to an instanced pipeline (it appears in boldface and italic), clicking Make Unique makes the modifier unique but not the entire pipeline (the modifier's name is no longer italic,
but it is still bold). For more information see How Instanced Modifiers Work and Transforms, Modifiers, and Object Data Flow.
3ds Max caches the results of evaluating most-recently used modifiers. This means that in general, you can see results more quickly as you move among modifiers on the stack.
To conserve memory use, the list of most-recently used modifiers has a fixed length. Once the list is full, adding a new modifier removes the oldest modifier in the list. By default, the list length is 1. You can increase it by adding an MRUModSize entry to the [Performance] section of the 3dsmax.ini file. For example:
MRUModSize=10
A good rule of thumb for this value is 10, but results will vary depending on how much main memory your system has.
To adjust an object's creation parameters:
Primitive objects have a Parameters rollout. Other kinds of objects (such as meshes and NURBS) have a variety of rollouts.
To apply a modifier to an object:
 Select the object.
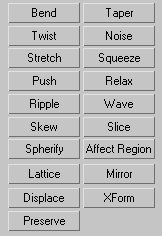
If the buttons are not visible but you want to use them, click  (Configure Modifier Sets, below the modifier stack display) and choose Show Buttons. A set of buttons with the names of modifiers appears between
the modifier list and the stack display. Click Configure Modifier Sets again, choose the set of modifiers you want to use
(for example, Free-Form Deformations), and then click the button for the modifier you want to apply.
(Configure Modifier Sets, below the modifier stack display) and choose Show Buttons. A set of buttons with the names of modifiers appears between
the modifier list and the stack display. Click Configure Modifier Sets again, choose the set of modifiers you want to use
(for example, Free-Form Deformations), and then click the button for the modifier you want to apply.
Rollouts are now displayed below the modifier stack display, showing settings for the modifier. As you change these settings, the object updates in viewports.
To remove a modifier, do one of the following:
 (Remove Modifier From The Stack). This button is one of the tools beneath the display of the modifier stack.
To turn the effect of a modifier off, do one of the following:
 light-bulb icon to the left of the modifier's name in the stack.
When you apply a modifier, the light-bulb icon is on by default.
To turn the effect of a modifier back on, do one of the following:
 light-bulb icon to the left of the modifier's name in the stack.
To change the size of the modifier stack display:
The cursor changes to an up-and-down resize arrow (as it does on the horizontal edges of a resizable window).
To change a modifier's position in the stack, do one of the following:
(Configure Modifier Sets), and choose Show Buttons.
This menu item is a toggle. It is either on or off. When you turn on Show Buttons, the current button set appears between the drop-down modifier list and the stack display.
See Configure Modifier Sets Dialog for more information.
To convert the modified object to an editable mesh, do one of the following:
A dialog opens, warning you that the collapse operation cannot be undone, and gives you the option of performing a Hold before converting the object.
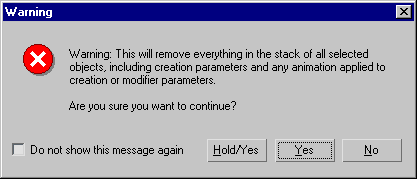
 Convert to Editable Mesh from the quad menu.
To adjust a modifier's component such as its gizmo or center point:
 plus-sign icon.
For example, you might use transforms to move a gizmo or a center point.
 minus-sign icon. The modifier itself is highlighted again.
To go to a sub-object level for complex objects:
plus-sign icon to display the object's hierarchy.
The sub-object level highlights to show it is active.
Keyboard shortcut: Insert cycles through the different sub-object levels.
When you add a new sub-object type, the modifier stack updates to show the new sub-object levels. For example, when you add a point curve sub-object to a NURBS surface, the Point and Curve sub-object levels appear in the stack.
The Modifier Stack

The Modifier List lets you choose a modifier to add to the stack. When you choose an object-space modifier from this list, it appears above the object, or above the modifier currently highlighted in the stack. When you choose a world-space modifier from this list, it appears at the top of the stack.
The first item in the Modifier List is the Use Pivot Points toggle. It is available only when multiple objects are selected.
When Use Pivot Points is on, 3ds Max uses the pivot point of each object as the center of a modifier's operation. For example, if you bend a line of trees around the Z axis, they all bend along their trunks.
When Use Pivot Points is off, 3ds Max calculates a central pivot point for the entire selection set and modifies the selection as a whole. For example, if you bend a line of trees around the Z axis, trees at the end of the line deform more than those at the center where the pivot is located.
The Use Pivot Points setting persists, so that applying modifiers to different sets of objects during the current session always uses the same setting.
Between the Modifier List and the stack display, you can optionally display up to 32 buttons. The buttons are a shortcut way to add modifiers to the stack.
To display the modifier buttons, click Configure Modifier Sets (below the stack display) and choose Show Buttons.
To customize the button set, click Configure Modifier Sets (below the stack display) and choose Configure Modifier Sets.
When a modifier's button is visible, clicking the button adds the modifier to the stack. Object-space modifiers are applied immediately above the currently selected object or modifier. World-space modifiers are applied at the top of the stack.
The modifier stack is organized as follows:
When you click to choose an entry in the modifier stack, its background highlights to show that the entry is current, and that the object's or modifier's parameters are available for adjusting, in rollouts that appear beneath the stack display.
This section lets you go back to any modifier you've applied and adjust its effect on the object. You can also delete the modifier from the stack, canceling its effect.
To the left of each modifier in the stack is a light-bulb icon. When the bulb appears white, the modifier is applied to the
stack below it. When the bulb appears gray, the modifier is turned off. Click to toggle the on/off state of the modifier.
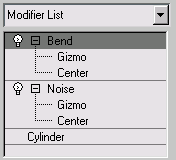
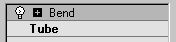
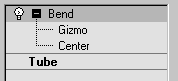
If the modifier has sub-controls such as a center or a gizmo, the stack also shows a small plus/minus icon. Click this icon
to open or close the hierarchy.
Opening a modifier's hierarchy to access sub-controls
Opening a modifier's hierarchy to access sub-controls
When the hierarchy is open, you can select a sub-control, such as a gizmo, and then adjust it. The available sub-controls vary from modifier to modifier.
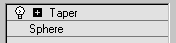
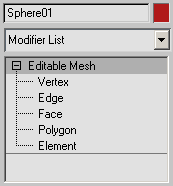
Objects that have a sub-object hierarchy, such as editable meshes and NURBS, also show a collapsible hierarchy in the modifier stack.
To work at a sub-object level, click to open the hierarchy, then click to select the sub-object level. Controls for that particular level or type of sub-object appear in rollouts below the stack display.
(Certain types of sub-objects display an icon at the right of the stack, to help you see which sub-object type you are adjusting.)

Opening an object's hierarchy to access sub-object levels
Opening an object's hierarchy to access sub-object levels
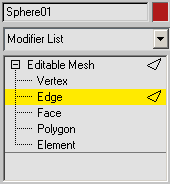
Opening an object's hierarchy to access sub-object levels
Below the stack display is a row of buttons for managing the stack.
 Pin Stack
Locks the stack to the currently selected object so it remains with that object regardless of subsequent changes in selection. The entire Modify panel is locked to the current object as well.
Pin Stack is useful for transforming another object while keeping your place in the modified object's stack.
 Show End Result Make Unique
Converts an instanced modifier to a copy that's unique to the current object. See Make Unique.
Remove Modifier Configure Modifier SetsClick to display the pop-up Modifier Sets menu.


 Modify panel