Skeleton Helper


Command entry:Select one or more bones in a character or the associated skin mesh. Animation menu Simulation - MassFX submenu Rigid Bodies submenu Create Kinematic Skeleton
Command entry:(with existing Skeleton helper in the scene) Select Skeleton helper. Modify panel

The Skeleton helper is a component of MassFX that lets animated characters participate in simulations as kinematic rigid bodies. The character can be a Bones system, a Biped, or a CATRig, plus, optionally, an associated mesh using Skin. One beneficial aspect of the Skeleton helper is that it helps you improve performance by grouping bones to act together as a single rigid body.

Procedure

To use the MassFX Skeleton helper:

  1. Create and animate a character, using any of the features listed in the introduction of this topic.
  2. Select a bone in the character or its associated skin mesh.
  3. Open the Animation menu and choose Simulation - MassFX submenu Rigid Bodies submenu Create Kinematic Skeleton.

    This creates a Skeleton helper in the scene.

    NoteThe Skeleton helper always faces the viewpoint and is always the same size when visible in the viewport. It does not render.

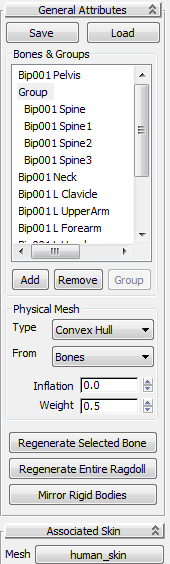
    The helper is selected, so its interface appears on the Modify panel. On the General Attributes rollout, the Bones & Groups list is empty because no bones are added to the helper by default.

  4. Click the Add button under the list.

    This opens the Select Bones dialog, which lists all bones associated with the rig to which the selected bone belongs.

    NoteThe list scrolls horizontally, not vertically.

  5. In the list, highlight the bones that should participate in the MassFX simulation, using standard Shift+click and Ctrl+click methods to highlight multiple bones, then click OK.

    The bones now appear in the Bones & Groups list on the General Attributes rollout.

  6. Use the other Skeleton controls, described following, to customize your setup. In the simulation the participating bones affect dynamic rigid bodies in the simulation, but are not affected by them.
    TipIf several adjacent bones can act as a single rigid body during the simulation, use the Group function to represent them in the simulation with one physical mesh. This can help to speed up the simulation.

Interface

Save
Click to store information about the skeleton in a disk file. The file type is MassFX Skeleton, or RAG, and it uses the .rag filename extension.

The stored data include type of the rigid body, referenced physical material preset, physical mesh, overridden physical mesh material settings, and advanced rigid body parameters.

Load

Loads skeleton information from a RAG file created with the Save function.

Bones & Groups group

Bones & Groups list

Shows bones associated with the skeleton, plus any groups. Highlight bones in this list to remove them, group them, or batch-change the rigid body settings. To highlight multiple bones, use standard Shift+click and Ctrl+click methods.

As a convenience for when you want to adjust the settings for an individual bone, double-clicking a bone's name in the list selects that bone in the scene.

Add
Associates bones from the character with the Skeleton helper. Clicking this button opens the Select Bones dialog, listing of all the bones in the skeleton not already associated with the skeleton. A MassFX Rigid Body modifier is applied to each added bone.
Remove
Disassociates highlighted bone(s) in the bone list from the skeleton. Removes the MassFX Rigid Body modifiers from each disassociated bone, but does not delete or otherwise modify the bone itself.

If a group is highlighted, instead ungroups the bones, creating a rigid body for each.

Group
Create a group from bones highlighted in the bone list. Applies a single MassFX Rigid Body modifier to the root bone in the group, and removes the Rigid Body modifiers removed from all other bones. The physical mesh for the single bone is generated to encompass the sizes of all bones in the group.

A group is indicated in the list by the name "Group" with the member bones indented beneath.

Physical Mesh group

To use these settings, first optionally highlight one or more bones in the list, then adjust the remaining settings on the rollout, then click Regenerate Selected Bone (or Bones) to apply the changes to the highlighted bones. Alternatively, apply the changes to all bones in the skeleton by clicking Regenerate Entire Skeleton.

Type
Create a Capsule or Convex Hull physical mesh for each bone when regenerating the skeleton (see following). The From setting determines the size of each capsule or hull.

For details on the physical mesh types, see Adjusting the Physical Mesh.

From
Sizes the capsule or convex hull physical mesh (see preceding) for each bone to fit around either the skinned mesh or the bone itself:
  • Skinned MeshFinds the vertices in the associated skin mesh that have a weighting above the specified Weight threshold (see following) and fits the capsule or convex hull around them. Use this option only if you created the skeleton from a rig that has an associated skin mesh.
  • BonesFits the physical mesh around the shape of the bone. This option is typically useful only when a character mesh is not available.
TipYou can adjust the sizing and placement of rigid bodies on a per-bone basis after the fact.
Inflation

The amount to inflate the convex hull or capsule beyond the cloud of vertices or bone. To contract the physical mesh to be within the skinned mesh, use a negative value.

Weight

When finding associated vertices in the skinned mesh, the skeleton feature uses this value to determine which vertices to include for each bone. A lower value includes more vertices per bone, reusing some vertices for multiple overlapping bones.

Regenerate Selected Bones

Re-creates the rigid bodies for the bones or groups highlighted in the Bones & Groups list, using the Physical Mesh settings (see preceding).

Regenerate Entire Skeleton

Re-creates the rigid bodies for all bones associated with the skeleton (shown in the Bones & Groups list), using the Physical Mesh settings (see preceding).

Mirror Rigid Bodies

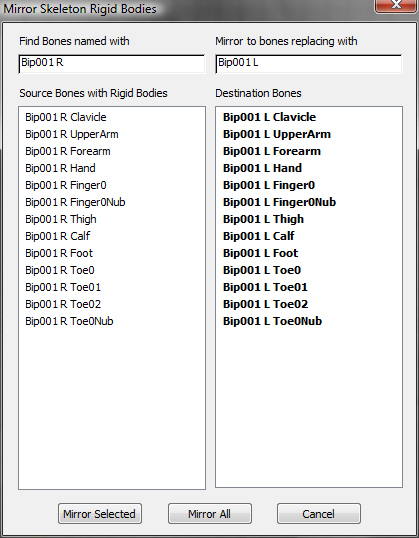
Opens the Mirror Skeleton Rigid Bodies dialog, allowing you to copy Rigid Body settings and physical meshes for bones from one side of the skeleton to bones on the other side. You can use a (case-insensitive) match on the names to find the bones to copy and replace.

First, enter a portion of the name common to all bones you want to mirror in the "Find Bones named with" field at the top of the left column. All bones that match that name are then displayed in the list of bones on the left.

Next, enter the name to replace your "find" string with in the "Mirror to bones replacing with" field at the top of the right column. If a bone is found whose name matches the result of the find/replace, it is listed in the right column across from its counterpart in the left column.

If a bone in the right column already has a Rigid Body modifier on it, its name is shown in boldface text to warn you that you will be overwriting the existing rigid body settings for that bone. In the preceding illustration, this is the case for all bones to be replaced in the mirroring process.

If the software cannot find a bone with a name that matches the result of the find/replace, a blank line is shown in the right column.

To mirror the rigid bodies for all bones shown in the columns, click the Mirror All button.

To mirror the rigid bodies for only a few of the matched bones, highlight the bones in the list (clicking in either column highlights across the row) and then click the Mirror Selected button.

Associated Skin

Shows the current associated skin mesh. To use a different mesh, click this button and select another graphical character mesh in the scene to be bound to the bones. With a character mesh associated, you will be able to generate the physical mesh from the Skinned Mesh option.