For a geometric object to participate in a physics simulation, it must have the MassFX Rigid Body modifier applied. The easiest way to do this is by selecting the object and then choosing the appropriate rigid body type from the flyout on the MassFX toolbar.
The modifier interface consists of several rollouts on the Modify panel plus a modifier stack with four sub-object levels. Most of the controls on this rollout are available only for unbaked rigid bodies and become unavailable once you've baked an object's motion. To restore the controls, click the Unbake button on the Rigid Body Properties rollout.
Modifier Stack - Sub-Object Levels
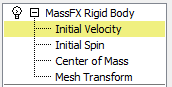

This level shows a visualization of the axis and direction of the Initial Spin for the rigid body. Use the Rotate tool to change the axis.

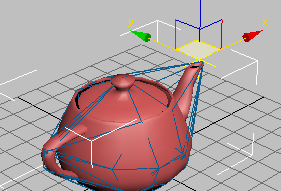
This level shows a visualization of the location of the Center of Mass for the rigid body. Use the Move tool to change the location.
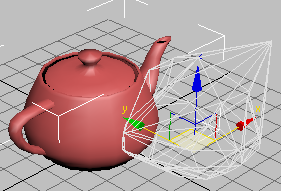
This level lets you adjust the position and rotation of a physical mesh for the rigid body. Highlight the physical mesh to transform in the list on the Physical Meshes rollout; the physical mesh will draw in white wireframe in the viewports. Use the Move and Rotate tools to adjust the physical mesh's relative placement with respect to the rigid body.
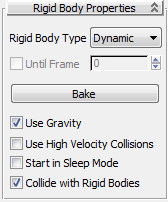
This means you can animate an object using standard methods and set Rigid Body Type to Kinematic so it performs as animated until the designated frame. At that point it becomes a dynamic object and is then subject to the full MassFX simulation forces.
For example, to re-create a baseball game, you might animate the ball leaving the pitcher's hand and flying toward the bat. Then, using Until Frame, when the bat strikes the ball, MassFX would take over and accurately simulate the action of the batter hitting a home run (or fouling out).
 Gravity Enabled switch is on, the global gravity settings apply to the selected rigid body.
Use High Velocity Collisions switch is on, the High Velocity Collisions settings apply to the selected rigid body.
Gravity Enabled switch is on, the global gravity settings apply to the selected rigid body.
Use High Velocity Collisions switch is on, the High Velocity Collisions settings apply to the selected rigid body.
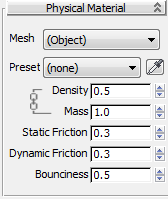
The Physical Material properties control the the way the rigid body interacts with other elements in the simulation: its mass, friction, bounciness, and so on. You can set the material properties one at a time, or use a preset to simulate real-world substances such as cardboard or rubber.
To use the settings from a different rigid body in the scene, click  and then select a rigid body in the scene.
At the bottom of the list are commands to load and save a preset as a file and to create a new preset.
The degree of difficulty for two rigid bodies to start sliding against one another. A value of 0.0 indicates no friction (more slippery than Teflon); a value of 1.0 indicates full friction (rubber cement on sandpaper).
The effective static friction between two rigid bodies is the product of their static friction values. If one rigid body has a static friction of 0.0, it doesn't matter how what the value of the other is. (Everything slides on wet ice; even sandpaper.) Once the two objects start sliding, the dynamic friction (see following) applies instead.
The degree of difficulty for two rigid bodies to keep sliding against one another. Technically, this parameter is called the "coefficient of kinematic friction." A value of 0.0 indicates no friction (more slippery than Teflon); a value of 1.0 indicates full friction (rubber cement on sandpaper).
In the real world, this value should be less than the coefficient of static friction. (It's harder to start pushing a couch across the floor than it is to keep it moving.) As with static friction, the effective value between two rigid bodies is the product of their respective values.
How easily and high an object bounces when it hits another rigid body. Technically, this parameter is called the "coefficient of restitution." A value of 0.0 indicates no bounce (a lump of peanut butter dropped on carpet); a value of 1.0 indicates that the object will bounce off just about as hard as it hit. The effective bounciness between two rigid bodies is the product of their bounciness values. A super-bouncy rubber ball landing on peanut butter will not recover.
Use this rollout to edit the physical meshes assigned to an object in the simulation. You can use the controls to add and remove physical meshes, change the mesh type, copy physical meshes between objects, and more. When you run the simulation, MassFX uses all assigned physical meshes to represent the object's physical presence. For more information, see Rigid Body Overview.

Shows each physical mesh added to the rigid body. Highlight a physical mesh in the list to rename it, delete it, copy and paste it, change its mesh parameters or affect its transform via the Mesh Transform sub-object level.
The type of the physical mesh applied to the highlighted mesh in the list at the top of the rollout. The available types are Sphere, Box, Capsule, Convex, Composite, Original, and Custom. Sphere, Box, and Custom are MassFX primitives and simulate more quickly than convex/custom hulls. For best performance, use the simplest type you can get away with.
Changing the mesh type generates a new mesh of the chosen type sized to fit around the graphical mesh. The options for the mesh change depending on the mesh type selected, and are available on the Physical Mesh Parameters rollout (see following).
Clicking this button creates a new Editable Mesh object in the scene from the highlighted physical mesh and sets the physical mesh type to Custom. You can use standard mesh-editing tools to adjust the mesh, then update the physical mesh from it. For more information, see Custom.
By default, every physical mesh in a rigid body uses the material settings set on the Physical Material rollout. However, you might be working with a complex rigid body that comprises many physical meshes, where you want to use different settings for certain physical meshes. In this case, turn on Override Physical Material. All properties in this section work as described for the Physical Material rollout, but apply only to the selected physical mesh.
Physical Mesh Parameters Rollout
The contents of this rollout vary, depending on the Mesh Type setting (see preceding). For descriptions of the parameters for each type, see MassFX Physical Mesh Types.

Use this function to apply initial motion values from a point in the animation of the kinematic body other than those at the frame at which it becomes dynamic.
The point around which real physical objects rotate unless they are constrained in some way. To visualize and adjust this point graphically for the rigid body, use the Center of Mass sub-object level.
This topic covers the parameters rollouts and settings for the various physical mesh types in MassFX.


