MassFX provides tools for creating rigid bodies as well as adjusting their settings and their physical meshes: objects' representations within the simulation.
You create a rigid body by applying a MassFX Rigid Body modifier to an object. You can do this from the Modify panel, with
the Rigid Body flyout on the MassFX toolbar, or via the commands on the Animation menu  Simulation - MassFX Rigid Bodies submenu.
The different toolbar buttons and menu commands all create the same modifier while setting the value of the Rigid Body Type parameter based on your choice. You are free to change the type of the rigid body after creation. For more information on the different rigid body types, see "Rigid Body Types: Dynamic, Kinematic, and Static".
Adding the MassFX Rigid Body modifier to an object automatically adds the object to the simulation.
 Create Dynamic Rigid Body button on the MassFX toolbar.
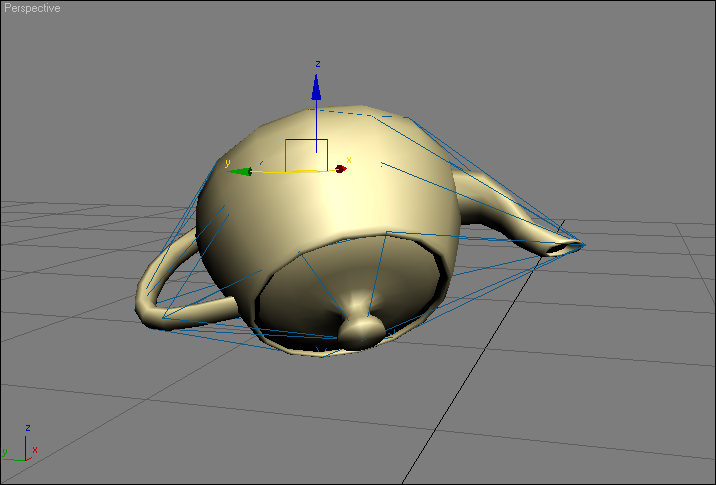
A MassFX Rigid Body modifier is added to the modifier stack, with a convex hull created for the physical mesh.
 (Start Simulation) on the MassFX toolbar.
The teapot should fall to the ground, and perhaps bounce and roll a little.
Did it fall right through the ground? You probably need to enable the Use Ground Plane option on the World panel.
Click  (Start Simulation) again to stop the simulation at the current frame.
Click  (Reset Simulation) to return the teapot to its starting location.
Managing the "Initial Transform" of Dynamic Rigid Bodies
If you tried the preceding procedure, you saw that the MassFX simulation moves dynamic rigid bodies in the scene. Clicking
(Reset Simulation) moves all dynamic rigid bodies back to their starting positions. This starting spot is referred to as
the "initial transform" of the dynamic rigid body.
How does MassFX know where this transform is? By default, any change you make to the position or rotation of a dynamic rigid
body when the time slider is at the first frame automatically updates the initial transform. Any changes you make to the transform of a dynamic rigid body when the Time
Slider is not on the first frame will be lost when you click (Reset Simulation).
(Reset Simulation).
The time slider jumps back to the first frame and the teapot returns to its initial position, floating above the ground. All your careful placement is ruined!
(Reset Simulation).
You can also "capture" as the initial transform the state of a rigid body at any point during the simulation. To do this, use the Capture Selected button on the Tools panel of the MassFX Tools dialog.
Tweaking the Physical Material
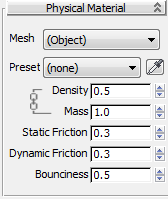
The Density and Mass parameters for a physical material are tied together through the volume of the object. For example, a tiny steel pin and a large steel bollard both have a density around 7.85 g/cm3, but (of course) the pin has a mass that is far less. Heavier objects carry more inertia and can more easily push light objects out of their way.
To make a dynamic rigid body fall faster, you might try increasing its density (or mass) in the Physical Material rollout for the modifier, but that won't do anything. In the idealized world (ignoring air resistance), objects of different sizes and weights all fall at the same speed. (Perhaps you remember something apocryphal about Galileo dropping things from the Leaning Tower of Pisa?) The only ways that you can make an object fall faster are to either:
Moving the object towards the ground may sound obvious and unhelpful, but it brings up the important issue of units.
In a graphics-only world, a brick tower 50 feet tall seen by a person six feet tall standing 10 feet away appears identical to a brick tower 500 feet feet tall seen by a giant 60 feet tall standing 100 feet away. However, a (gigantic) brick falling from that (enormous) 500 feet tower is going to take a lot longer to hit the ground than a (normal) brick falling from just 50 feet up. If you are looking through the giant's eyes while thinking you are a human, you are going to wonder why the brick is falling so slowly.
The teapot gets bigger but the convex hull does not update along with it.
Edit panel Physical Mesh rollout, click the Convex button and choose Convex from the drop-down list. Alternatively, tweak any parameter
on the Physical Mesh Parameters rollout on the Modify panel or Edit panel.
The teapot drifts slowly to the ground like a balloon, touching down a couple seconds later.
Now you have a normal-sized teapot floating way up in the air.
So if your simulation feels like it is on the moon, before cranking up the gravity, first check how big everything is. You can almost hear your high-school teacher saying, "When it comes to physics, units matter!".
The amount of friction you apply to an object determines how easily it slides along other surfaces. For example, a teflon cube on a teflon table with friction values of 0.05 (almost no friction) will slide almost indefinitely before coming to a stop. Conversely, two pieces of sandpaper-covered-blocks with friction values of 0.95 (almost full friction) will almost never slide on each other.
Two Friction settings are available in MassFX:
If you've every tried to push a car or a couch, you may have noticed that it's hard to get it moving, and easier once you're underway. For realistic results, the static friction value should usually be higher than the dynamic friction value.
The Bounciness parameter controls the extent to which objects bounce off each other when they collide.
A rubber ball might have a Bounciness value around 0.75, a foam ball perhaps around 0.2, and a ball made of peanut butter 0.0.
As described in Physical Meshes versus Graphical Meshes, a rigid body can have one or more physical meshes representing it in the physics simulation. (If you haven't read that section, please do so now.)
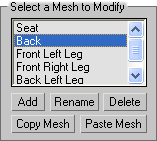
The Select a Mesh to Modify section of the Physical Meshes rollout lets you create additional physical meshes. For more information on this (uncommon) situation, see the reference section for the MassFX Rigid Body Modifier. Typically, you'll need multiple physical meshes only if the simulation requires a concave surface on a dynamic rigid body; the easiest way to accomplish this is with the Composite mesh type (see following).
The Mesh Type setting lets you change the type of (selected) physical mesh used for your rigid body. When you choose a mesh type, its parameters appear on the Physical Mesh Parameters rollout on the Modify panel and MassFX Tools dialog > Edit panel. Following are high-level descriptions of the available choices:
These are simple, "infinitely smooth" MassFX primitives. Although, by default, these primitives roughly bounding the graphical mesh when created, you can use the parameters (Radius, Length, Width, Height) to control the size of the primitive after creation.
To automatically recalculate the best-fit values after changing your graphical mesh, simply choose the same Mesh Type again from the drop-down list. This rebuilds the shape to fit the graphical mesh.
The Sphere is the fastest primitive type to simulate, followed by Box and then Capsule. However, these are all faster than Convex Hulls, Composite, and Custom mesh types.
This is the default physical mesh type for all rigid bodies because it can be used for every rigid body type and roughly resembles the original graphical mesh.
The default parameters are 32 vertices and no inflation. For increased performance at the expense of a rougher approximation, lower the number of vertices. To create a hull larger than the graphical mesh, increase the Inflation value.
To tweak vertices of the convex hull manually, click the "Convert to Custom" button and see Custom physical meshes.
This option provides the easiest method for creating a concave physical mesh for use as a dynamic rigid body. It automatically creates and combines multiple convex hulls to create the physical mesh based on the vertices from your graphical mesh. If your graphical mesh is concave, this option will generate the most precise composition of convex hulls to support the concave shape. However, using this mesh type consumes a lot of resources; use it only if you need a precise concave rigid body.
This option uses the vertices from your graphical mesh to create the physical mesh. If your graphical mesh is concave, using the Original mesh type doesn't magically make dynamic or kinematic rigid bodies support the concave shape. However, Original gives the best performance to support a concave static rigid body. If you require a precise concave rigid body, use Composite instead.
For example, create a Plane primitive of 32x32 segments and add a Ripple modifier to it with sufficient amplitude and wavelength to make it bumpy. Set it to be a static rigid body and set the physical mesh type to Original. Dropping dynamic rigid bodies onto this will show them bouncing off the ridges and settling into the valleys.
The Custom mesh type lets you specify an object in your scene whose geometry to copy for the physical mesh. To use an object as a physical mesh, it must be convex or flat, but not concave.
To use a custom object, set Mesh Type to Custom, click the button next to the "Custom" label, click the Pick Source Object button on the Physical Mesh Parameters rollout, and then select the object in the scene you wish to use for your physical mesh. The name of the associated object is then displayed on the button.
The geometry of the custom object is copied to the MassFX Rigid Body modifier. If you like, you can then delete the custom object without problem. However, if you don't delete the custom object, you can change its geometry and then use the Update From Source Object function to re-copy the latest information to the modifier.
What if you want to use a custom physical mesh, but do not have one ready-made? For example, the default convex hull is close to the desired physical mesh, but you want to tweak the placement of some of the vertices. Just click Convert To Custom Mesh on the Physical Meshes rollout of the Rigid Body modifier (unavailable on the MassFX Tools dialog) for a different mesh type to create a new Editable Mesh in the scene that is associated as a Custom object. All you then have to do is tweak the mesh object, then use the Update From Source Object function.


