Command entry:
Rendering menu

Video Post
Video Post window
Make sure no events are selected in the queue.
Video Post toolbar

(Add Image Filter Event)
Command entry:Rendering menu
Video Post
Video Post window
Select a filter from the Video Post Queue.
Video Post toolbar

(Edit Current Event)
The Add Image Filter Event provides image processing for images and scenes. Several kinds of image filters are provided, see
list below. For example, the Negative filter inverts the colors of an image and the Fade filter fades an image in or out over
time.
An Image Filter event is usually a parent event with a single child (which can itself be a parent with children), for example,
a Scene event, an Image Input event, a Layer event that contains Scene or Image Input events, or a Filter event that contains
Scene or Image Input events. You can also add an Image Filter without a child event, in which case the Image Filter processes
the result of the previous events in the queue.
Procedures
To add an image filter event:
- Either select a valid child event, or make sure no event is selected in the queue.
- Click (Add Image Filter Event).
An Add Image Filter Event dialog appears.
- Choose the kind of filter you want from the Filter Plug-In list.
- If the Setup button is enabled for this kind of filter, click Setup to set the filter options.
- Choose a mask if you want the filter to be masked or if the kind of filter you're using requires it.
- Adjust other Image Filter settings, and then click OK.
If you selected a child event, the Image Filter event becomes its parent. If no event was selected, the Image Filter event
appears at the end of the queue.
To choose the mask file:
- Click Files.
- Use the file dialog to choose the mask file, and then click OK.
- Choose the channel to use from the drop-down list of channels.
To position or resize the mask:
- Click Options.
An Image Input Options dialog appears, identical to the dialog you use with Image Input events.
If the mask is animated, you also use this dialog to specify its time range and playback speed.
Interface
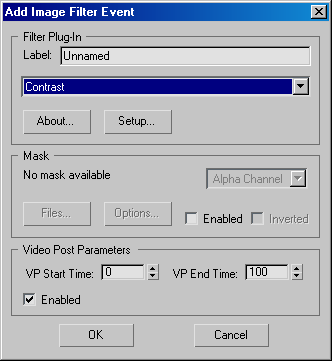
The Add Image Filter Event and Edit Filter Event dialogs have the same controls.
Filter Plug-In group
- Label
-
Lets you give the event a unique name. A unique name can make the filter event easier to distinguish in a long list of events.
- Filter List
-
Lists the filter plug-ins you have installed.
See the separate help topics for a description of the filters that come with 3ds Max by clicking any of the filters listed above.
- About
-
Provides version and source information specific to the plug-in.
- Setup
-
Displays a setup dialog specific to the plug-in. Some plug-ins might not use this button.
Mask group
- Channels
-
If you are using a bitmap as the mask file, you can use the Alpha channel, the Red, Green, or Blue channel, Luminance, Z-Buffer,
Material ID channel, or Object ID.
- Files
-
Select a file to use as a mask. The name of the selected file appears above the Files button.
- Options
-
Displays an Image Input Options dialog where you can set alignment and size, relative to the frames of video output. For animated images, you can also synchronize
the mask with the frame sequence of video output. This is the same dialog used for Image Input Event options.
- Enabled
-
Enables the mask. If turned off, Video Post ignores any other mask settings.
- Inverted
-
When turned on, the mask is inverted.
Video Post Parameters group
- VP Start Time/End Time
-
Set the starting and ending frames for the selected event within the overall Video Post queue. Video Post renders the event
over the number of frames specified here.
- Enabled
-
Enables or disables the event. When turned off, the event is disabled and Video Post ignores it when rendering the queue.
Each event must be disabled individually. For example, disabling a composite layer event does not disable the composited image
events. The range bars of disabled events are unavailable in the event track area.