Command entry:
Edit/Editable Poly object

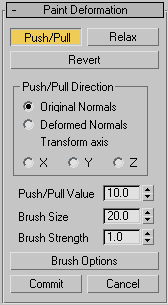
Paint Deformation rollout
Paint Deformation lets you push, pull, or otherwise affect vertices by dragging the mouse cursor over the object surface.
At the object level, Paint Deformation affects all vertices in the selected object. At sub-object levels, it affects only
selected vertices (or vertices that belong to selected sub-objects), and recognizes soft selection.
By default, deformation occurs in the normal direction of each vertex. 3ds Max continues to use a vertex's original normal for the direction of deformation, but you can opt to use the altered normal direction
for a more dynamic modeling process, or even deform along a specific axis.
NotePaint Deformation cannot be animated.
Procedures
To paint deformation onto a mesh object:
- Apply an Edit Poly modifier to an object, or convert the object to Editable Poly format. Paint Deformation uses existing geometry, so the object should have enough mesh resolution for the desired deformation.
- Do either of the following:
- To deform anywhere on the object, remain at the object level, or work at a sub-object level with no sub-objects selected.
- To deform only specific areas of an object, go to a sub-object level and then select the sub-objects in the area to deform.
- On the Paint Deformation rollout, click Push/Pull.
- Set Push/Pull value to a negative value to push into the object surface, or to a positive value to pull the surface outward.
The higher the absolute value, the greater the effect.
- Set Brush Size and Brush Strength.
- Position the mouse cursor over the surface to be deformed.
As you move the mouse, the “brush” reorients dynamically to show the normal direction of the portion of the mesh currently
under the cursor. You can use the normal direction of deformed surfaces as the push/pull direction by choosing Deformed Normals.
- Press the mouse button and drag to deform the surface. If you paint in the same spot repeatedly without lifting the mouse
button, the effect is cumulative up to the maximum Push/Pull Value setting.
Interface
Paint Deformation has three modes of operation: Push/Pull, Relax, and Revert. Only one of these modes can be active at a time.
The remaining settings control the effect of the active deformation mode.
For any mode, choose the mode, change settings as necessary, and then drag the cursor over the object to paint the deformation.
To paint deformation anywhere on the object, remain at the object level, or work at a sub-object level with no sub-objects
selected. To deform only specific areas of an object, go to a sub-object level and select the sub-objects in the area to deform.
- Push/Pull
-
Moves vertices into the object surface (push) or out of the surface (pull). The direction and extent of pushing or pulling
is determined by the Push/Pull Value setting.
TipTo reverse the Push/Pull direction while painting, press and hold Alt.
NotePush/Pull supports soft selection in that effective strength falls off with the selection value of soft-selected sub-objects.
- Relax
-
Normalizes the distances between vertices by moving each vertex to a position calculated from the average of its neighbors.
Relax uses the same method as the Relax modifier.
Use Relax to push apart vertices that are too close together, or to pull together vertices that are too far apart.
- Revert
-
Lets you gradually “erase” or reverse the effects of Push/Pull or Relax by painting. Affects only vertices deformed since
the most recent Commit operation. If no vertices qualify for reversion, the Revert button is unavailable.
TipYou can switch to Revert mode temporarily by pressing and holding the Ctrl key while painting deformation in Push/Pull or Relax mode.
Push/Pull Direction group
This setting lets you specify whether pushing or pulling vertices occurs with respect to surface normals, original or deformed,
or along a specific axis. Default=Original Normals.
Painting deformations with Original Normals typically moves vertices perpendicular to the original surface; using Deformed
Normals tends to move vertices outward after their initial deformation, resulting in a “puffy” effect.
- Original Normals
-
When chosen, pushing or pulling a vertex moves it in the direction of its normal before deformation. Repeated applications
of Paint Deformation always move each vertex in the same direction it moved originally.
- Deformed Normals
-
When chosen, pushing or pulling a vertex moves it in the current direction of the normal; that is, after deformation.
- Transform axis X/Y/Z
-
_____
- Push/Pull Value
-
Determines the direction and maximum extent of a single application of the push/pull operation. Positive values “pull” vertices
out of the object surface, and negative values “push” vertices into the surface. Default =10.0.
A single application is defined as painting (that is, dragging once or more over the same area) without lifting the mouse
button.
TipYou can use Alt to switch between pushing and pulling with the same value while painting. For example, if you're pulling with a value of
8.5, press and hold Alt to start pushing with a value of -8.5.
- Brush Size
-
Sets the radius of the circular brush. Only vertices inside the brush circle are deformed. Default=20.0.
Tip To change the brush radius interactively, release the mouse button, press and hold
Shift+Ctrl+left mouse button, and then drag the mouse. This also works with all other painter-interface features in
3ds Max such as Skin
Paint Weights and VertexPaint.
- Brush Strength
-
Sets the rate at which the brush applies the Push/Pull value. A low Strength value applies the effect more slowly than a high
value. Range=0.0 to 1.0. Default=1.0.
Tip To change the brush strength interactively, release the mouse button, press and hold
Shift+Alt+left mouse button, and then drag the mouse. This also works with all other painter-interface features in
3ds Max such as Skin
Paint Weights and VertexPaint.
- Brush Options
-
- Commit
-
Makes any deformation changes permanent, “baking” them into the object geometry. After using Commit, you can no longer apply
Revert to changes up to that point.
- Cancel
-
Eliminates all changes since the initial application of Paint Deformation or the most recent Commit operation.