The Radiance image file format is used for high-dynamic-range images (HDRI). Most cameras don't have the capability to capture
the dynamic range (the gamut of luminances between dark and bright regions) that is present in the real world. However, the
range can be recovered by taking a series of pictures of the same subject with different exposure settings, and combining
them into one image file.
Radiance image files, also known as radiance map files, have an .hdr or a .pic extension (they’re both the same format). Each Radiance-format file contains all the data from all the pictures, so a wide
luminance range is present, from bright, white highlights to the darkest black.
Radiance files are useful as backgrounds for compositing, and as reflection maps on composited objects. When using a Radiance
image as a skylight, use the parameters in the Exposure group to control the brightness of the scene.
ImportantWhen incorporating HDR images in your scene, it is highly recommended that, instead of the Radiance format, you use the
OpenEXR format. Its advantages include:
- Support for alpha (transparency) data, which other formats lack.
- The best image format for interoperating with Autodesk Toxik.
- Can be opened in Photoshop.
TipTo take best advantage of the HDR or PIC format, use the mental ray renderer with the
Frame Buffer Type set to Floating-Point (32 bits per channel).
NoteWhen you render with floating-point, 32-bit output, bright areas such as self-illumination or reflections of light sources
might appear to be jagged. See
Frame Buffer Type for more information.
Procedures
To use a Radiance image as a background, or as a diffuse or reflection map:
- In the
 Material Editor, choose Bitmap as the map type.
- On the Select Bitmap Image File dialog, under Files Of Type, choose Radiance Image File (HDRI). Open the Radiance file to
use.
The HDRI Load Settings dialog appears, with the image displayed in its preview window.
- On the HDRI Load Settings dialog, look at the Measured Min/Max values to see the luminance range for the image.
- Turn on Black Point.
- Adjust the Black Point and White Point values until the red lines on the histogram encompass the majority of the graph, and
the preview image is satisfactory.
TipFor the Internal Storage option, use the default choice of 16 bit/chan Linear (48bpp) unless you have a specific reason for
doing otherwise.
- When you have finished adjusting values, note the Linear White Point value, and click OK to accept the settings.
- In the Material Editor, expand the Output rollout. Set the RGB Level to the same value as the Linear White Point value on
the HDRI Load Settings dialog.
The result is a map with a wide range of deep blacks and very white highlights. If such an image is used as both a background
in the rendering and a reflection map on an object, the object will appear to be extremely shiny and reflective.
Interface
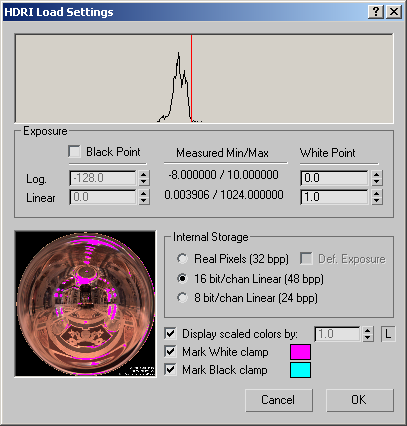
HDRI Load Settings dialog
When you open a Radiance file as a bitmap, the HDR Load Settings dialog appears. This dialog allows you to specify the luminance
range to use from the image, and the method for storing the data.
- Histogram
-
This graph shows the image's luminance values in a logarithmic scale. The red lines indicate the current Black Point and White
Point values.
The graph is visible only for luminance levels with substantial representation in the image. In other words, if a luminance
level only applies to one or two pixels in the image, there will be no corresponding graph line on the histogram. Compare
with Measured Min/Max, which gives the entire range of luminance levels in the image.
In general, the resulting image will have the most dramatic effect when the histogram is used to set the Black Point and White
Point range values, rather than using the full range expressed by Measured Min/Max.
Exposure group
- Black Point
-
When this option is turned on, you can set the luminance value that you would like to be treated as the darkest color, or
“black”. The value can be set as a logarithm (Log) or as a linear value (Linear). All values below this value will be clamped
to black. When this option is turned off, the lowest possible value is used as the Black Point.
- Measured Min/Max
-
Displays the actual minimum and maximum luminance values in the image, expressed as both the logarithmic and linear values.
Using these values for the Black Point and White Point will result in the image's full luminance range being used. However,
the histogram might show that the majority of the luminance levels fall into a much smaller range.
- White Point
-
Sets the luminance value that you would like to be considered the brightest color, or “white”, either as a logarithm (Log)
or linear value (Linear). All luminance values in the image that are above this value will be clamped to white. White pixel
values inside HDR files can be much larger than a Linear value of 1.
The image's extended luminance range is used only when the White Point's Linear value is set above 1.0. In other words, setting
White Point at or below a Linear value of 1.0 will not use any of the HDR image's special luminance properties, and will give
results similar to other bitmap formats such as TIF and JPG.
- Log
-
Sets the Black Point or White Point as a logarithmic value ranging from –128 to 127. Changing this value changes the Linear
parameter to the corresponding value.
- Linear
-
Sets the Black Point or White Point as a linear value ranging from 0 to over 1 trillion. Changing this value changes the Log
parameter to the corresponding value.
_____
- Preview window
-
Displays the selected HDR image.
Internal Storage group
- Real Pixels (32 bpp)
-
Compresses the luminance selections into a color space with 32 bits per pixel. Premultiplied Alpha and Motion Blur do not
work with this option.
- Def Exposure
-
When on, the image will load as is without applying any changes to the colors. When off, you can use the parameters in the
Exposure group to remap colors. Available only with the Real Pixels option.
- 16 bit/chan Linear (48 bpp)
-
Compresses the luminance selections into 16–bit color space, at 48 bits per pixel. This is the recommended setting. To decompress
the luminance for use in the scene, set the RGB Level on the image's Output rollout to the same value as the linear white value on this dialog.
- 8 bit/chan Linear (24 bpp)
-
Compresses the luminance selections into 8–bit color space, at 24 bits per pixel. This compression method uses less memory
than other methods, but it is generally not adequate to display the range of luminance in a HDR image, and can result in banding
or other artifacts.
_____
- Display scaled colors by
-
When on, this value scales the preview image's luminance value by the specified amount.
- L
-
Locks the preview luminance scale to the white linear value. When off, you can change the value manually. Default=on.
- Mark White clamp
-
Masks the white-clamped values in the preview window with the color indicated by the color swatch. Click the color swatch
to change this color.
- Mark Black clamp
-
When Black Point is on, this option masks the black-clamped values in the preview window with the color indicated by the color
swatch. Click the color swatch to change this color.
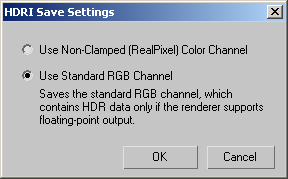
HDRI Save Settings dialog
3ds Max can render and save images with 32-bit floating-point channels. Among the useful applications for this type of imagery are:
- Compositing: Using 16–bit images in a compositing pipeline can quickly become a problem as colors are manipulated. For example,
banding may appear.
- HDR images are not bound to a specific range (such as 0–255 or 0–65535); they have a dynamic range. As such, high-contrast
and physically accurate values can be stored in 32-bit floating-point pixels.
- Because of their large range of values, HDR images can easily be modified, and effects can be reapplied long after rendering,
without affecting the quality of the image. For example, changing the contrast/brightness/exposure of a 16-bit image could
cause banding, which would require re-rendering the image. However, the same operation on an HDR image should not affect its
quality.
Clicking Save or Setup in the Render Output File dialog displays the HDR Save Settings dialog.
The dialog lets you choose the source of the values used for output:
- Higher dynamic range and color precision than existing 8- and 10-bit image file formats.
- Support for 16-bit floating-point pixels. The pixel format, called "half," is compatible with the half data type in NVIDIA's
Cg graphics language and is supported natively on their new GeForce FX and Quadro FX 3D graphics solutions.
- Multiple lossless image compression algorithms. Some of the included codecs can achieve 2:1 lossless compression ratios on
images with film grain.
- Extensibility. New compression codecs and image types can easily be added by extending the C++ classes included in the OpenEXR
software distribution. New image attributes (strings, vectors, integers, and so on) can be added to OpenEXR image headers
without affecting backward compatibility with existing OpenEXR applications.