Applies subdivision to the object in the style of MeshSmooth, so you can work on a lower-resolution "cage" mesh and simultaneously see a smoother, subdivided result. This rollout is available at all sub-object levels, as well as at the object level, and always affects the entire object.
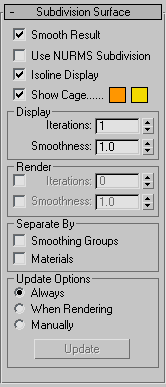
Applies smoothing via the NURMS method. See NURMS. The difference between NURMS in Editable Poly and MeshSmooth is that the latter gives you access to control vertices, but the former does not.
You control the degree of smoothing with the Iterations controls in the Display and Render groups.
When on, 3ds Max displays only isolines: the object's original edges, before smoothing. The benefit of using this option is a less cluttered display. When off, 3ds Max displays all faces added by NURMS Subdivision; thus, higher Iterations settings (see Display group) result in a greater number of lines. Default=on.
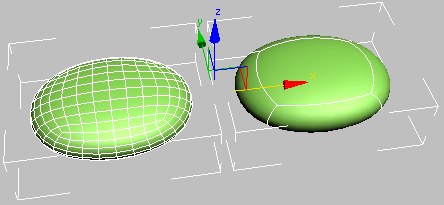
Smoothed box with Isoline Display off (left) and Isoline Display on (right).
Toggles the display of a two-color wireframe that shows the editable poly object before modification or subdivision. The cage colors are shown as swatches to the right of the check box. The first color represents unselected sub-objects, and the second color represents selected sub-objects. Change a color by clicking its swatch.
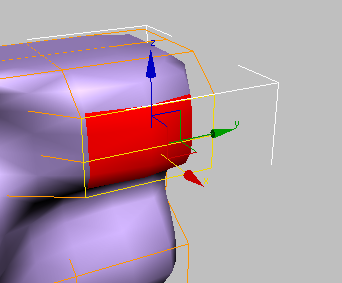
The cage displays the original structure of the edited object.
Typically this feature is used in conjunction with the NURMS Subdivision feature, or with the MeshSmooth modifier, because it lets you easily toggle visibility of the unsmoothed base object while simultaneously viewing the smoothed result, but it works with any modifier. When used with a modifier, turn on Show End Result to make Show Cage available.
Sets the number of iterations used to smooth the poly object. Each iteration generates all polygons using the vertices created from the previous iteration. Range=0 to 10.
When the Iterations check box in the Render group (see following) is off, this setting controls iterations both in the viewports and at render time. When the check box is on, this setting controls iterations only in the viewports.
Determines how sharp a corner must be before polygons are added to smooth it. A value of 0.0 prevents the creation of any polygons. A value of 1.0 adds polygons to all vertices even if they lie on a plane.
When the Smoothness check box in the Render group (see following) is off, this setting controls smoothness both in the viewports and at render time. When the check box is on, this setting controls smoothness only in the viewports.
Applies a different number of smoothing iterations and/or a different Smoothness value to the object at render time.
Lets you choose a different number of smoothing iterations to be applied to the object at render time. Turn on Iterations, and then use the spinner to its right to set the number of iterations.
Lets you choose a different Smoothness value to be applied to the object at render time. Turn on Smoothness, and then use the spinner to its right to set the smoothness value.


 Modify panel