The MeshSmooth modifier smoothes geometry in your scene by means of several different methods. It lets you subdivide the geometry while interpolating the angles of new faces at corners and edges, and apply a single smoothing group to all faces in the object. The effect of MeshSmooth is to round over corners and edges as if they had been filed or planed smooth. Use MeshSmooth parameters to control the size and number of new faces, and how they affect the surface of the object.
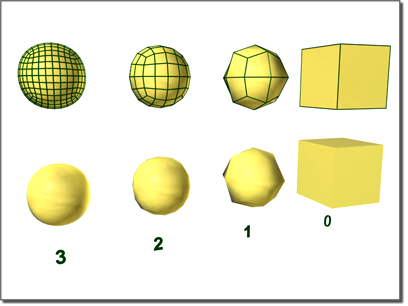
Smoothing an object modeled with extrusions
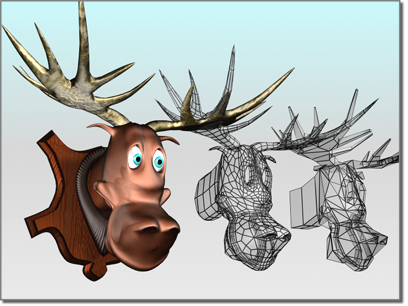
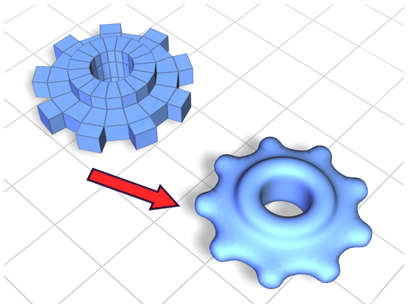
Angular model (shown on the right) changed to a smooth model with MeshSmooth
You can use MeshSmooth to produce a Non-Uniform Rational MeshSmooth object (NURMS for short). A NURMS object is similar to a NURBS object in that you can set different weights for each control vertex. You can further control the object's shape by changing edge weights.
MeshSmooth's effect is most dramatic on sharp corners and least visible on rounded surfaces. Use MeshSmooth on boxes and geometry with crisp angles. Avoid using it on spheres and similar objects.
To apply MeshSmooth to an object:
 Select an angular object.
At this sub-object level you can transform or edit face edges in the smoothed mesh.
For more information on the stack display, see Modifier Stack.
Choose one of the following to determine the output of the MeshSmooth operation:
A NURMS object is similar to a NURBS object in that you can set different weights for each control vertex. You can further control the object's shape by changing edge weights. See Display/Weighting group, following, for further information on changing weights.
Uses the 3ds Max version 3 algorithm to apply MeshSmooth to the mapping coordinates. This technique tends to distort the underlying mapping coordinates as it creates new faces and as texture coordinates shift.
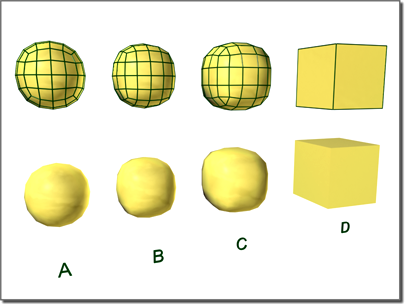
Effect of MeshSmooth with two iterations on a cube and different iteration method:
A. NURMS
B. Quad
C. Classic
D. Original object with no MeshSmooth
Sets how many times to apply MeshSmooth.
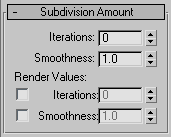
Sets the number of times the mesh is subdivided. When you increase this value, each new iteration subdivides the mesh by creating smoothly interpolated vertices for every vertex, edge, and face from the iteration before. The modifier then subdivides the faces to use these new vertices. Default=0. Range=0 to 10.
The default value of 0 iterations allows you to modify any setting or parameter, such as the type of MeshSmooth or the update options, before 3ds Max starts subdividing the mesh.
Determines how sharp a corner must be before faces are added to smooth it. Smoothness is calculated as the average angle of all edges connected to a vertex. A value of 0.0 prevents the creation of any faces. A value of 1.0 adds faces to all vertices even if they lie on a plane.
These let you apply a different number of smoothing iterations and a different Smoothness value to the object at render time. Typically you would use a low number of iterations and a lower Smoothness value for modeling, and higher values for rendering. This lets you work quickly with a low-resolution object in the viewports, while producing a smoother object for rendering.
Lets you choose a different number of smoothing iterations to be applied to the object at render time. Turn on Iterations, and then use the spinner to its right to set the number of iterations.
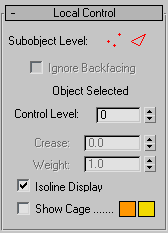
Sets the weight of selected vertices or edges. Increasing a vertex weight "pulls" the smoothed result toward that vertex. Edge weights are more complex and behave in an opposite manner in some respects. They aren't really "weights" as such, but "knot intervals," in NURBS terminology. Consequently, increasing an edge weight tends to push the smoothed result away. Kinks will form in the result if weights of 0 are used.
When on, 3ds Max displays only isolines: the object's original edges, before smoothing. The benefit of using this option is a less cluttered display. When off, 3ds Max displays all faces added by MeshSmooth; thus, higher Iterations settings (see Subdivision Amount Rollout) result in a greater number of lines. Default=on.
Toggles the display of a two-color wireframe that shows the modified object before subdivision. The cage colors are shown as swatches to the right of the check box. The first color represents unselected edges at the Vertex sub-object level, and the second color represents unselected edges at the Edge sub-object level. Change a color by clicking its swatch.
Soft Selection controls affect the action of sub-object Move, Rotate, and Scale functions. When these are on, 3ds Max applies a spline curve deformation to unselected vertices surrounding the transformed selected sub-object. This provides a magnet-like effect with a sphere of influence around the transformation.
For more information, see Soft Selection Rollout.
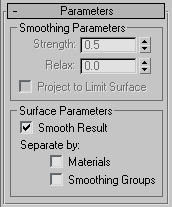
Parameters rollout > Smoothing Parameters group
These settings are available only when MeshSmooth Type is set to Classic or Quad Output. Also, Project To Limit Surface is available only in Classic mode.
Parameters rollout > Surface Parameters group
Applies smoothing groups to the object and restrict the MeshSmooth effect by surface properties.
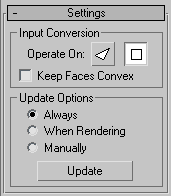
Settings rollout > Input Conversion group
(Available only with Operate On Polygons mode.) Keeps all input polygons convex. Selecting this option causes non-convex polygons
to be handled as a minimum number of separate faces, each of which is convex. (Turn on Display/Weighting group  Display Control Mesh to see what's happening here.)
"Convex" means that you can connect any two points in the polygon with a line that doesn't go outside the polygon. Most letters aren't convex. In the capital letter "T," for example, you can't connect the upper-left corner to the bottom with a straight line without going outside the shape. Circles, rectangles, and regular polygons are all convex.
Problems that can occur with non-convex faces include the fact that changes in the geometry of the input object can result in a different topology for the MeshSmooth result. For instance, in a box, if you drag one of the top corners across the middle of the top face, the box becomes non-convex. MeshSmooth would then see this as two triangles instead of one quad, and the number of points in the result would change.
If you need to make sure your output topology is stable, turn this off. If you have a lot of letters or other non-convex faces in your mesh, however, you'll probably want it on.
Settings rollout > Update Options group
Sets manual or render-time update options, for situations where the complexity of the smoothed object is too high for automatic updates. Note that you can also set a greater degree of smoothing to be applied only at render time, on the Subdivision Amount rollout.
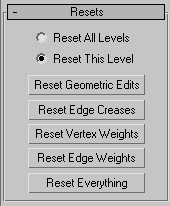
This rollout allows you to go back to default or initial settings on any changes you made such as sub-object transforms (geometric edits), and changes to edge creases, vertex weights, and edge weights.
You can reset changes for all control levels or to the current control level. Turn on the reset option for the sub-object level you want, and then click the appropriate button.


 Modify panel