The tool combines the functionality of three different tools into one. You can cut, slice, and insert edge loops when the tool is active.
To cut a polygon mesh
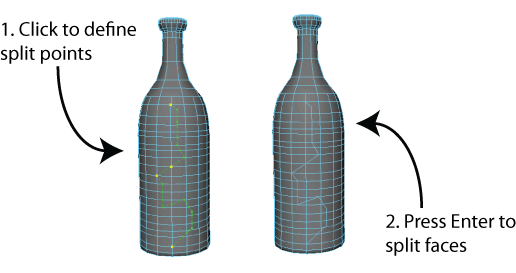
The cut function lets you split polygon faces by drawing a line across a face to specify the location of the split.
- In the section of the window, click to activate the tool.
- In your scene, click the point on your mesh where you want the split to begin. Split points can be on edges and vertices,
and in the middle of faces.
A yellow split point appears.
TipUse the following tips to adjust split points:
- Press Backspace to remove split points.
- Hold Shift to snap split points along edges. You can adjust the snap interval in the field in the .
- Drag to reposition split points that are placed on faces. (When you reposition a split point on a face, you're constrained
to the surface of the single face.)
- Click another edge, vertex, or face to define the second split point.
A second dot appears and the two split points are joined by a green dotted line.
TipYou can insert split points that are several faces apart. The cut will automatically span across all components.
- (Optional) Continue to define points to split many polygon faces.
- Press Enter to bake the split into the mesh.
To slice a polygon mesh
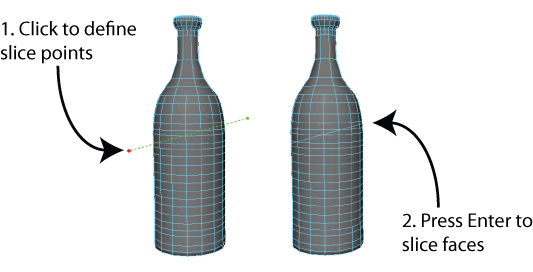
The slice function lets you cut faces perpendicularly to the view plane.
- In your scene, click anywhere outside the mesh to define the first slice point.
TipYou can also click-drag to create the start and end points of a slice.
- Use the following tips to adjust slice points:
 -drag to move a slice point after it is dropped.
- Drag to reposition slice points placed on the surface of a face.
- Click in your scene again to define the second slice point.
A second dot appears and the two slice points are joined by a green dotted line.
TipDrag across the mesh to automatically create a cut.
- (Optional) Do either of the following to edit the slice plane:
- -drag the slice plane to reposition it.
- Shift-drag a slice point to reposition it.
- Press Enter to slice your mesh.
All of the faces are cut along the slice plane.
To insert an edge loop
- Do one of the following to insert edge loops:
 -drag to insert an edge loop anywhere on your mesh.
- + -drag to insert an edge loop that automatically snaps to the middle of the edge ring path.
- +
 -drag to insert an edge loop that snaps to the edge ring path according to the interval. See Mesh Editing Tools
 Except where otherwise noted, this work is licensed under a Creative Commons Attribution-NonCommercial-ShareAlike 3.0 Unported License