Select a CATRig part. > Motion panel > Layer Manager rollout > Create or highlight an animation layer. > Click Dope Sheet: Layer Ranges button.
Ranges View is 3ds Max CAT's nonlinear animation (NLA) view; it lets you move and retime all keyframes in a layer simultaneously. Benefits include the ability to change the animation timing and speed and trim off the end of the animation.
 Click
the Ranges button on the
Layer
Manager rollout. The layers are displayed
as individual tracks.
Click
the Ranges button on the
Layer
Manager rollout. The layers are displayed
as individual tracks.
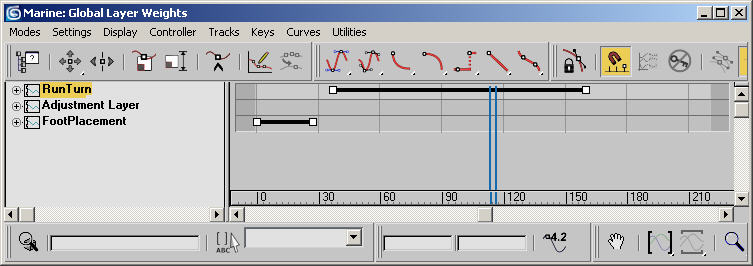
Ranges View
The range for a layer is specified by the first and last keyframes on any track for any part of the rig. If a range extends before the start or beyond the end of your animation, one of the rig bones might have rogue keyframes. 3ds Max creates a keyframe at frame 0 whenever you keyframe (using Auto Key) an object for the first time. This can create an unintended keyframe.
Whenever you use Ranges View to edit the keyframes on a layer, all the keyframes on the rig are moved. You can see this clearly by selecting a bone with keyframes and then editing the layer range bar.
To move all the keyframes on a layer, drag the bar to the left or right.
With a complex character, the movement might be somewhat slow or jerky. Remember that you are moving many keyframes at once and the entire rig is updating repeatedly as you drag the keyframes.
Squashing and Stretching Keyframes
You can speed up or slow down an animation by dragging the range bar endpoints. To slow down the entire animation, make the range bar longer by moving the end of the bar to the right, or the start to the left.
To speed up your animation make the range bar shorter by moving the start of the bar to the right, or the end to the left.
To reverse the direction of an animation, drag the start of the range bar past the end, thus reversing the order of the keyframes.
Setting Looping Options for a Layer
 To access
the looping options for this layer, click the Parameter Curve Out-of-Range
Types' button.
To access
the looping options for this layer, click the Parameter Curve Out-of-Range
Types' button.
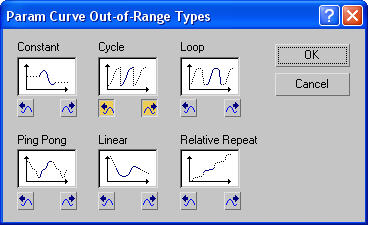
You might have an animation on a layer that you would like to repeat in some way. This could be a simple action like a breathing motion on a ribcage, or a while walk cycle. You can use the ranges view to set the looping options for the entire layer.
Remember that each controller on the rig loops separately, so to get the whole layer to loop at the same time, you might want to set the layer time range manually (see following).
Setting the Layer Time Range Manually
Each controller in the rig has its own time range, which is defined by the first and last keyframes on that controller. This means, for example, that if you want your animation to loop, then each controller will loop according to its own time range. As a result, the whole animation can get out of sync and look incorrect. If you set the time range manually, you can force all the controllers on the character to use the same time range, thereby ensuring correct looping.
To use position ranges on an animation layer:

 Click
the Position Ranges button.
Click
the Position Ranges button.
 At some
point you might wish to go back to standard range editing. You can
do so by clicking the Recouple Ranges button. This resets all the
ranges to their default behavior where the time range is defined
by the first and last keyframes.
At some
point you might wish to go back to standard range editing. You can
do so by clicking the Recouple Ranges button. This resets all the
ranges to their default behavior where the time range is defined
by the first and last keyframes.


