Chapter 11, 2D Compositing
| 2D Compositor | Channel Processing Tools | ||
Chapter 11, 2D Compositing |
|||
The Alpha tools let you control the look of your alpha:
| Tool | Description |
| Alpha Levels | For matte cleanup tasks during the keying process--see Alpha Levels. |
| Blend Alpha | Blends two mattes together under the optional control of a third matte--see Blend Alpha. |
| Blur Alpha | Softens the alpha channel of its primary input--see Blur Alpha. |
| Clamp Alpha | Brings the alpha channel of the primary input within a predetermined range--see Clamp Alpha. |
| Cleanup Alpha | Lets you remove gray details from white and/or black regions of the alpha channel--see Cleanup Alpha. |
| Comp Alpha | Composites two mattes together--see Comp Alpha Tool. |
| Control Edge | Allows edges in the matte to be moved, stretched, and softened--see Control Edge. |
| Detect Edge | Replaces the source alpha channel with an edge map of the source alpha--see Detect Edge. |
| Drop Alpha | A simple matte modifier that drops the alpha channel from its primary input--see Drop Alpha. |
| Edge | Lets you refine the edges of a matte--see Edge Tool. |
| Extract Alpha | Extracts the alpha channel from its primary input--see Extract Alpha. |
| Fade | Lets you modify the transparency of an image--see Fade Tool. |
| Invert Alpha | Inverts the alpha channel of its primary input--see Invert Alpha. |
| Median Alpha | Excellent for removing impulse noise--see Median Alpha. |
| Remap Alpha | Remaps the alpha--see Remap Alpha. |
| Set Alpha | Create an alpha channel for an image based on a component from a second image--see Set Alpha Tool. |

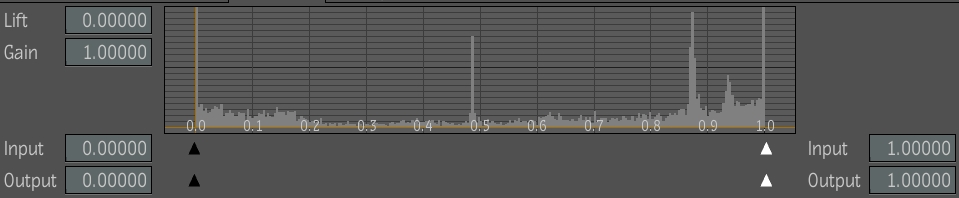
The Alpha Levels tool is one of the tools used for matte cleanup tasks during the keying process. When used as a tool defined by the keyer tool's dependency graph, the Alpha Levels tool applies its effect to the alpha component of the keyer's output. You can clean up the matte by manipulating the input/output luma remapping curve, by adjusting the input and output luma fields or sliders, or by adjusting the lift and gain. The Alpha Levels tool also allows you to invert the matte. The Alpha Levels tool is located in the Alpha tools folder in the Tools tab.
The histogram indicates the distribution of luma values in the input source alpha channel with gray vertical bars along the X-axis. The curve illustrates the resulting luma value. For example, if you drag the part of the curve that represents the darker input grays upwards, the curve over that region becomes lighter.
Since the Alpha Levels tool affects the alpha and is typically applied to the output of a keyer tool, such as the Luma Keyer or the Diamond Keyer, your dependency graph should include, as a minimum, one source and a keyer.
The Alpha Levels tool UI has the following parameters.
 "Show full-size image")
|
|
|
|
|
|
Lift -- Adjust the Lift to add an overall offset to the matte.
Gain -- Adjust the Gain to adjust a scaling factor for the matte. Lift, Gain, Input and Output are animatable attributes--see Marking Attributes for Keyframing.
Minimum Output slider -- Drag to remap input blacks to dark gray.
Minimum Input slider -- Drag to the right to remap dark grays as black.
Luma remapping curve -- View the changes you make in this curve.
Maximum Input slider -- Drag to the left to remap light grays as white.
Maximum Output slider -- Drag to the left to remap output whites to light gray.
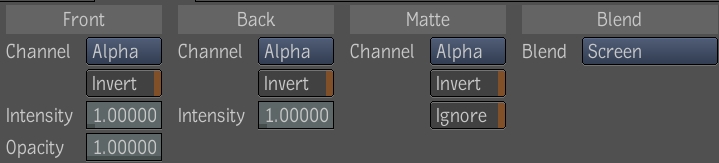
The Blend Alpha tool is used to blend two mattes together under the optional control of a third matte. It has front, back, and matte inputs. It extracts a matte from the front image and composites it over the alpha channel of the back input using a choice of blend modes. The coverage of the front can be controlled by the matte input. The back is the primary input; the output inherits the format of the back input; this tool only affects alpha; if the back is an RGBA image, the color part is simply copied to the output.
Note: The alpha output of this tool is always clamped to the [0,1] interval.
The Blend Alpha tool has the following parameters:
 "Show full-size image")
Front Channel -- Selects which channel to use for the front. Channel selections include Luma, Red, Green, Blue, and Alpha (default is Alpha).
Front Invert -- Inverts the front before using it (default is off).
Front Intensity -- Specifies the intensity of the front layer (default is 100%; range is [0,10]).
Front Opacity -- Controls the opacity of the front in the blending. If a matte image is also used to control the blending, the two are multiplied together. This parameter is never ignored (default is 100%; range is [0,1]).
Back Channel -- Selects which channel to use for the back. Channel selections include Luma, Red, Green, Blue, and Alpha (default is Alpha).
Back Invert -- Inverts the back before using it (default is off).
Back Intensity -- Specifies the intensity of the back layer (default is 100%; range is [0,10]).
Matte Channel -- Selects which channel to use for the matte. Channel selections include Luma, Red, Green, Blue, and Alpha (default is Alpha).
Matte Invert -- Inverts the matte before using it (default is off).
Matte Ignore -- Determines whether or not the matte input is used to modulate the blend. The default is false (meaning that the matte input will be used in the blending equations). Note that if the Matte Input is not chain connected, it will be automatically ignored (no feedback needs to be provided in the UI).
Blend Mode -- Determines which blend mode will be used (the default is Normal).
Click the Blend button to view other available modes.
The following tables (grouped by type) list the available blend modes and describe the resulting blend effect.
Note: The Blend Alpha tool has four fewer modes than the Blend & Comp and Glow tools, because the Blend Alpha tool affects only the alpha channel.
Basic blend modes--
| Mode | Blend Result |
| Normal | This is the default setting and displays the front input |
| Average | Adds the front and back, then divides by 2. |
| Add | Adds the front and back. |
| Subtract | Subtracts the front from the back. |
Blend modes that darken--
| Mode | Blend Result |
| Darken | Compares the pixels of the front and back inputs at a given location and selects the darker of the two. |
| Multiply | Multiplies the color values of the back input pixels and the front input pixels, producing a darker color. |
| Color Burn | Colorizes darker back input pixels with the front input color. |
| Linear Burn | Same as Color Burn but with less contrast. |
Blend modes that lighten--
| Mode | Blend Result |
| Lighten | Compares the pixels of the front and back inputs at a given location and selects the lighter of the two. |
| Screen | Makes the light areas much lighter, darker areas somewhat lighter. |
| Color Dodge | Colorizes lighter pixels with the front input color. |
| Linear Dodge | Same as Color Dodge but with lower contrast. |
Modes based on lighting--
| Mode | Blend Result |
| Spotlight | Like Multiply but with 2 X the brightness. |
| Spotlight Blend | Same as Spotlight but also adds ambient illumination to the back input. |
| Overlay | Darkens or lightens the pixels depending on the back color. |
| Soft Light | If the front color is lighter than mid-gray, the image is lightened. If the front color is darker than mid-gray, the image is darkened. |
| Hardlight | If the front colors are lighter than mid-gray, screen mode is applied. If the front colors are darker than mid-gray, multiply mode is applied. |
| Pin Light | Replaces the back colors depending on the brightness of the front color. If the front color is lighter than mid-gray, back colors darker than the front color are replaced. And vice versa; if the front color is darker than mid-gray, back colors lighter than the front color are replaced. |
| Hard Mix | Produces either white or black depending on similarities between front and back. |
Difference Modes--
| Mode | Blend Result |
| Difference | Looks at the front and back inputs, and subtracts the less bright from the brighter one. |
| Exclusion | Similar to Difference but with less contrast. |
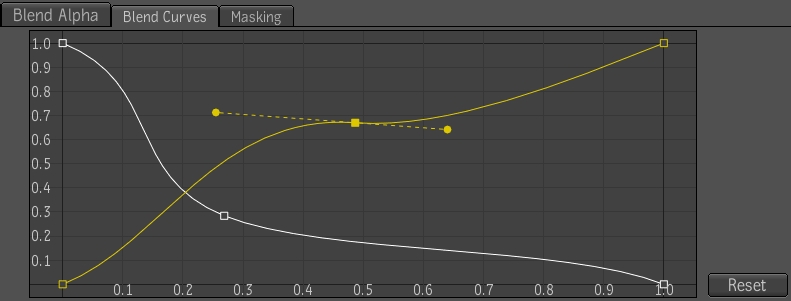
Blend curves are used to adjust the blend of the front and back elements by adjusting the amount of fractional opacity (pixel area) for the front, and one minus front. The latter gives more importance to the back. Blend curves is useful for controlling the blend along the edges of a matte by adjusting fractional values, not 0 and 1 values. Because mattes have fractional values along the edges, the blend curves affect the edge blending.
 "Show full-size image")
Select and drag a control point on the curve.
With the cursor in the curve window, press + (plus sign) and click the curve at the location in which you want to add a control point.
With the cursor in the curve window, press - (minus sign) and click the control point you want to delete from the curve.
Press Esc.
Select the curve and click Reset.
Hold down the Ctrl key and select both curves then select Reset.
Note: Blend Curves can be animated.
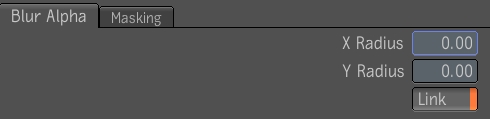
The Blur Alpha tool lets you soften the alpha channel of its primary input.
The Blur Alpha tool has the following parameters:
X Radius -- Change this value to blur horizontal pixels.
Y Radius -- Change this value to blur vertical pixels.
Link -- Select to link X and Y values.
 "Show full-size image")
Note: X and Y Radius are animatable attributes--see Marking Attributes for Keyframing.
The Clamp Alpha tool is used to bring the alpha channel of the primary input within a predetermined range. You can use clamp alpha values outside of the [0,1] range in order to prepare the alpha channel for use in compositing operators. This is necessary because Toxik does not force alpha values to be in the [0,1] range.
The Clamp Alpha tool contains the following parameters:

 "Show full-size image")
Minimum Alpha -- Set Largest negative float point. By default, Min is 0.
Maximum Alpha -- Set Largest positive float point. By default Max is 1.0.
Note: Min and Max Alpha are animatable attributes--see Marking Attributes for Keyframing.
The Cleanup Alpha tool lets you remove gray details from white and/or black regions of the alpha channel. You can choose to remove holes in black regions, white regions, or both. You can specify what range of values is black and what range is white. In addition, you can control the maximum number of pixels of edges to preserve and the softness controlling the blend between the preserved edge region and the interior filled-in region. The specified edge preservation width is considered to be a maximum limit; for instance, when removing holes in white regions, all pixels that are connected to black regions and within the specified distance from black regions will be considered part of the edge and preserved. Essentially the black region fills into the edges until it hits the white region or its maximum width limit, and then this is used as a mask to preserve input values in the filled region.
The Cleanup Alpha tool has the following parameters:
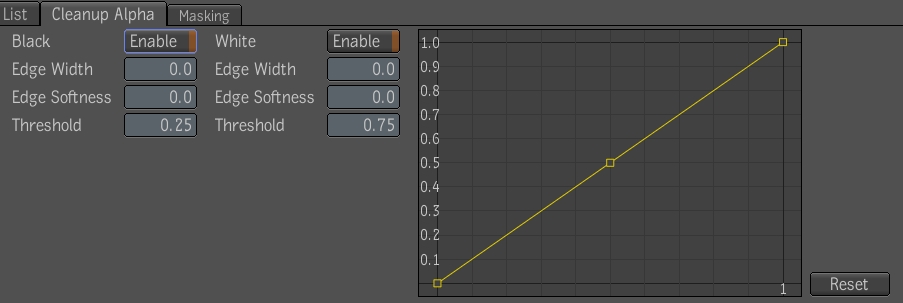
 "Show full-size image")
| Use: | To: |
| Enable | Enable the black or white (or both) clean up controls. |
| Edge Width | Control the number of pixels of edges to preserve. |
| Edge Softness | Control the blend between the preserved edge region and the interior filled-in region. |
| White/Black Threshold | Specify black or white (or both) thresholds. |
| Curve | Gesturally manipulate the alpha remapping. |
| Reset | Reset the remapping curve. |
The Comp Alpha tool lets you composite two mattes together. It has front and back inputs, and works by extracting a matte from the front image and compositing it over the alpha channel of the back input using a choice of compositing operators. The back is the primary input and the output inherits the format of the back input.
This tool only affects alpha. If the back is an RGBA image, the color part is simply copied to the output.
Note: The alpha output of this tool is always clamped to the [0,1] interval.
The Comp Alpha tool has the following parameters:
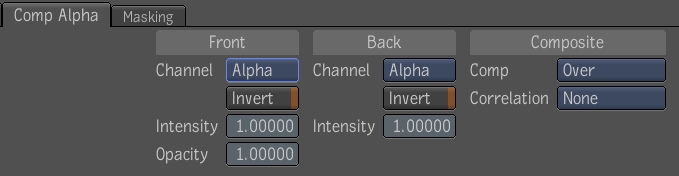
 "Show full-size image")
Front Channel -- Selects which channel to use for the front (default is alpha).
Front Invert -- Inverts the front before o using it (default is off).
Front Intensity -- Specifies the intensity of the front layer. Default is 100% and range is [0,1].
Front Opacity -- Controls the opacity of the front in the compositing. If the opacity is less then one, the front will get more transparent and you will start seeing the back through it. Default is 100%; range is [0,1].
Back Channel -- Selects which channel to use for the back (default is alpha).
Back Invert -- Inverts the back before using it (default is off).
Back Intensity -- Specifies the intensity of the back layer. Default is 100%; range is [0,1].
Comp Mode -- Determines which compositing mode will be used (default is Over)--see Compositing Operators.
Correlation -- Specifies how the two input mattes are correlated. This can be used to improve the quality of the composite in special cases. For example, if you composite two mattes that share a good portion of their outline, you should indicate if they are Adjacent or Superposed. By default, the correlation mode is None, assuming that normally, the input mattes are not correlated.
The following table lists the compositing operators applicable between front and back input images:
| Operator | Result: |
| Over | Composites the front over the back. The output will cover any area covered by either the front or the back. Where the front and back overlap, the output will show the front. |
| Replace | Completely replaces the back image with the front image. |
| Atop | Similar to the Over operator, but the output will cover the same area covered by the back. |
| Inside | Composites the front over the back, but the output will cover only the area covered by both front and back. |
| Outside | The output will be equal to the front except that the part of the front overlapping the back image will be missing. No part of the back will be visible in the output in any case. |
| Cutout | The output will be equal to the back except that the part of the back covered by the front image will be missing. No part of the front will be visible in the output in any case. Basically this operator is equal to the Outside operator with the front and back roles reversed. |
| Xor | Both front and back are copied to the output except for the part where they overlap. |
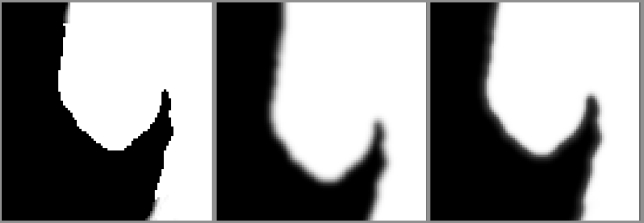
The Control Edge tool lets you move, stretch, and soften the edges of a matte. You can widen an edge, offset it toward the interior or exterior, and blur its inner and outer extremities separately.
 "Show full-size image")
|
|
|
Note: This tool can be masked and animated.
The Control Edge tool has the following parameters:
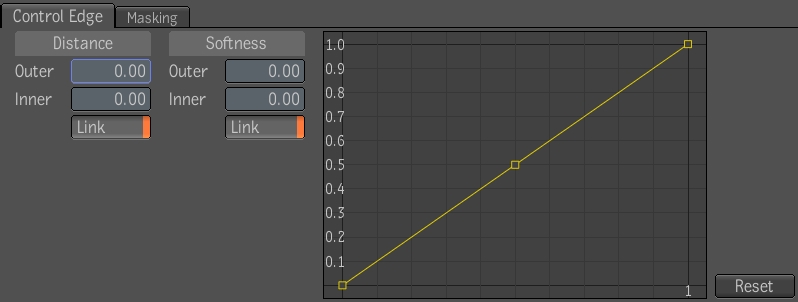
 "Show full-size image")
| Use: | To: |
| Outer Distance | Control the width and offset of the outer edges. |
| Inner Distance | Control the width and offset of the inner edges. |
| Link Distance | Link the Outer and Inner Distance sliders so that the alpha edges are thickened by an amount of twice the slider value, centered about their original position in the input image. By default, the Link button is enabled. |
| Outer softness | Add blur to the outside extremities of edges. |
| Inner Softness | Add blur to the inside extremities of edges. |
| Link Softness | Link the Outer and Inner Softness sliders. By default, the Link button is enabled. |
| Remap Alpha Curve | Remap the alpha as the last step in the internal pipeline. |
| Reset | Reset the alpha remapping curve. |
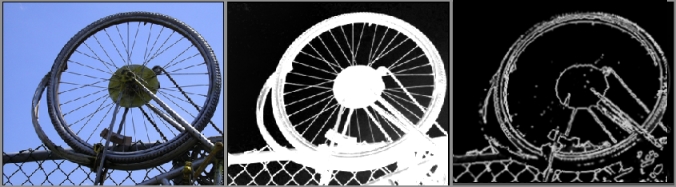
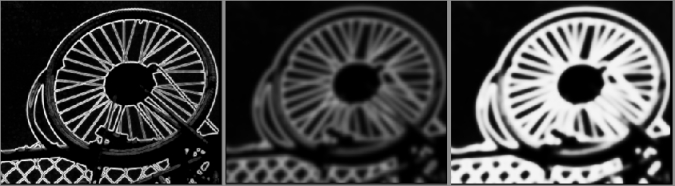
The Detect Edge tool lets you create an image composed of the edges in an image. The resulting grayscale image can used as a matte or to produce special effects. You can apply the Detect Edge tool to a color or monochrome image. This tool has many applications, the most useful include:
Delimiting a portion of the matte to perform color corrections on the front image.
Creating special effects by using it directly on the front or back image.
The Detect Edge tool replaces the source alpha channel with an edge map of the source alpha.
The Detect Edge tool has the following parameters:
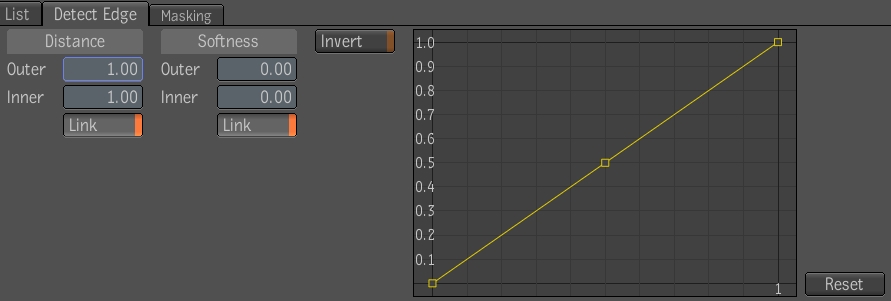
 "Show full-size image")
| Use: | To: |
| Outer Distance | Control the width and offset of the outer edges. |
| Inner Distance | Control the width and offset of the inner edges. |
| Outer softness | Add blur to the outside extremities of edges. |
| Inner Softness | Add blur to the inside extremities of edges. |
| Link Distance | Link the Outer and Inner Distance sliders so that the alpha edges are thickened by an amount of twice the slider value, centered about their original position in the input image. By default, the Link button is enabled. |
| Link Softness | Link the Outer and Inner Softness sliders. By default, the Link button is enabled. |
| Invert | Create negatives of Edge Mattes, by simply inverting the output alpha. |
| Remap Alpha Curve | Remap the alpha as the last step in the internal pipeline. |
| Reset | Reset the alpha remapping curve. |
 "Show full-size image")
|
|
|
 "Show full-size image")
|
|
|
The Drop Alpha tool is a simple matte modifier that drops the alpha channel from its primary input. This tool has no control parameters but always outputs an RGB image.
Note: This implies that if the input is an alpha-only image, the output will be a black RGB image.
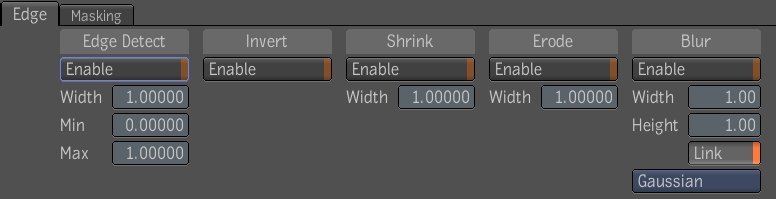
The Edge tool is one of the tools used for matte cleanup tasks during the keying process. It lets you shrink, erode, or blur the edge of the matte, as well as isolate the edge of the matte, or invert the matte.
Because the Edge tool affects the alpha and is applied to the output of a keyer tool, such as the Luma Keyer or the Diamond Keyer, your dependency graph should include, as a minimum, a source and a keyer.
The Edge tool contains the following parameters:
 "Show full-size image")
| Use: | To: |
| Edge Detect | Isolates the edge of the key. The numeric field takes values representing the width of the detected edge based on a 0% to 100% float. Edge width can depend on image size. |
| Invert | Invert the matte. |
| Shrink | Reduce the edge width. The numeric field takes values representing the pixel width of the shrink filter (from 0.000 to 30.000 float). |
| Erode | Blend (soften) the light and dark edges. The numeric field takes values representing the pixel width of the erode filter (from 0.000 to 30.000 float). |
| Blur | Reduce the edge width. The numeric fields take values representing the pixel width of the blur filter along the X-axis and
the Y-axis (from 0.000 to 30.000 float).
|
The Extract Alpha tool lets you extract the alpha channel from its primary input and has no control parameters. This tool always outputs an alpha-only image, implying that if the input is an RGB-only image, the output will be a constant 1.0 alpha image.
Note: The Extract tool will extract a selected channel into an alpha-only image. The Extract Alpha tool is just a more convenient and readable tool to use when the selected channel is always the input alpha channel.
The Fade tool provides a convenient way to modify the transparency of an image. The usual case will be to fade an image without having to do it at the same time as compositing. This tool fades an image by reducing the value of its alpha channel, making it transparent.
The Opacity parameter controls the fading effect; at 100% (the default value) the image is unchanged; smaller values fade more; at 0% the image is completely transparent.
This tool in an image modifier; it restricts processing to the masked region and propagates it to the output. The Fade tool can be muted, as well as animated and masked; it affects the alpha channel only.

 "Show full-size image")
Note: If the input image has no alpha channel, one will be added. This is consistent with Toxik's general behavior with respect to missing channels. A missing alpha channel is interpreted as a virtual solid opaque alpha channel.
The Invert Alpha tool inverts the alpha channel of its primary input and has no control parameters. The Invert tool is already capable of inverting the alpha channel of its primary input. However, Invert Alpha can achieve this without the need to select the proper affect target and makes the schematic easier to understand.
The Median Alpha tool is almost identical to the Median Tool (see Median Tool) and is excellent for removing impulse noise, but is designed to operate on the alpha channel of the input image.
It has all the parameters of the Median tool except for the Criteria parameter, which is not needed because this tool always computes the median value by ranking the alpha value of each pixel.
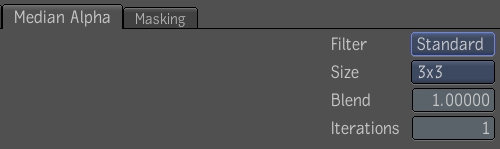
 "Show full-size image")
Note: This tool affects only the alpha channel.
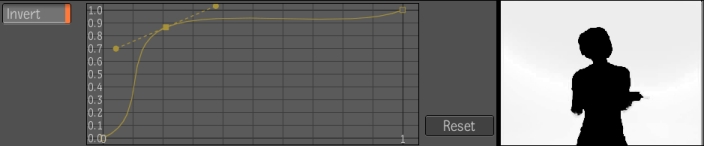
The Remap Alpha tool lets you remap the alpha using a single curve manipulation interface similar to Blend Curves. The curve defaults to the identity mapping.
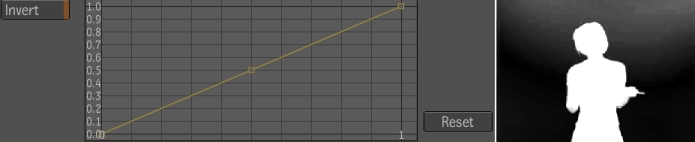
 "Show full-size image")
| Original matte |

 "Show full-size image")
| Alpha remapped |
 "Show full-size image")
| Alpha inverted |
An invert button provides inversion of the alpha after the curve mapping. This tool affects alpha only; the RGB channels, if present, are passed through unchanged. The pixel format of the output is the same as the pixel format of the image input. If the image has no alpha, then the output will have an alpha channel, properly modified by the curve remapping.
For more detailed curve manipulation, control points can be added to, or deleted from the curve.
With the cursor in the curve window, press + (plus sign) to enter a mode where each click on the curve creates a control vertex at that location.
With the cursor in the curve window, press - to enter a mode where each click on a control vertex deletes the control vertex at that location.
Press Esc.
Note: This tool can be masked.
The Remap Alpha tool has the following parameters:
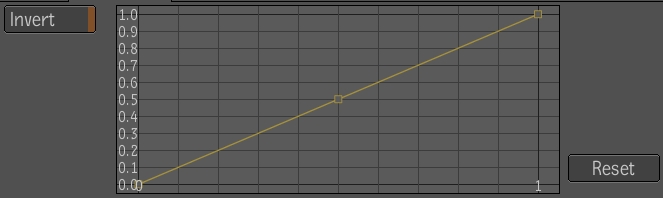
 "Show full-size image")
| Use: | To: |
| Invert | Invert the alpha after the curve mapping. |
| Curve | Gesturally manipulate the alpha remapping. |
| Reset | Reset the remapping curve. |
