Chapter 20, Color Correction
| Transforming Color Space with the Log and Delog Tools | CC Histogram | ||
Chapter 20, Color Correction |
|||
 Determining the Sequence of Corrections
Color Correcting Shadows, Midtones, and Highlights
Color Balancing with Hue and Gain
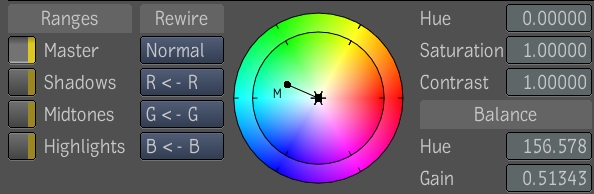
The CC Basics UI contains the controls used to perform color correction. CC Basics lets you:
Color correct shadows, midtones, and highlights separately or together
Rewire the red, green, or blue channels of an image
Set the hue, saturation, or contrast of an image
Set the color balance
Set the red, green, blue, or RGB channels by modifying the gamma, gain, and offset values for the channel
Match colors
Perform color suppression
Note: Many of the CC Basics fields are animatable attributes--see Setting Keys Manually and Validating and Applying the Expression String.

After you have analyzed the image, it is important to determine what sequence to use to make the color corrections. Some corrections may interfere with previous adjustments that you have made, or change results that were satisfactory. In general, you should not set saturation before applying modifications to the hue, as hue shift affects the saturation value.
For predictable results, perform color corrections in the following sequence:
Correct the hue color balance
Correct the light and dark areas of the image using gamma, gain, offset, and contrast
Correct the saturation
When you modify saturation, gamma, gain, offset, and contrast, you can color correct the shadows, midtones, and highlights ranges in the image individually or all together.
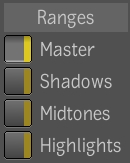
Under Ranges, select a luma range to modify.
| Click: | To Modify: |
| Master | The entire image. Modifications made in the Master range are applied after individual range modifications. |
| Shadows | Dark areas in the image. |
| Midtones | Midlevel areas in the image. |
| Highlights | Light areas in the image. |
 "Show full-size image")
Rewiring color channels redirects the information contained in one channel to another, and in some cases, makes adjustments to that information.
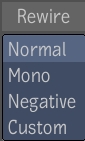
The following modes are available from the Rewire list.
 "Show full-size image")
| Select: | To: |
| Normal | Return the footage to its original values. |
| Mono | Create a monochrome (black and white or grayscale) version of the image. |
| Negative | Create a negative version of the image. |
| Custom | Redirect information from one color channel to another. |
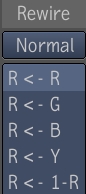
The following rewiring options are available.
 "Show full-size image")
| Select: | To: |

|
Use color values for the red channel. |
|
Replace color values of the red channel with those of the green channel. |
|
Replace color values of the red channel with those of the blue channel. |
|
Replace color values of the red channel with the luma of all channels. |
|
Replace color values of the red channel with its inverse. For example, 1 corresponds to the maximum value of the given color channel. In 8 bits, this value is 255. |
Note: The green and blue channels are rewired in the same way as the red channel (described in the previous table).
Select a rewire mode from the Rewire list.
Select a rewiring option.
You can redirect the information from one channel into any of the other channels. You can also direct a pixel's luma value into a component, or make a negative of a channel's information.
The color wheel acts as a reference and monitoring guide or template. You can see how the colors that are 180 degrees apart are complements, and how the RGB and CMYK points are distributed around the wheel.
Because RGB is an additive color model, magenta, cyan, and yellow are expressed as combinations of two other colors.
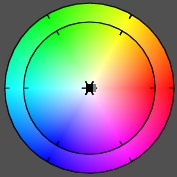
 "Show full-size image")
The default display of the color wheel is the following:
Red is at 3 o'clock.
Blue is at 7 o'clock.
Green is at 11 o'clock.
Magenta (red plus blue) is at 5 o'clock.
Cyan (green plus blue) is at 9 o'clock.
Yellow (green plus red) is at 1 o'clock.
Shifting the hue changes the colors in the image.
You can use hue shift to compensate for material that is too hot or too cool, or simply to correct undesired tones present in the images. Note that in a monochrome or very low saturation image, a hue shift produces no results, since there is no hue to begin with.
Since you are working with a circle, a hue shift value of 360 returns to the original color or image. A hue shift of 180 is equivalent to a negative, as the colors are at their complements. The default for the Hue parameter is 0.
Select the range that you want to modify, then do one of the following:
Set the Hue Shift field by either dragging inside the field or typing in a value.
Place your mouse on the outer ring of the color wheel and drag in a circular motion.
Saturation indicates how concentrated the color is: a saturated color has very little gray, while a desaturated one is dampened with more gray. For example, a pastel blue has a very low saturation level, while a blue screen is heavily saturated. A scarlet red has a high saturation, while a pale pink has a low one.
Set the Saturation field by either dragging inside the field or typing in a value.
Contrast indicates the difference between the light and dark colors in an image. A high-contrast image is mostly black and white, with very little gray. A low-contrast image is very flat, foggy, and composed mostly of midtones.
Set the Contrast field by either dragging inside the field or typing in a value.
The two parameters used with color balancing are hue and gain. The value of hue determines the color to add and the value of gain specifies the amount of color to use.
Do one of the following:
Set the Hue and Gain fields by either dragging inside the field or typing in a value.
Drag the center of the wheel. Repeat to set a different range (shadows, midtones, or highlights) of colors.
 "Show full-size image")
Pure red is the 0-degree point for hue on the color wheel. When you increase the hue value, you move counterclockwise on the color wheel. When you decrease the hue, you move clockwise on the color wheel.
The center of the color wheel represents 0 gain. As you increase the value of gain, you move towards the edge of the color wheel and add more of the selected color to the image.
Note: If saturation is set to 0, no color balancing is performed, regardless of the gain value.
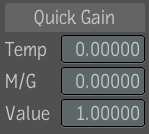
The Quick Gain controls are used to set the Gain in three specific ways:
 "Show full-size image")
Note: The main Gain value is applied after the other Gain fields, so changes to main Gain do not change the separate channel Gain fields or the Quick Gain fields.
| Modify: | To: |
| Temp | Set gain using a scale from warm (-100) to cool (100), which results in orange to cyan. It affects the Red and Blue Gain fields. |
| M/G | Set gain using a scale from green (-100) to magenta (100). It affects the Red, Green, and Blue Gain fields. |
| Value | Set gain using a scale from dark (0) to bright (200). It affects the Red, Green, and Blue Gain fields. |
Drag the field to set the gain. You may also type values into the field and press Enter.
Note: You can reset all fields simultaneously by clicking Reset in the Tool Options area located on the right side of the UI.
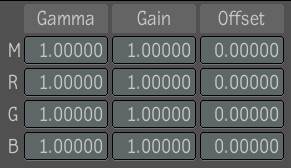
You can set the gray values of an image by setting the gamma to brighten or darken an image without greatly affecting the shadows or highlights.
Select the tonal range that you want to modify.
Drag the Gamma field to change the value (you can also type values into the field). Lower the gamma value to increase the contrast or raise the gamma value to decrease the contrast.
 "Show full-size image")
You can boost the colors in an image by increasing the gain and offset values. Gain and Offset controls multiply the pixel color values by the gain and then adds the offset value. The resulting color values are clipped at the maximum color value of 255 in 8-bit mode, or 1 in floating point mode.
You can also reduce the colors in the image by decreasing the gain and offset values. The resulting color values are clipped at the minimum value of 0.
Gain is expressed as a percentage value. The default value of 100% has no effect on the image since the color values are multiplied by 1.
Note: You can set the gain for individual ranges, or across all ranges simultaneously (by using the Gain fields in the global controls).
Select the range that you want to modify.
Drag the Gain field for the color channel that you want to modify (you may also type values into the field).
Drag the Offset field for the color channel that you want to modify (you may also type values into the field).
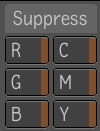
Unwanted color can be caused by factors such as inconsistent lighting conditions during a shoot. This can result in images that contain unnatural looking colors or one predominant color, which gives the image an unwanted color cast. You can dampen the channel information for one or more channels. It is available for all channels.
Under Suppress, disable the color or channel by selecting it.
Note: Suppressing blue may result in a subtle overall pale yellow cast, since yellow is the spectral complement of blue. The effect of suppressing any color will unsuppress its complement.
 "Show full-size image")
There are four options available for transferring the color value settings from one image to another. One color match option will almost certainly work better than all others for each particular shot, but it may take trial and error to determine which option works best.
Not all color match options use all sample values. Match All and Match SMH (Shadows, Midtones, Highlights) use all of the four pairs, but Match Gain and Match Offset only match the Master pair of colors. In this second case, the gamma, gain, and offset of the Master range is changed to perform the match.
Under Color Match, click a tonal range.
Ctrl + click in the Source field and use the eyedropper to sample a pixel in the Player for that tonal range.
The sampled color is displayed in the Source field and stored as the source value for the selected tonal range.
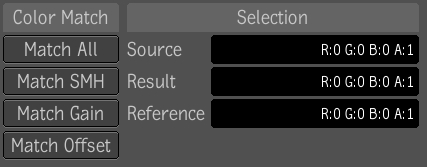
 "Show full-size image")
Ctrl + click in the Reference field to invoke the eyedropper and sample a pixel in the player for that tonal range.
The sampled color is displayed in the Reference field and stored as the value for the selected tonal range.
To match other tonal ranges, repeat the preceding steps.
You may want to match the Master, or you may want to match just the Shadows, Midtones, the Highlights, or any combination thereof.
Select one of the following Color Match options.
| Select: | To: |
| Match All | Match RGB values; match gamma, gain, and offset; and match shadows, midtones, and highlights from source to reference. |
| Match SMH | Match shadows, midtones, and highlights from source to reference. |
| Match Gain | Apply gain to the source to match it to the reference of the master color sample pair. |
| Match Offset | Apply Offset to the source to match it to the reference of the Master sample pair. |
The Result field updates to reflect the changes made to match the color.