Chapter 21, Animation
| Marking Attributes for Keyframing | Setting Keyframes Automatically | ||
Chapter 21, Animation |
|||
 Example: Animating Using the Tool UI
Example: Animating Using the Composition Browser
You can set keyframes for any animatable parameter at any time, and in any order. When you add a keyframe, the interpolation between the previous and the next keyframe is computed automatically. Setting a keyframe over another keyframe replaces the old keyframe.You can set keyframes the following ways:
The Keyframe button in the Player controls.
The Add Keyframe button in the Tool Options.
The Set Keyframe button in the Animation Tab.
The Set Keyframe button in the Animation Type column of Composition Browser.
The Set Keyframe option list when you right-click on an attribute's value field.
The Set Keyframe hotkey (K).
Note: When you use the K hotkey in the Curve/Track Editors, keyframes are added as follows:
If none of the inputs of the selected node are selected, a keyframe is added at the current viewer's time for every input in the selected node (as if you selected every input in the tool).
If at least one input is selected, keyframes are set on the selected inputs only.
Every time a keyframe is set, there is no check for previous animation on inputs. This means that pressing the K hotkey will set keyframes on inputs even if the inputs were not already animated.
The Set Keyframe for marked attributes hotkey combination (Shift + K).
Note: The Shift + K hotkey has the same behavior as the Set Keyframe buttons mentioned above. It will set keyframes for all the marked attributes of the currently selected tool. The K hotkey, on the other hand, can only be used in a Curve/Track Editor context.

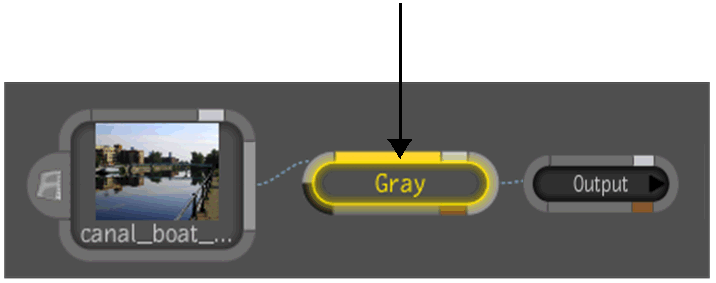
In this example, you'll be creating a simple animation that would change the amount of gray in an image over the span of 96 frames. You'll be manually setting keyframes using the tool UI.
Note: It is assumed that the composition is loaded and that the Gray tool has been added to the dependency graph.
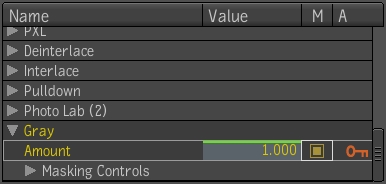
Open the Gray tool and select the Amount attribute label, marking it for keyframing. A yellow rectangle appears on the tool node indicating that it has been marked for keyframing.
 "Show full-size image")
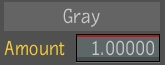
At the first frame leave the value at 1.00000.
Select the Set Keyframe button in the Tool Options or the Player controls.
A red line appears at the top of the attribute label, indicating the start point of the animation.
 "Show full-size image")
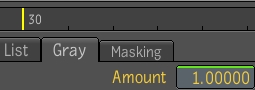
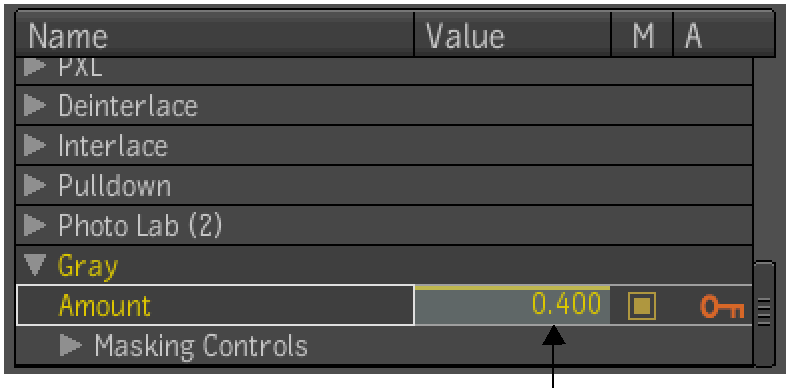
Move the time cursor in the Player navigation bar to frame 30.
The red line changes to green to indicate that animation occurs between frames 0 and 30.
 "Show full-size image")
Change the value in the Amount field to .50000.
Select the Set Keyframe button.
The green line changes back to red. Again, this indicates that a new keyframe has been added to the timeline.
Repeat steps 3 to 6 as required.
Select the Gray attribute in the Composition browser.
Select Frame or Frame All to view the curves in a Curve Editor (or press Home).
Note: You can also set keyframes in the tool UI by right-clicking an attribute field and choosing any of the options to mark attributes and set keyframes.
You can also use the Composition Browser to manually set keyframes. The following procedure uses the same example of adjusting the amount of gray in an image.
Note: It is assumed that the film footage is loaded and that the Gray tool has been added to the dependency graph.
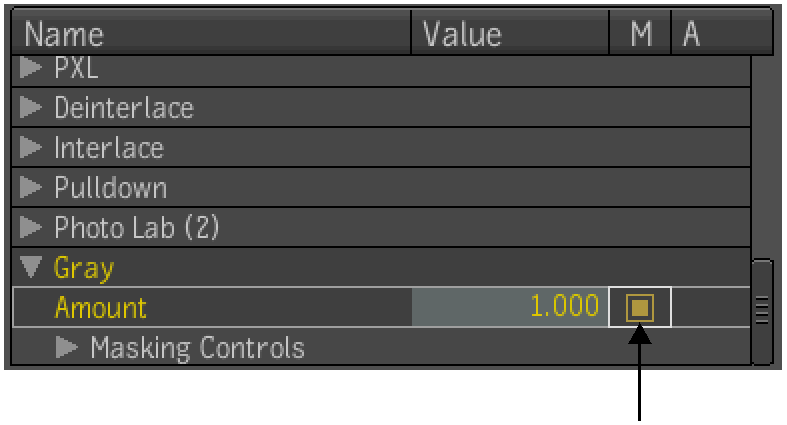
Expand the Gray tool in the Composition Browser.
Mark the Amount attribute for keyframing by selecting its radio button in the M column.
 "Show full-size image")
At the first frame, leave the initial value as is.
Select the Set Keyframe button to set a keyframe on the Amount attribute.
An orange key icon appears in the animation A column next to the attribute, indicating a keyframe has been added for this attribute at that frame.
 "Show full-size image")
Move the time cursor in the Player navigation bar to frame 30.
Note: When you move the time cursor to the next frame, you will notice that the orange key icon changes to white, indicating that animation occurs between the first keyframe you set and the next one.
Click in the value editor in the Composition Browser and either type the new amount of gray, then press Enter, or drag inside the value editor.
 "Show full-size image")
Repeat steps 4 to 6 as required.
Select Frame or Frame All to see the curves in the Curve Editor.