Show in Contents

Add to Favorites

Home: Smoke

Adding Grain to a Clip

Adding Grain to a Clip

Adding Monochrome Grain

Adding Grain Using a Preset
Grain Signature
The
easiest way to add grain to a clip is to select a preset grain signature,
add and fine-tune the grain, and then adjust the radius until you
get the result you are looking for.
To add grain using a preset grain signature:
- Enable View to see the View menu.
Disable View to return
to the ReGrain menu.
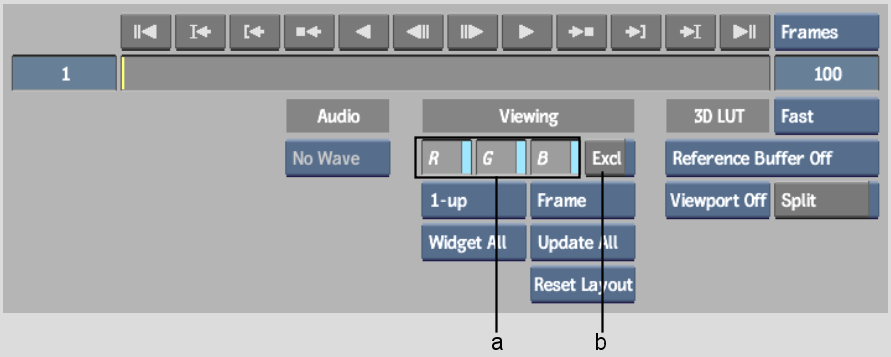
- In the View menu, use the R, G, and B
buttons to control the display of the corresponding channels in
the image window. You can also use the corresponding hot keys (Shift+R, Shift+G,
or Shift+B) in
the ReGrain menu. Enable Excl and then click R, G, or B to view
each channel exclusively as a greyscale representation. You can
also use the Shift+X hot
key combination in the ReGrain menu to enable Excl. Use Shift+Z to restore the RGB view.
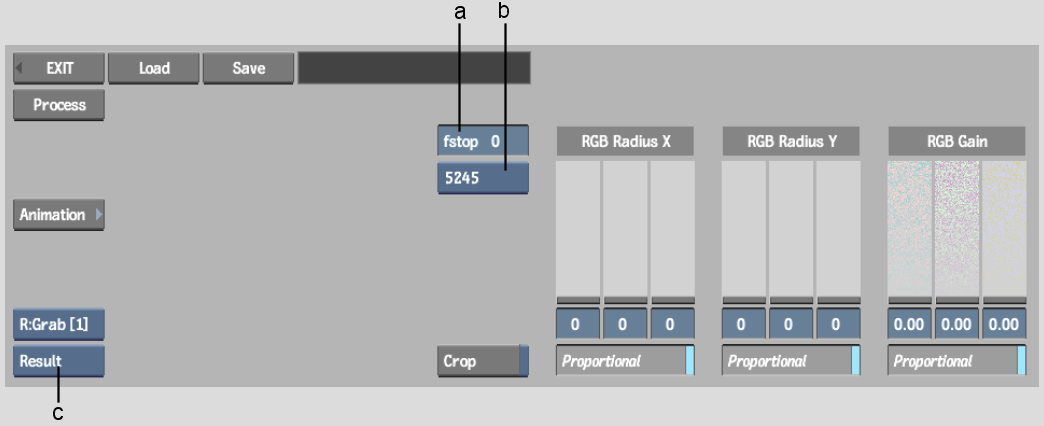
- In the ReGrain menu, from the Grain Signature
box, select the preset option corresponding to the grain signature
that you want to add.
Grain signature presets
are indicated by four-digit names that correspond to the film stock
from which their grain signature is derived. These signatures are
based on a colour noise filter.
- To add grain to the clip, adjust the
RGB Gain sliders:
- Enable Proportional and drag the RGB
Gain sliders to add grain proportionately to the Red, Green, and
Blue channels.
- Disable Proportional and adjust the R,
G, and B channels independently to fine-tune the grain.
- To compensate for under or overexposure,
set the relative exposure offset by entering a value in the fstop
field.
The range of permissible
fstop values is from -3 to 3. Set a positive value to compensate
for overexposure or a negative value to compensate for underexposure.
Values entered must be integers.
- To adjust the radius of the grain along
the X-axis, drag the RGB Radius X sliders:
- Enable Proportional and drag the RGB
Radius X sliders to add grain proportionately to the R, G, and B
channels.
- Disable Proportional and adjust the R,
G, and B channels independently to fine-tune the grain radius.
- To adjust the radius of the grain along
the Y-axis, drag the RGB Radius Y sliders:
- Enable Proportional and drag the RGB
Radius Y sliders to add grain proportionately to the R, G, and B
channels.
- Disable Proportional and adjust the R,
G, and B channels independently to fine-tune the grain radius.
- When you are satisfied with the result,
click Process to add grain to the clip.