Show in Contents

Add to Favorites

Home: Flame

About Nodes

Accessing the Modular Keyer

Adding Clips to the Pipeline

Working with Nodes
This section describes
how to perform basic operations to set up your pipeline, such as
adding nodes to the pipeline and moving them.
For information on individual
nodes and where on the pipeline they can be used, see
Using Nodes and
Nodes Placement Table.
Selecting Nodes on the
Pipeline
You can select individual nodes, branches,
all nodes in the pipeline, or all nodes in the schematic. You can also
use the Ctrl key to
select a combination of nodes.
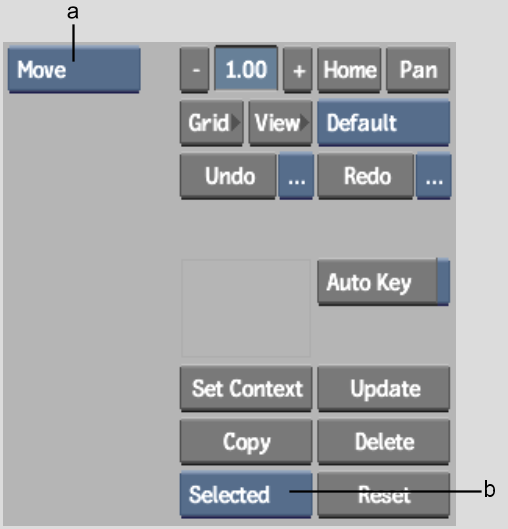
To select nodes in the schematic:
- Select Move from the Edit Mode box.
- Select the node(s) as follows.
| To select: |
Do this: |
| One node |
Select Selected from the Selection box and click the
node.
|
| A branch |
Select Branch from the Selection box and click anywhere
on the branch.
|
| All nodes on pipeline |
Select Graph from the Selection box and click anywhere
on the pipeline.
|
| All nodes in schematic |
Select All from the Selection box and click any node. |
| A combination of nodes |
Press Ctrl and drag
a rectangle around the nodes. The current option in the Selection
box does not affect this type of selection.
|
Selected nodes have a
white border.
NoteA yellow border indicates
both that a node is selected and that its menu is the active menu.
Adding Nodes to the Pipeline
You
can add nodes to the pipeline to use while building your key. For
example, you can place several garbage mask nodes on the pipeline.
Most nodes can be placed
anywhere on the pipeline. There are a few exceptions when it comes
to the pipes of blend nodes. Certain nodes do not function on some
pipes because of the way the pipes operate. See
Blend Nodes.
The method for adding
nodes to blend node pipes differs from the method for adding them
to branches:
- When you add a node to the CBlend and
MBlend pipes, you can simply drag and drop them onto the pipe and
they are “attached”.
- When you add a node to branches of the
pipeline (for example, to the Back branch), you need to cut the
branch at the appropriate location, connect it to the new node,
and reconnect the branch to the rest of the pipeline.
To add a node to the CBlend and MBlend
pipes:
- Scroll the node bar to display the node
type you want by clicking on any node type and dragging to the left
or right.
- Do one of the following:
- Drag a node type to the schematic and
release it in the approximate location you want it to appear.
- Double-click a node type. The new node
appears to the right of the most recently selected node, or group
of nodes, in the pipeline. If no node was previously selected, the
new node appears in the center of the schematic.
- To use the node, it must be connected
to the pipeline. Drag the node over one of the blend pipes and release
the cursor.
| To place the node: |
Do this: |
| Between two nodes. |
Position it between the two nodes such that it is touching both
nodes.
|
| At the beginning of a pipe |
Overlap it with the first node and move it back a bit. |
| At the end of a pipe |
Overlap it with the last node, move it ahead a bit, and
release the cursor.
|
The node is added to
the pipeline.
NoteIf the node is not
added to the pipeline when you release the cursor, it is possible
that the node cannot be added at that location. For example, you
cannot add a Colour Curves node to the lower CBlend pipe. To learn
more about the types of nodes you can add to the CBlend and MBlend pipes,
see
Blend Nodes,
and
Nodes Placement Table.
To add a node to branches:
- Scroll the node bar to display the node
you want by clicking on any node and dragging to the left or right.
- Click the node and drag the cursor to
the schematic.
The cursor changes to
an arrow-headed cross.
- Release the cursor.
The node appears in the
schematic.
- Drag the node closer to the location
on the branch where you want to add it.
- Select Parent from the Edit Mode box.
- Drag the cursor across the branch where
you want to add the node.
The portion of the branch
between the previous and next items disappears.
- Drag the cursor from the front of the
previous clip or node (or its Result tab) to the back of the new
node.
If the node has source
tabs, attach the branch to the front, back, or matte tab, depending
on the type of node. See
Using Nodes.
NoteYou can also use
the output (result image) of any node on the pipeline as an input
source for the new node. This includes the output of nodes along
the pipes of blend nodes.
The branch is connected
to the new node.
- Drag the cursor from the result tab of
the new node to the back of the next node (or to the appropriate
source tab—see note, above).
Moving Nodes
You
can move a node from one part of the pipeline to another. For example,
you can move a garbage mask to the beginning of a branch on the
pipeline.
To move a node:
- Select Move from the Edit Mode box.
- Detach the node from the pipeline:
- If it is on a blend node pipe, Ctrl+Alt-click the node. It is detached
from the pipe, and is selected (shown by its yellow border).
- If it is on a branch, select Parent from
the Edit Mode box and drag the cursor across the branches that connect
it to the pipeline. Reconnect the branch without the node, then
return to Move mode.
- Drag the node over the pipeline where
you want to add it and release the cursor. See
Adding Nodes to the Pipeline.
Copying Nodes
You can copy one or more nodes and place the
copies elsewhere on the schematic. All the settings of a copied
node are included in the copy.
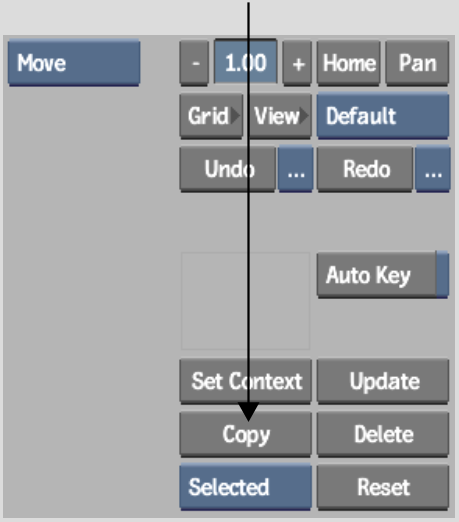
To copy one or more nodes:
- Select the nodes. See
Selecting Nodes on the Pipeline.
- Click Copy.
Copies of the nodes appear
on the schematic. The copies are selected (shown by the yellow border).
- Drag the copies over the pipeline where
you want to add them and release the cursor. See
Adding Nodes to the Pipeline.
Deleting Nodes
When
you delete a node from the pipeline, all the associated information,
including any unsaved work, is also deleted. There are several methods
you can use to delete nodes:
- Select the nodes and then delete them.
- Switch to Delete mode and then click
the nodes you want to delete.
- Drag the nodes off the Desktop.
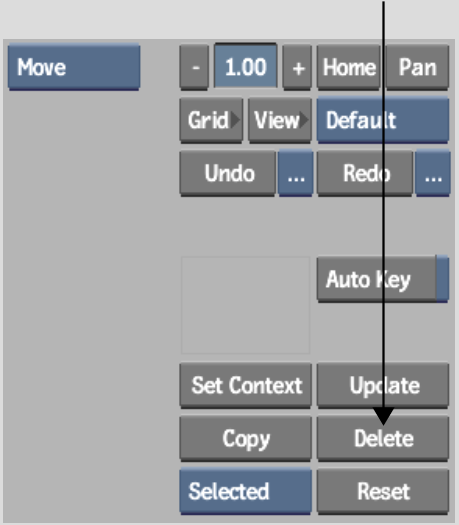
To select and delete one or more nodes:
- Select the nodes. See
Selecting Nodes on the Pipeline.
- Click Delete.
- Click Confirm to delete the nodes, or
click elsewhere to cancel.
To use Delete mode:
- Select Delete from the Edit Mode box.
- Click the node you want to delete.
- Click Confirm to delete the node, or
click elsewhere to cancel.
TipTo override Confirm,
press Alt as you click
the node.
- Repeat steps 2-3 for any other nodes
you want to delete.
- Return to Move mode.
To delete by dragging:
- From the Edit Mode box, select Move.
- From the Selection box, select Current,
Branch, Graph, or All.
- In the schematic, click a node and drag
either to the top or the bottom of the Desktop.
The cursor changes to
a green recycling icon.
- Click Confirm to delete the nodes, or
click elsewhere to cancel.
Updating Nodes
All
the nodes in the pipeline are not updated or processed when a change
is made to the pipeline. This is to save time if processing is not
needed. For example, when you make a change in one node, that node
and all previous nodes in the branch are updated immediately, but
not the subsequent nodes.
In the pipeline, the
status of a node is indicated differently depending on the type
of node.
| Node Type |
Unprocessed |
Processed |
| Single Input |
The arrowhead at the right side of the node is red. |
The arrowhead at the right side of the node is green. |
| Multiple Input |
The label under the node is black. |
The label under the node is white. |
| Blend |
The arrowhead is red and the label is black. |
The arrowhead is green and the label is white. |
You can opt to have nodes
updated on an “as needed” basis, or update them
manually:
- With automatic update, when you click
a node, that node and all nodes before it on the pipeline are updated
since the previous nodes are required to produce the correct result
for the node. For example, if you click the Result node, all nodes
in the pipeline are updated.
- With manual update, you selectively update nodes.
To set the update mode:
- Display the Setup menu.
- Use the Auto Update button to set the
update mode.
| For: |
Do this: |
| Automatic update |
Enable the Auto Update button. |
| Manual update |
Disable the Auto Update button. |
NoteAuto Update only
affects the schematic (it does not affect processing while you are
working within nodes).
To update a node automatically:
- Select Move from the Edit Mode box.
- Click the node.
NoteIf the node does
not get updated, make sure that all multiple input nodes in branches
leading to the node have the required source inputs.
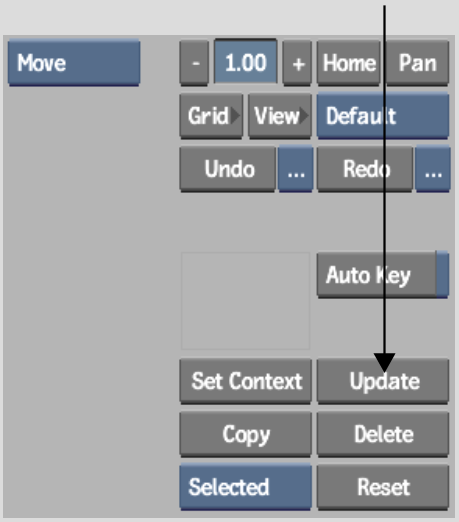
To update a node manually:
- Select the node. See
Selecting Nodes on the Pipeline.
- Click Update.
The selected node and
all previous nodes are updated.
NoteIf the node does
not get updated, make sure that all multiple input nodes in branches
leading to the node have the required source inputs.
Renaming Nodes and Clips
Nodes
are given a default name composed of the node name and a number
appended to it, for example, gmask1, gmask2. When you select a node
or clip, its name is displayed in the Name field.
Names are also displayed
in the schematic, below the clip or node (with the exception of
the nodes on blend pipes). Rename nodes and clips to help keep track
of them as the pipeline grows.
NoteYou cannot rename
clips that are brought into the schematic using the Add Clip button.
To rename a node or clip:
- Select the node or clip.
- Click the Name field.
The on-screen keyboard
appears.
- Click Esc to delete the previous name
and type a new name.
- Click Enter to save the new name or click
EXIT Keyboard to cancel.