


Creating Real-Time Deliverables from
the Timeline or Rendered Material
You can record 10-bit, multi-format video deliverables to tape from existing source or rendered footage without having to perform additional render passes. These deliverables are processed in real time and are subject to high-quality resizing.
Real-time deliverables can include specific primary grading (excluding curves), most reposition types, and hardware LUTs. Animation on primary grading, and on panning and scanning is also available and is performed in real time during output to tape. Modifications for real-time deliverables are displayed in Deliverable (D) view and do not affect the master version's Output view or rendered version's Print view. When playing out, you can use either source or rendered material.
For example, you could use 2K rendered footage to create an HD tape and a DVD version without having to render again. Alternately, you could use source material and apply primary grading and repositioning that only affects the real-time deliverable, and does not require a render pass prior to playing out.
Creating Setups for Real-Time Deliverables
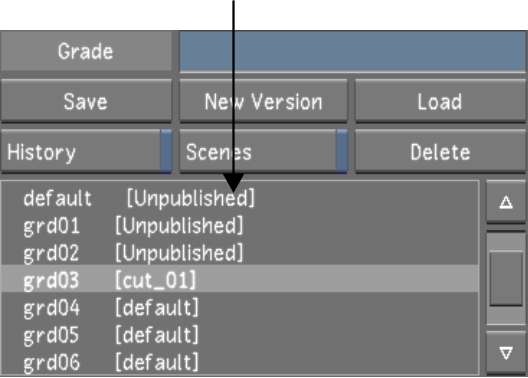
After you switch to Real-Time Deliverables mode, the work you perform on your shot is no longer saved to the grade. Instead, it is saved to a real-time deliverables setup file. This file contains grading and reposition information that is separate from the grade file. The setup file is an XML-based grade file, which allows you to use it with other systems.
Although real-time deliverables setups are linked to the grade file, you can apply a setup to a grade linked with a different cut.
After the setup has been created and loaded to a grade, you can switch back to the Playout menu and play out to tape in either Insert or Assemble mode.
To create a real-time deliverables setup:


The button automatically switches you to Real-Time Deliverables view mode, and enables GPU processing. See GPU Acceleration.
The setup is saved to the scene's sacc_data folder as an XML file. The file uses the real-time deliverables setup name, preceded by the name of the grade on which it is based. For example, if the grade name is grd01, and the setup name is My_HD, the XML grade file is [grd01]My_HD.deliv.xml.
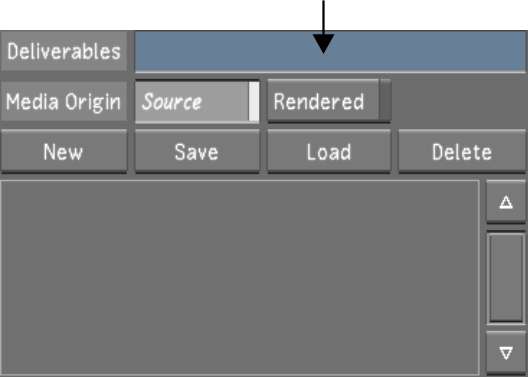
Once a setup exists, it can either be loaded to the grade for which it was created, or loaded to a different grade.
To load a setup to the grade for which it was created:
To load a setup to a different grade:
Resizing Shots Prior to Playing Out
Before you play out real-time deliverables, resize your shots to ensure that they properly conform to the destination output format. See Resizing Shots.
Playing Out Real-Time Deliverables to Tape
After a setup has been created and loaded to the desired grade, and resizing has been performed, you are ready to play out to tape.
To play out real-time deliverables to tape:
Sharing Modifications Between Setups and Grades
By default, unrendered changes to a grade file are not applied to real-time deliverables setups, and modifications made to a setup are not copied back to the grade. However, you can force changes to be copied back and forth either on a shot-by-shot basis or for the entire scene.
To share modifications between setups and grades:
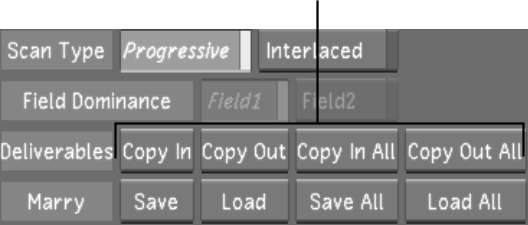
| Click: | To transfer: |
|---|---|
| Copy In | Modifications made to the current shot from the grade to the setup. |
| Copy In All | Modifications made to the scene from the grade to the setup. |
| Copy Out | Modifications made to the current shot from the setup to the grade. |
| Copy Out All | Modifications made to the scene from the setup to the grade. |