Resizing Shots


Resize shots prior to rendering them to conform to a different destination output format. For example, if you plan on playing out a cut to a video format, use the controls in the Resize menu to select the appropriate video format and then render the cut at that format to use as the version you play out to a VTR. After you have selected the output format, you can set crop and resize options to control how the image fits into the new format.

NoteSupport for resizing depends on the version of the graphics card installed on your system. See your release notes for details.

Resize data is saved with the grade in a Resize preset file that uses the grade name.

When you resize shots using the Resize menu, all shots in the timeline are resized. To resize individual shots, use the tools in the Reposition menu. See Repositioning an Image.

NoteThe Lustre HD Station does not support bit depths greater than 10-bit, input resolutions greater than 2K, or output resolutions greater than 1920x1080.

To resize shots:

  1. Load the grade linked to the cut containing the shots you want to resize. See Loading a Cut.
  2. Click Render and then click Resize.

    The Resize menu appears.

    Show small imageShow large image

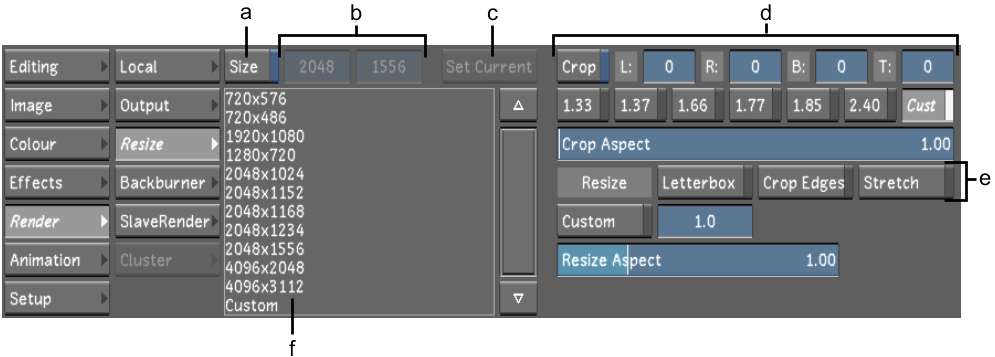
    (a) Size button  (b) Custom Width and Height fields  (c) Set Current button  (d) Crop options  (e) Resize options(f) Video and film format list  

  3. To resize to a new format, such as a video format, enable Size, and then select a format from the list. If you select Custom, you can enter a width and height in the Width and Height fields, or click Set Current to set the format to the current frame size.

    If the selected format is larger than the original image size, by default a black border appears around the image, showing the final output size. If the selected format is smaller than the original image size, the image is cropped, showing the final output size.

    NoteYou can check the resolution of the original scans in the Shot bin, accessible from the Editing Browse menu. Source resolution is important for quality resizing. For example, you obtain a better quality HD output with 2K full scan sources than with 1K half scan sources.
  4. Select a Resize option to specify how the image will fit into the specified format.

    Select: To:
    Letterbox Fit the entire image into the specified output format. Vertical or horizontal black borders accommodate any difference in the aspect ratio of the original image and final output format.
    Crop Edges Fill the new format size with the image, cropping the edges of the original image as needed to accommodate differences in the aspect ratio of the original image and final output format.
    Stretch Stretch the original image to fit the specified output format. If the aspect ratio of the original image and final output format is different, the image is distorted.
  5. Set the crop size. Enable Crop and then do one of the following:
    • Enter custom crop values in the Left, Right, Bottom, and Top fields.
    • Enable one of the standard Crop Preset buttons.
    • Enable Cust and then use the Crop Aspect slider to set the aspect ratio of the crop.

    Show small imageShow large image

    (a) Crop button  (b) Left, Right, Bottom, and Top fields  (c) Cust (Custom) button  (d) Crop Aspect slider  (e) Crop Preset buttons  

    NoteCropping in Lustre affects both output resolution and how the source file is read. For example, if you crop a 2K (2048x1556) scan to 1:85, the render size becomes 2048x1107. Lustre also reads the scan more quickly since there are fewer lines of pixels to go through.
  6. To proportionally scale the image, enable Cust and then enter a scaling value in the Cust field.
  7. If needed, you can squeeze or stretch the image horizontally using the Resize Aspect slider.

    The Resize Aspect value you set is displayed in the field to the right of the slider.