Use the Engineering settings to configure:


(a) Graphic SDI Raster list (b) Graphic SDI Display option box (c) Video Device SDI Raster list (d) Graphic SDI Format option box (e) Graphic SDI Link Type option box (f) Video Device SDI Format option box (g) Video Device SDI Link Type option box (h) Audio File Type option box (i) Audio Sampling Rate/Bit Depth option box (j) Bit Depth option box (k) Audio Monitoring option box
Graphic SDI Display option boxAllows you to select how you would like to display your video on the Graphic SDI output. Cycle through the list to select one of the options.
| Select: | To: |
|---|---|
| Fit | Enlarge the image as much as possible while preserving the aspect ratio at the SDI out (graphics card). |
| Fit W | Fit the image to the width of the monitor at the SDI out. |
| Fit H | Fit the image to the height of the monitor at the SDI out. |
| Stretch | Fit the image to the dimensions of the monitor by adjusting the aspect ratio at the SDI out (graphics card). |
| Center | Center the image without zooming at the SDI out (graphics card). |
Graphic SDI Raster listSelect one of the graphics rasters to set the default format for the graphic card's SDI output.
Graphic SDI Format option boxToggle to display, in the Rasters list, rasters using the selected resolution format.
Graphic SDI Link Type option boxToggle to display, in the Rasters list, rasters using the selected link.
Graphic SDI Pulldown buttonEnable to configure Lustre to add a pulldown frame when outputting through the Graphic SDI. See About 3:2 Pulldown.
Graphic SDI Full Range buttonEnable to configure Lustre to use the full range of YUV and RGB when outputting to the Video device SDI. When this button is disabled, Lustre uses the Normal mapping matrix for the configured video raster.
Video Device SDI Raster listSelect one of the video rasters to set the default video resolution for the video device's SDI.
Video Device SDI Format option boxToggle to display, in the Rasters list, rasters using the selected footage format.
Video Device SDI Link Type option boxToggle to display, in the Rasters list, rasters using the selected link.
Video Device SDI Pulldown buttonEnable to configure Lustre to add a pulldown frame when outputting through the video device SDI. See About 3:2 Pulldown.
Video Device SDI Full Range buttonEnable to configure Lustre to use the full range of YUV and RGB when outputting to the Video device SDI. When this button is disabled, Lustre uses the Normal mapping matrix for the configured video raster.
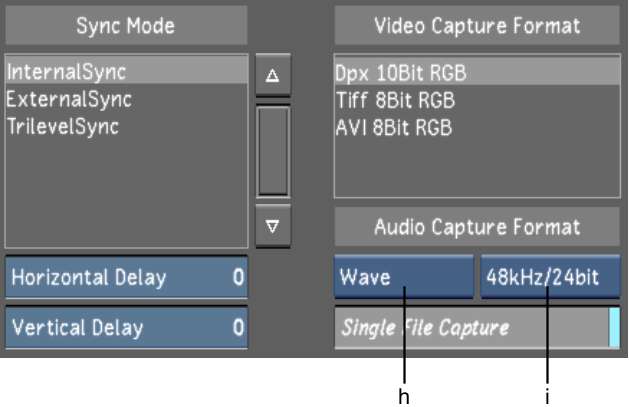
Sync Mode list Select one of the sync mode options from this list.
| Select: | To: |
|---|---|
| InternalSync | Set the sync mode to a free running internal sync (SD and HD). |
| ExternalSync | Genlock to analog sync connected to the sync input (SD only). |
| TrilevelSync | Genlock to trilevel sync connected to the sync input (HD only). |
Horizontal Delay sliderUse to define the number of pixels by which the horizontal sync output is delayed in relation to the incoming sync. The step interval is half a pixel for SDTV devices and two pixels for HDTV devices. The maximum delay is one line length.
Vertical Delay sliderUse to define the number of pixels by which the vertical sync output is delayed in relation to the incoming sync. The step interval is +/- 1 field for SDTV devices and +/- 8 line pixels for HDTV devices. The maximum delay is one line length.
Video Capture Format listSelect a video capture format to define Lustre's video capture format to a specific file type, colour space, and bit depth.
| Select: | To configure Lustre to capture only: |
|---|---|
| Dpx 10Bit RGB | DPX files with an RGB colour space at a bit depth of 10 bits. |
| Tiff 8Bit RGB | TIFF files with an RGB colour space at a bit depth of 8 bits. |
| AVI 8Bit RGB | AVI files with an RGB colour space at a bit depth of 8 bits. |
Audio File Type option boxChoose whether to save audio captured from a VTR/ATR, or imported from Wiretap as a Wave (.WAV) or AIFF (.AIF) file.
Audio Sampling Rate/Bit Depth option boxSelect to capture the audio tracks at a sampling rate of 48 kilohertz (kHz) and a bit depth of 16-bit, or 48 kHz and a bit depth of 24-bit.
Single File Capture buttonWhen enabled, all the selected audio tracks are saved in a single file. When disabled, each audio track is saved as an individual file. This option is not available when you are importing audio from Wiretap.
Video Delay (Play) sliderDefine the default number of video frames to add before the start of the shot when capturing from the VTR.
Audio Delay (Play) sliderDefine the default number of audio frames to add before the start of the shot when capturing from the VTR.
Video Delay (Record) sliderDefine the default number of video frames to add before the start of the shot when recording to the VTR.
Audio Delay (Record) sliderDefine the default number of audio frames to add before the start of the shot when recording to the VTR.
Auto-Eject buttonEnable to set the project's default to automatically eject the tape during EDL capture.
Playout from Timeline buttonEnable to set the project's default to play out from the Output view. If this button is disabled, the playout to tape function plays out rendered material only.
VTR Preroll sliderDefine the time (in seconds) allowed for the VTR to run up to speed and stabilize to perform an edit.
VTR Postroll sliderDefine the time (in seconds) allowed for the VTR to roll after an edit.
VTR Emulator buttonEnable to set the project to emulate a VTR.
VTR Emulator Offset in Frames sliderDefine the default number of frames you wish to offset the Start Timecode from the timeline.
Offset in Seconds sliderDefine the default number of seconds you wish to offset the audio. See Offsetting the Audio File.
Offset in Frames sliderDefine the default number of frames you wish to offset the audio. See Offsetting the Audio File.
Audio Monitoring option boxToggle to select a monitoring option to make sure your playback settings correspond to your audio configuration. See Audio Monitoring Options.
| Select: | Audio Device: | When: |
|---|---|---|
| Stereo Downmix | DVS or AJA | There are only two audio tracks that are supported on the audio monitoring device. All the odd numbered tracks (e.g., 1, 3, 5, etc.) go through port 1 and all the even numbered tracks go through port 2. |
| 4-Track Downmix | DVS or AJA | There are only four audio tracks that are supported on the audio monitoring device. |
| 8 Tracks | DVS only | There are up to eight tracks and each track is supported on the audio monitoring device. |
| 8-Track Downmix | AJA only | There are only eight tracks that are supported on the audio monitoring device. |
| 16 Tracks | AJA only | There are up to 16 tracks and each track is supported on the audio monitoring device. |
Bit Depth option boxToggle to select the default bit depth of virtual colour clips in your project. Possible values are 8, 10 (default), and 16 bit.
RGB slidersDefine the default colour of virtual colour clips in this project.


