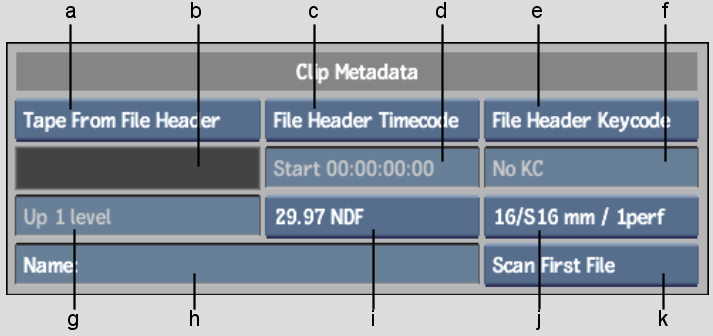
Use these options to select how clip metadata is handled on import.


(a) Tape Name box (b) Tape Name field (c) Timecode box (d) Timecode field (e) Keycode box (f) Keycode field (g) Level field (h) Clip Name field (i) Framerate box (j) Film Gauge box (k) Import Keycode Strategy box
Tape Name box Select an option to determine how the tape name is set for the imported clips.
| Select: | To: |
|---|---|
| Enter Tape | Activate the Tape Name field so that you can manually enter the tape name. When selecting multiple sequences for import, this tape name is used for all imported clips. |
| Tape From File Header | Read the tape name from the Input Device Name field (field 38) in the header of the file. The tape name detected for the currently selected sequence is displayed in the Tape Name field. If multiple sequences are selected in the Files list, the tape name corresponding to the uppermost selected sequence will be displayed. |
| Tape From Directory | Infer the tape name from the detected directory structure. A Level field appears below the Tape Name field. Use this to configure the relative file path to the directory from which the tape name can be inferred. |
Tape Name field Displays the tape name of the imported clip. If Tape Name is set to Enter Tape, then this field becomes active, allowing you to enter a tape name.
Timecode box Select an option to specify how the timecode information for the clip is set.
| Select: | To: |
|---|---|
| Enter Timecode | Manually enter a timecode in the Timecode field. |
| File Header Timecode | Set the source timecode of the imported clip based on the timecode information in the image file header. |
| File Name Timecode | Use a numerical filename (for instance, 100000.dpx) and translate it into timecode for the resulting clip (based on the selected frame code mode). This is useful when working with files from film scanners that do not have embedded timecode. Also, it is useful for reading the files generated by Lustre. |
Timecode field Displays the timecode of the imported clip. If the Timecode box is set to Enter Timecode, then this field becomes active, allowing you to enter a starting timecode value for the imported clip.
| Select: | To: |
|---|---|
| Enter Keycode | Manually enter a keycode in the Keycode field. |
| File Header Keycode | Load a clip based on the keycode information embedded in the image file header. |
| No Keycode | Not use keycode. |
Level field Select an option to set the relative file path to the directory from which the tape name can be inferred. Although it is available for all file types, the Level field is specifically designed to work with the directory structures that are output by film scanners. A typical file structure would look like: ./<tape>/<resolution>/clip.######.dpx. In this case, selecting Up 2 Levels in the Level field identifies the directory that corresponds to the tape name (./<tape>). The Level field is active when Tape Name is set to Tape From Directory.
Clip Name field Displays the name of the current clip. By clicking the field you activate it so that you can create or modify a clip name.
Framerate box Select the frame rate of the imported clip. If you are importing a DPX file, select File FCM to detect and use any existing framerate information in the DPX file to create the clip.
| Select: | To: |
|---|---|
| Scan First File | Scan the keycode from only the header of the first file in a DPX sequence. |
| Scan First/Last Files | Scan the keycode from only the header of the first and last files in a DPX sequence. |
| Scan Every File | Scan the keycode from the header of every file in a DPX sequence. |