


Processing Group
Use the Resize options to change resolution, aspect ratio, bit depth, and field dominance. See Resizing on Import, Export, or in a Clip Library.
If Resize is disabled, you can force an aspect ratio for all the images selected for import, or use the Default Resolutions list to determine the aspect ratio for each individual image in the selection. See Setting Default Image Resolution Characteristics on Import.


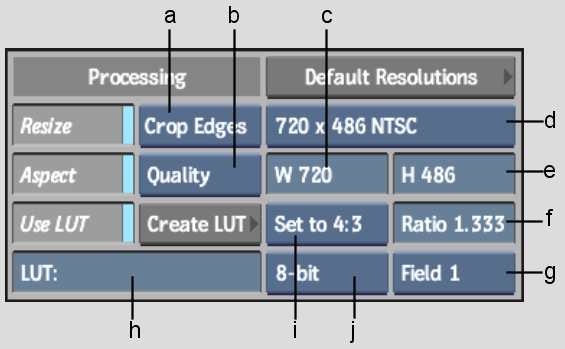
(a) Fit Method box (b) Resize Filter box (c) Frame Width field (d) Resolution Presets box (e) Frame Height field (f) LUT Name field (g) Aspect Ratio Presets box (h) Aspect Ratio field (i) Scan Mode box (j) Frame Depth box
Resize button When enabled, displays the Resize options that can affect one or more clips on import. If disabled, the Aspect Ratio Presets box and the Aspect Ratio field are still available. Resize options are not active when you soft-import media.
Aspect button When enabled, allows you to use non-square pixel formats. This button is active only when Fit Method is set to Crop Edges or Letterbox.
Fit Method box Select the fit method that is applied to the clips. Fit Method is active only when Resize is enabled.
| Select: | To: |
|---|---|
| Pan | Fit the source image to the smaller destination frame by cropping and using the Pan Start X and Pan Start Y fields. |
| Centre/Crop | Fit the source image, centred, over the destination frame. If the source is larger than the destination, it is cropped. If the source is smaller than the destination, it is surrounded by a black border. |
| Crop Edges | Fit one edge of the source into the destination frame
without stretching or squashing the frame. Excess parts of the source
frame after resizing are cropped. If the source—after the one edge is resized—is wider than the destination, its overhanging left and right edges are cropped. If the source is taller than the destination, the upper and lower edges are cropped. |
| Fill | Fit the source, width and height, into the destination frame. If the source and destination frames do not have the same aspect ratio, the image can become distorted. |
| Letterbox | Fit the source to the destination frame without squashing
or stretching it, and without cropping the source. If the source is wider than the destination, black bars fill the top and bottom of the destination frame. If the source is narrower than the destination, black bars fill the right and left sides of the frame. In all cases, the entire source frame is contained within the destination frame. |
Pan Start X field Enter the offset for horizontal position. Pan Start X is active only when Fit Method is set to Pan.
Pan Start Y field Enter the offset for vertical position. Pan Start Y is active only when Fit Method is set to Pan.
Resize Filter box Select the filter option to determine the quality of the interpolated resize result. Defining a filter method in the Resize menu will override the default setting specified in the Preferences menu. The Resize Filter box is active only if Fit Method is set to Crop Edges, Fill, or Letterbox.
| Select: | For: |
|---|---|
| Bicubic | Best results when resizing a clip to a higher resolution. Processing time is increased compared to Medium, but decreased compared to Quality. |
| Quality | Best results when resizing a clip to a lower resolution. Processing time is increased compared to Medium. |
| Medium | Moderate results. Processing time is increased compared to Coarse. |
| Coarse | Poorest results in the least amount of processing time. A segment with a soft Resize can be played back in real time when using the Coarse resizing filter. Other options may require rendering. |
Default Resolutions button Displays the Default Resolutions list. See Default Resolutions List.
Frame Width field Displays the frame width of the selected resolution preset. If Resolution Presets is set to Custom, then this field is active, allowing you to enter the frame width value that you want to use.
Resolution Presets box Select one of many standard resolutions, as well as a Custom option that you can use to specify non-standard resolutions.
Frame Height field Displays the frame height of the selected resolution preset. If Resolution Presets is set to Custom, then this field is active, allowing you to enter the frame height value that you want to use.
Create LUT button Create a custom LUT. See Applying a LUT on Import or Export. Create LUT is active only if Use LUT is enabled.
LUT Name field Displays the name of the currently used LUT file. When enabled, a browser appears containing the LUTs currently residing in the project ~/lut directory. These include the samples provided with Flint, as well as any LUTs you may have saved or exported to this directory. LUT Name is active only when you enable the Use LUT button.
Use LUT button When enabled, activates Create LUT and LUT Name and uses a Lookup Table on import. Use LUT is active only if File Format is set to Cineon or Dpx, and Soft-Import is not enabled.
Aspect Ratio Presets box Select a standard frame aspect ratio. Select the Set to w:h option to set the clip to use square pixels. Select Custom to define a custom frame aspect ratio in the Aspect Ratio field.
Frame Depth box Select from one of five frame depth options: 8-bit, 10-bit, 12-bit, 12-bit u, or 16-bit fp. Frame Depth is active only when Resize is enabled.
Aspect Ratio field Displays the aspect ratio of the imported clip. When Aspect Ratio Presets is set to Custom, this field becomes active so that you can enter a custom frame aspect ratio.
Scan Mode box Select an option to determine the order in which the fields of interlaced material is scanned.
| Select: | To: |
|---|---|
| Progressive | Scan a frame-based clip with no interlacing. |
| Field 1 | Scan Field 1 first, followed by Field 2. |
| Field 2 | Scan Field 2 first, followed by Field 1. |