Automatic 2D tracking


Running the automatic 2D tracking

To run the automatic tracking:

  1. Do one of the following:
    • Select 2D Tracking > Automatic Tracking.
    • Click the Run the Automatic Tracking icon in the Toolbar.
    • Press F10.

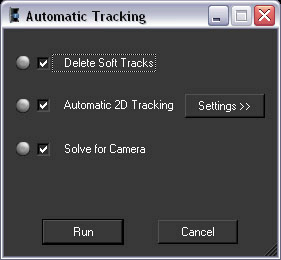
    A window appears, listing the steps in the automatic matchmoving process.

    • If checked, Clear Soft Tracks clears previously generated soft tracks, which are indicated by a single cross in the tree view.
    • The next step, 2D Tracking, extracts relevant information from images within the video sequence as you would do manually. See Supervised 2D tracking. All tracks generated during this step are flagged "automatic."
    • In Camera Solving, the movement of the camera in 3D space and its (the camera’s) settings are calculated. For more details. See Solving for the camera.
  2. The Settings button allows you to configure the automatic tracking engine:
    • From the Track Using drop-down list, choose either Grayscale to track the feature’s luminance (it's the faster way, and should fit most cases), or Colors to take care of each color channel independently.
    • Enter the Minimum Track Length. Tracks that do not last at least this number of frames will be discarded.
    • Use the sliders to set the Features Sensitivity (how sensitive is the feature detector) and the Features Density (to allow more or less points in an area).
    • Set a minimum and maximum Displacement Range, expressed as a percentage of the largest dimension of the image. You can also enter this data in pixel unit.
    TipUse the Colors option when your sequence contains motion blur or low-contrast images or sequences.
  3. Now click Run to begin the matchmoving process. Colored indicators beside the option name show you the status of the process as well as the status of each step.
    • A gray button indicates a task that has not been started yet.
    • A yellow button indicates a task in progress.
    • A green button indicates a completed task.

Viewing the results

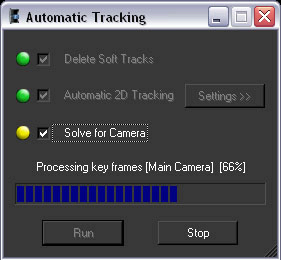
Upon completion of the automatic tracking process, you will have a list of the automatically generated point tracks, marked with a circle in the Point Tracks / Auto Tracks folder (and optionally, moving rigid object sub-folders, if any) in the Project window and Track window. Tracks are only generated in areas of the image that are not masked or cropped out. Each track is automatically named "Auto####," where "####" represents the track number.

Note

All automatically generated tracks will be flagged as soft tracks.

Differences with supervised tracking

Running the automatic tracking is an easy and robust way to track many points simultaneously. The process can be launched whenever needed, on the entire sequence or on a selected time range, on the entire image, or on selected areas only using masks. The automatic process is different from supervised tracking in the sense that as many tracks are handled at the same time, 3D coherency is used while tracking.

Also, when supervised tracks are present before launching the automatic process, they are used in the 3D coherency checking.

The results are different from the kind of tracks you will have when using the supervised tracking, as in this case, each track is handled individually.

As automatic tracking may lead to huge number of tracks, a soft track is not guaranteed to be used in the solving process. An algorithm that automatically selects the best soft tracks to fit the computation in memory is launched before the solving. To convert a soft track into a hard track, simply check the hard track check-box in the track parameters window or pop-up menu. This way you’re sure it will always be fed into the engine.

Apart from this difference, the same tools handle automatic and supervised tracks.