


Learning Resources > Tutorials > Getting Started with Maya > Polygon Texturing > Lesson 2: UV unfolding >
Creating a planar mapping
To texture an organic object, you must start by creating a planar mapping as a base, which you can then unfold.
To create a planar map for the torso
 -click
the torso and select Object mode from the marking
menu.
-click
the torso and select Object mode from the marking
menu.
 .
.
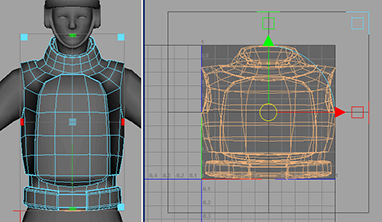
Maya creates a new UV mapping for the torso. If you look at the UV Texture Editor, you can see the new UVs look like a flattened version of the front of the chest. At first glance this may seem perfect, but there’s a major problem here that you need to change the UV Texture Editor view to shaded mode to see.
 ), or
select Image > Shade UVs.
), or
select Image > Shade UVs.
In shaded UV mode, overlapping faces appear red while non-overlapping faces appear blue.
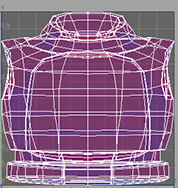
Notice that all the faces for the torso are red. This is because the faces of the front and back of the torso are overlapping. If you tried to apply a texture to the UV mesh like this, you would get the exact same image on the front and the back of the torso.
To fix this, we need to unwrap the texture so that front and back no longer overlap.