Evaluating the tracking
of a point
Making sure the track point stays on target will help later when you solve. Don’t worry if the connection between tracking and solving is not clear yet. For now, simply identify major tracking errors by following these steps:
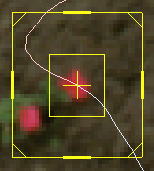
Identify any areas where the cross-hair slips noticeably from the original position on the flower. This takes some judgment. Since the flower changes shape over time, you must visualize where the original point would be as the camera perspective changes.
If the cross-hair appears to stay within two pixels of the original target point, you have tracked the flower successfully. If the cross-hair moves completely off the flower or the tracking stops before it reaches the last frame, you must track again. Delete the track point (click Delete in the Track control panel), return to frame 1, position the track box cross hair exactly in the center of the flower closest to the fence, and click Start Track.
This graph shows how closely Live matched the track box’s pixel pattern on each frame. Specifically, Live compares each frame and the frame before it to see how well they match. Green is a good match, yellow is a warning, and red is a stronger warning.

As illustrated, the green region drops over time, leaving the graph mostly yellow toward the end. This is a normal occurrence, caused by the changing pixel pattern of the point you tracked. In this case, you can ignore the yellow color, because the main evaluation tool—the movie file—indicates the track is on target.