This section presents an overview of the ways you can improve solutions. The suggestions are presented in order of the most common problem areas.
Track points should be the first area you try to improve. First, look for jumps or obstructions in the tracking and retrack those areas. Then, look for areas in the sequence that require more track points and add them.
Bad track data can be as problematic as too little track data. Make sure to delete all frames where a track point is obscured or falls out of the camera’s view (Edit > Delete Region).
The solver can consider additional information in the form of constraints. There are two types: survey and camera.
Survey constraints help define spatial relations, especially in areas where track point data is minimal. For example, if part of your shot has only three track points visible, but they are coplanar, you can add a Plane constraint. See Choose survey constraints.
Camera constraints control camera focal length, translation, and rotation. The focal length constraint is used more often (see Create a focal length constraint). The camera translation constraint is useful for shots where the camera remains on a tripod. Camera rotation is occasionally used, but it can only constrain all three axis at once. More often, you can improve camera translation and rotation through survey constraints. For details, see Create camera translation and rotation constraints.
Another constraint feature, called locked point, is available in the Locator Summary panel. Locked points are the same as Point constraints, but they are easier to create. They are primarily used to snap 3D locators to points of geometry. See Choose survey constraints.
The Locator Summary panel also lets you specify points as infinitely far from the camera so the solver can use it exclusively for calculating camera movement. This feature is especially helpful for zoom shots. See Choose survey constraints.
Eliminate inconsistent constraints
If you add multiple survey constraints, be careful that they do not conflict with each other. Live weighs constraints together and makes compromises if they conflict. For example, if a point were constrained at 0,0,0 and also constrained to a plane at X=2, the solver would choose half-way between the origin and the plane (X=1). If you detect this kind of problem in your solution, look for conflicting constraints.
Adjust the number of root frames
The default number of root frames chosen by the solver may not be enough for your shot, especially if the track points in your shot move quickly out of frame. Change the value in the Number of Root Frames setting to a greater number (typically, 10 or 15).
Modify the choices for root frames
In general, the solver picks good, representative frames, but you may want to try choosing your own. Live lets you add or remove root frames in the Solve Solution control panel. The next time you run the solver, it uses your list of root frames rather than choosing its own root frames.

Select frames that help depict the camera movement, but be careful to avoid frames that have poor tracking. For example, if the camera moves slow and then speeds up for ten frames, add root frames where it speeds up. However, if the camera moves too quickly, such as a whip pan, the tracking may be too poor and you should avoid those frames.
The Finish step performs smoothing on camera motion curves around frames where track points appear or disappear. You can control the extent of smoothing in the Smoothing Interval setting on the Solve control panel.
Sometimes the smoothing might not be enough. If you detect bad transition in the camera movement, try doubling or tripling the value in Smoothing Interval and then running Finish again. The more smoothing you add, however, the more pixel slip you introduce between the 3D locators and track points.
Smoothing only applies to camera movement and only around frames where track points appear or disappear. The appearance or disappearance of track points can cause sudden shifts in the camera’s motion curves, because the points are suddenly taken in or out of the calculation. Smoothing counteracts this effect by adjusting the curve before and after frames where track points appear or disappear. Smoothing Interval is the number of frames to smooth before and after.
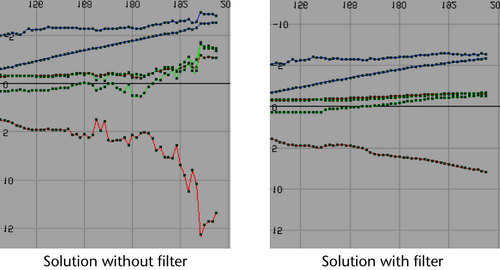
To correct for unwanted jitter in your camera move solution, the solver performs a filter during the Finish step. You can control the amount of filtering with the Filter Level control on the Solve control panel.
This filter specifically corrects the jitter that can occur around frames where the solution is mathematically ambiguous or uncertain. The root frame solve process tends to amplify these ambiguities, creating jitter in the camera’s motion. Filtering finds the frames with ambiguities and applies a strong filter to those areas in the camera curves.
Adjust the Filter Level if you want more filtering or if the precision of the solution suffers as a result of too much filtering. A value around ten is the upper limit, while zero disables the filter.
Move the camera into an approximate starting position
If the Root Frame Start produces incorrect guesses, you may be able to help it by positioning the camera into an approximate starting position. You may also try positioning the camera on both the first and last frames. The camera does not have to be accurate, just roughly where you expect it to be.
This method is particularly useful if you have created survey constraints prior to running Start, because the constraints may be interfering with the solver’s guess. If this is the case, you may also try making the constraints inactive or Registration only until you reach the Refine step.
For minor adjustments to the camera position, you can try using the tools on the Fine Tune control panel. You make these adjustments per frame. Make sure, however, you have checked the track point accuracy first, because that will often remove problems with camera jitter or jump.
Change the camera rotation order
For panning shots on a tripod, you can get improved results by changing the Rotate Order attribute of the shot camera to ZXY. You can find the Rotate Order attribute in the Attribute Editor, under the shotCamera node, Transform attributes.


