The Sliding attributes of the Muscle deformer node let you cause the skin mesh to show objects truly sliding underneath. See Sliding attributes for descriptions of each Sliding attribute of the Muscle deformer.
Sliding Weights let you use any capsule, bone or muscle to push out the skin surface and give true sliding results. The points themselves do not move along with the object, but instead are pushed out or collide with it.
Sliding weights are not usually normalized. That is, multiple muscles can affect the same point 100%. If more than one muscle is pushing out on a point, the point moves to the location farthest outside.
The calculation speed of Sliding is based on the type of object doing the slide, as well as the Muscle sliding quality setting. In general, capsules are the fastest to use for sliding, polygon objects give moderate speed, and NURBS muscles are the slowest.
With this in mind, you may want to use capsules as much as possible for basic bone sliding effects. For example, rather than modeling a polygon knee bone, you might be able to get similar results with faster speed using a non-uniformly scaled-down capsule instead.

In addition, you want to paint only the area that the bone or muscle can slide over for that bone or muscle. This limits the sliding calculation of the given object to only the points you weight and speeds up deformation. For example, a bicep (arm) muscle never slides skin around a leg, so you only need to paint sliding weights for the biceps around the arm.
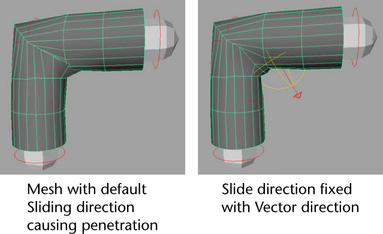
In creases or areas where the skin folds along itself you may find some points that do not slide outwards properly. To help with these areas, you can use a cMuscleDirection node as described in Direction weights. This node overrides the direction the skin slides to make it move outwards properly.
Direction weights allow you to get better control over Sliding effects. They cause the points weighted to the cMuscleDirection node to be moved in the direction you specify.
For example, if some points are sliding the wrong way, or are moving in an incorrect direction, usually in crease areas or areas where the skin has folding, you can create and paint weights to a Muscle Direction to control the direction these points slide.
Radial directions are useful when dealing with areas of a sliding skin that are cylindrical or that need a cylindrical-type push out for sliding. Usually sliding is based on the surface shaping. If there is a concavity or wrinkle, you can use a Muscle Direction to fix the direction of the slide. Radial directions work well for things where you would normally have a long bone inside of the main center of the mesh, for example an upper or lower arm, upper or lower leg, and so on. These are cases where you probably have one main bone or capsule for the upper arm running in the center line of that area. If you have a capsule for that, you can select it and make it a Muscle Direction object. If you do not have a capsule, you can create a separate radial direction object parented to the bone.

Vector directions can be useful for areas where the sliding or skin pinches more, such as in the back of a knee, or in an elbow area. The direction object can split the angle of the two bones and keep the slide direction pointing outwards so that the two slides do not push into each other.
