Create a Muscle Direction object


To create a Muscle Direction object

  1. Select Muscle > Direction > Make Muscle Direction from the main menu bar.

    If nothing is selected, a new direction object is created. If a capsule object or objects are selected, a direction object is created as a child shape of the capsule as a radial direction node.

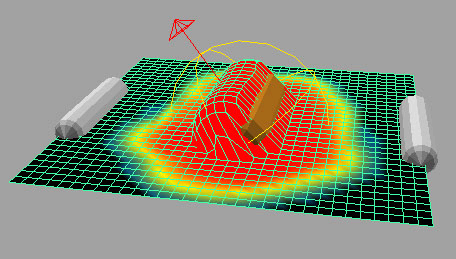
    A Muscle Direction locator appears.

  2. You can adjust the settings now, or adjust them after connecting to a cMuscleSystem node.
    NoteThe falloffInner attribute only controls the display of the cMuscleDirection node. The effect of the node is determined solely by weighting. The falloffInner value has no effect on the result.

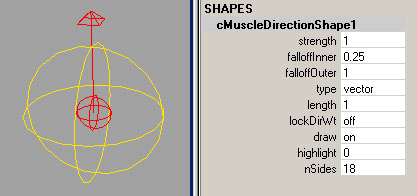
    The falloffOuter value only affects "radial" or capsule-based Muscle Directions. Raising this value effectively ‘lengthens’ the radial direction object, shown by the increasing length of the red center-line. It has no effect in "vector" mode.

  3. To connect the direction node to a Muscle deformed object, select both the deformed object and any Muscle Direction objects you want to connect. (Selection order does not matter.)

  4. Select Muscle > Direction > Connect selected Muscle Directions from the main menu bar.

    The objects are connected, but have no effect until Direction weights are painted or set.

  5. Select the skin mesh, then select Muscle > Paint Muscle Weights to open the Muscle Paint tool.
  6. In the Muscle Paint tool, switch the Weights to Direction, and select the proper direction node to paint.
  7. Paint weights on the areas you want. Any points affected by the Muscle Direction that are sliding have the direction of their slide adjusted. Shown below, the direction node has been rotated, and points that were pushing outwards are now sliding/pushed out along the axis specified by the cMuscleDirection node.

    NoteYou can have more than one cMuscleDirection node affect an area of points and use weighting to blend their effect together.