Show in Contents

Add to Favorites

Home: Autodesk Maya Online Help

Editing the animation of clips

Lesson 4: Nonlinear animation with Trax

Soloing and muting tracks

Reusing clips within Trax
You can save and reuse
clips for future use. You can key specific types of motion or attribute
effects, save them as clips, and reuse the clips for other characters.
When
you reuse a clip created for one character and apply it to another,
the clip attributes must be mapped to correspond between the two
characters. For more information, see
Mapping animation between characters in
the Maya Help.
In this lesson, you work
with clips created for this aircraft animation. The clips contain
animation to make the aircraft shift to the left and right and bank
left and right.
To load a clip from disk
- From
the Trax menu, select File
> Import Animation Clip.
The File
Browser appears. When importing a clip, the File
Browser defaults to the clip directory of your current
project.
- Find the clip file named Bank_Left.ma in the GettingStarted/Anim/clips directory.
- Select the file named Bank_Left.ma and click the Import button.
The clip is imported
and appears in the Outliner named as Bank_LeftSource to indicate it is a
source clip.
- Repeat steps 1 and 2 to import the clips
Bank_Right, Shift_Left and Shift_Right.
When
you have finished, four new clips appear in the Outliner as
source clips. In the steps that follow, you place and position the
clips on tracks in the Trax Editor.
NoteWhen you import clips
they also appear in, and can be accessed from, the
Visor (
Window
> General Editors > Visor). The
Visor is
a graphical interface that allows you to import items that reside
on disk or in your current file ( such as files, textures, clips,
or poses). Clips that are assigned to a character in Trax will appear
listed under the
Character Clips tab in the
Visor.
Clips that have not yet been placed on a track will appear listed
in the
Visor under the
Unused
Clips tab.
To
place clips into a track from the Outliner
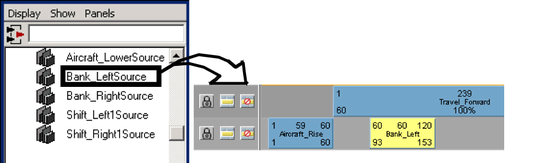
- In
the Outliner, using the middle
mouse button drag the clip named Bank_LeftSource into the same track
as the Rise and Lower clips. Ensure you drag into an open area on
the track that the clip will fit into.
- Position the Bank_Left clip on the track
so its Frame In number matches the Frame
Out number on the Aircraft_Rise clip, as shown below.
- Using the middle mouse button drag the
clip named Bank_RightSource from the Outliner into
the same track as the Rise and Lower clips. Ensure you drag into
an open area on the track that the clip will fit into.
- Position the Bank_Right clip on the track
so its Frame In number matches the Frame
Out number on the Bank_Left clip, as shown below.
You can
also drag clips from the Outliner or Visor into
the Trax Editor and create a new
track for them to be placed in.
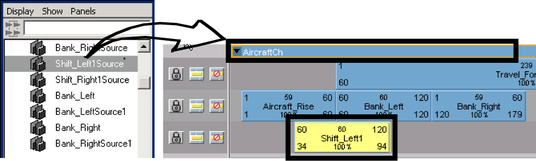
- Drag the clip named Shift_Left1Source
from the Outliner using the middle mouse
button, but this time, drag to the narrow blue area above the tracks before
releasing your middle mouse button.
A new track appears in
the Trax Editor and the clip is
placed on the new track.
The narrow blue box is the summary
track for the character set (in this case the Aircraft)
The summary track represents all of the clips under a character,
subcharacter, or group. When you import a clip onto the summary area
by dragging it from the Outliner or Visor,
the Trax Editor creates a new track
for the clip.
- Click-drag the Shift_Left clip so it
lies directly below the Bank_Left clip on the track above it.
Because the Shift_Left
clip is positioned directly below the Bank_Left clip, the actions
will occur simultaneously when the animation is played back.
- Using the middle mouse button drag the
clip named Shift_Right1Source from the Outliner into
the same track as the Shift_Left clip . Ensure you drag into an
open area on the track.
- Position the Shift_Right clip on the
track so its Frame In number matches the Frame
Out number on the Shift_Left clip, as shown below.
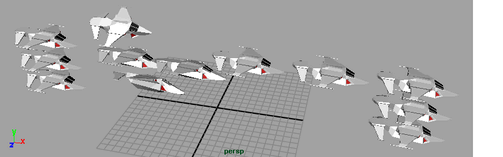
- In the front view menu, select Panels
> Perspective > persp.
The view updates to display
the aircraft from a perspective view.
- Dolly and track the view so you can fully
see the area the aircraft will travel within.
- Click play on the Time Slider’s playback
control to play back the animation.
After the aircraft rises,
it travels forwards as before but now it shifts sideways to the
left while one wing tips downwards, and then shifts sideways to
the right, while the opposite wing tips downwards.
- Click stop on the Time Slider’s playback
control.