Below are descriptions of the attributes in the FurFeedbackShape node. To see these attributes, select the fur on the object’s surface and open the Attribute Editor (Ctrl+a).
Set the number of U Samples and V Samples to define how many fur feedback hairs display on the surface. This does not change how many hairs actually render on the surface, only the number of fur feedback hairs that appear on the surface while you are working on it.
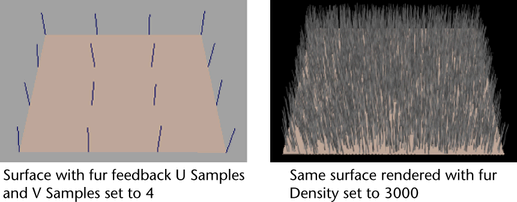
You may want to decrease the U and V Samples on very small surfaces so you can see the effect of fur attributes more clearly while you work.
The number of U Samples and V Samples define where the sample hairs are. When you paint fur attribute values on a surface, only the values for fur represented by the feedback change to the painted values. The values for hairs growing between fur feedback hairs are interpolated and blend automatically.
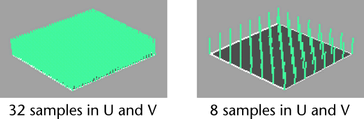
The following example shows a profile of rendered fur where the fur length in the fur description is 1 with a fur length of 5 painted using the Paint Fur Attributes Tool. The same brush stamp (size and shape) was used in both images.
The first image was created with 40 U and V Samples. The second image was created using only 4 U and V Samples.

If you increase the number of U and V Samples, ensure that the Attribute Map Height and Width are larger (as a rule of thumb, the Attribute Map should be at least twice as large) to account for the change in the level of detail. Otherwise, you will lose detail for attributes you painted using the Paint Fur Attributes Tool.
Set how closely the fur feedback resembles the appearance of the final rendered fur. This is particularly useful for representing scraggle and curl. Fur accuracy ranges from 0 to 1. A value of 0 represents the hairs as straight lines, regardless of any curl, scraggle, or attraction. A value of 1 uses the same number of segments for each hair in the fur feedback that will be used for the actual render, but significantly slows interaction. A value of 0.5 uses half the number of segments in the fur feedback that will be used in the actual render, and is often sufficient to give a good indication of what the final fur render will look like.
The default value for Fur Accuracy is 1, but you can turn it down to speed up interaction.

These are descriptions of the attributes in the Render Stats section. These render settings are unique to each fur feedback node.
These are descriptions of the options in the mental ray section of the FurFeedbackShape node. These mental ray settings are used when the fur object is rendered in mental ray.
Use the Min Sample Level and Max Sample Level attributes to set the range of samples used for the fur object. Note that the min and max sample level values set for the fur are bound by the global min and max sample level values, found in the Render Settings dialog. See Anti-Aliasing Quality in the Rendering guide for more information regarding the global sample level values.
This is the minimum number of samples per pixel used when processing an image, specific to the fur object. This value is clamped to the global min sample level value. For example, if the fur-specific min sample level is set to -1 and the global min sample level is set to 1, then the global setting of 1 will be used. Based on Contrast Threshold(adaptive) settings, mental ray for Maya will increase these samples as needed.
This is the maximum number of samples per pixel used when processing an image, specific to the fur object. This value is clamped to the global max sample level value. For example, if the object-specific max sample level is set to 3 and the global max sample level is set to 2, then the global setting of 2 will be used.
This attribute controls the rasterizer’s shading samples for the fur object only. See Rasterizer Quality in the Rendering guide for more information.
Controls how many rays are shot in each final gathering step to compute the indirect illumination. The default is 1000 per sample point, but this tends to be high for test renders (renders can take hours). Test rendering at lower values, usually 100 or 200, is sufficient; higher values are required for final renders. Increasing the value reduces noise but also increases the rendering time. The setting for Final Gather Rays uses the ghosting settings from Window > Settings/Preferences > Preferences > Display > Animation.
Max Radius and Min Radius control the size of the sampling region within which Final Gather rays search for irradiance information from other surfaces.
With the default values, Maya calculates values that seem appropriate based on scene dimensions to speed up the render, but this calculation doesn’t allow for complex geometry. Generally, enter a value that is 10% of scene’s overall dimension for the Max Radius, then enter 0.0 for Min Radius. Make further adjustments based on scene geometry detail, how the geometry is arranged in the scene, and how the render looks. For example, use smaller radii to achieve better detailing in nooks and crannies in your scene.
Use this to control how Final Gather uses a speckle elimination filter to prevent samples with extreme brightness from skewing the overall energy stored in a Final Gather sampling region.
Neighboring samples are filtered so that extreme values are discarded in the filter size. By default, the filter size is 1. Setting this to 0 disables speckle elimination, which can add speckles but will better converge towards the correct total image brightness for extremely low accuracy settings. Size values greater than 1 eliminate more speckles and soften sample contrasts. Sizes greater than 4 or so are not normally useful.
Controls the maximum distance at which mental ray for Maya considers photons for global illumination. When left at 0 (the default), mental ray for Maya calculates an appropriate amount of radius, based on the bounding box size of the scene. If the result is too noisy, increasing this value (to 1 to start, then by small increments up to 2) decreases noise but gives a more blurry result. To reduce the blur, you must increase the number of global illumination photons (Global illumination Accuracy) emitted by the light source.
Controls the maximum distance at which mental ray for Maya considers photons for caustics. When left at 0 (the default), mental ray for Maya calculates an appropriate amount of radius, based on the bounding box size of the scene. If the result is too noisy, increasing this value (to 1 to start, then by small increments up to 2) decreases noise but gives a more blurry result. To reduce the blur, you must increase the number of caustic photons (Caustic Accuracy) emitted by the light source.
Specifies the maximum displacement applied to object control points in a normal direction. This provides control over the otherwise automated displacement range to better focus tessellation where most needed. Set this value if you have any displaced objects in your scene. See Render Settings: mental ray tabs in the Rendering guide for more information.
This attribute controls the overall display settings for the fur object.
When this attribute is on, the current fur object appears as a template. See Display > Object Display and Make an object unselectable (template).
If the current fur object is connected to a lodGroup node, then this check box displays the Hide/Show status of the fur object’s display level. Also, this attribute is read-only.
If the current fur object is not connected to a lodGroup node, this attribute turns off the fur object’s visibility in the scene view.
Displays and allows you to set the ghosting settings for the fur object. For more information on ghosting, see Ghosting animated objects in the Animation guide.
Ghosting Control
Lets you choose a type of ghosting for the fur. You can select any one of the following:
Uses the ghosting settings from Window > Settings/Preferences > Preferences > Display > Animation.
Only available when the ghosting type is Custom Frame Steps or Custom Key Steps.
When the ghosting type is set to Custom Frame Steps, this field sets the number of ghosts that appear before the current frame. Spacing of these ghosts is defined by the Step Size field.
When the ghosting type is set to Custom Key Steps, this field sets the number of ghosts that appear before the current frame. Spacing of these ghosts is defined by the number of keyframes on an object and the Step Size.
Only available when the ghosting type is Custom Frame Steps or Custom Key Steps.
For Custom Frame Steps, this field sets the number of ghosts that appear after the current frame. Spacing of these ghosts is defined by the Step Size field.
For Custom Key Steps, this field sets the number of ghosts that appear after the current frame. Spacing of these ghosts is defined by the number of keyframes on an object and the Step Size.
Only available when the ghosting type is Custom Frame Steps or Custom Key Steps.
For Custom Frame Steps, Step Size determines the number of frames between each ghost. For example, if the Step Size is 10, every tenth frame is ghosted.
For Custom Key Steps, Step Size and the number of keyframes control the spacing of ghosts. For example, if the Step Size is 2, then every other key is ghosted.
This attribute displays bounding box information for the object, but the information is not editable. For more information on bounding boxes, see bounding box in the Glossary.
In this section, you can view and change drawing override settings for the FurFeedbackShape node. For more information about the settings in this section, see Drawing Override options in the Basics guide.
Adjusting these settings changes the behavior of the FurFeedbackShape node. For more information, see Node behavior in the Basics guide.


