


Edit Mesh > Insert
Edge Loop Tool
The Insert Edge Loop Tool lets you insert one or more edge loops across either a full or partial edge ring on a polygonal mesh. An edge loop is a path of polygon edges that are connected in sequence by their shared vertices. An edge ring is a path of polygon edges that are connected in sequence by their shared faces.
When you insert an edge loop, you are splitting the polygon faces associated with the selected edge ring. The Insert Edge Loop Tool lets you insert on or more edge loops across a full, partial, or multidirectional edge ring.
The Insert Edge Loop Tool is useful when you want to add detail across a large area of a polygon mesh or when you want to insert edges along a user-defined path. You can also modify the profile of the inserted edge loops creating features that protrude or recess on your polygon meshes along the inserted edge loop.
Edit Mesh > Insert
Edge Loop Tool > 
These are descriptions of the options in the Insert Edge Loop Tool Settings editor.
Maintain position
The Maintain position options specify how new edges are inserted on the polygon mesh.
When the Maintain position is set to Relative distance from edge (default) the dotted insert edge preview locator is positioned along the selected edge based on a percentage distance along the selected edge. For example, if you click and then drag the selected edge to a location that is approximately halfway along the selected edge, the dotted preview locator appears approximately halfway between all of the other edges along the selected edge ring.

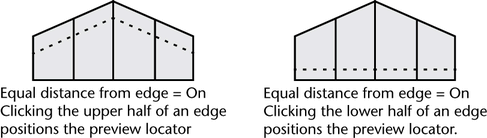
When Maintain position is set to Equal distance from edge, the dotted insert edge preview locator is positioned along the selected edges at an absolute distance based on where you click on the first edge. When the length of edges is highly variable, the tool uses the shortest edge to determine the maximum distance the preview locator can be moved. This option is useful if you want the new edges inserted at a specific distance from existing edges. For example, when you want to control any subsequent edge creasing you may perform on the mesh.
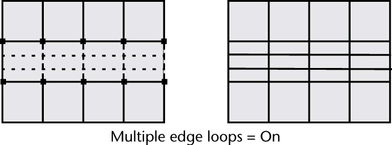
Inserts multiple equally spaced edge loops along the selected edges, based on the number specified in the Number of loops setting. The multiple edge loops cannot be manually repositioned. The maintain distance settings are not available when Multiple edge loops is turned on.
When Auto complete is
on (default), new edges are immediately inserted across the edge
ring as soon as you click, drag to position, and then release your
mouse button. When Auto complete is turned off,
the insert edge preview line remains until you press  or
or  and
select Complete Tool from the marking
menu. Turning Auto complete off is useful
when you want to insert edges on a partial edge ring or a multidirectional
edge ring path.
and
select Complete Tool from the marking
menu. Turning Auto complete off is useful
when you want to insert edges on a partial edge ring or a multidirectional
edge ring path.
Specifies whether or not the inserted edges along the edge ring are automatically softened or hardened when the operation is complete. When the Smoothing angle is set to 180 (default) the inserted edges will appear soft. When the Smoothing angle is set to a value less than 180, the inserted edges appear hard.
Modifying the 3D profile of an edge loop
When the Multiple edge loops option is selected, additional attributes become available on the polySplitRing node that let you modify the profile of the inserted edge loops. This lets you create features that protrude or recess on your polygon meshes along the inserted edge loop.
To modify the cross-sectional profile shape of the inserted edge loop you need to select the polySplitRing node and turn on the Enable Profile Curve setting. The additional attributes are described below:
Specifies the number of edge loops to be created when the Multiple edge loops setting is on. The default setting is 2. When Divisions is set to 1, a single edge loop is inserted at the halfway point between the edges. This is the same attribute as Number of loops located within the Insert Edge Loop tool settings window.
Relates to the height and shape of the profile curve. When Use Equal Multiplier is off a Selected Value of 1 sets the corresponding vertex offset at a distance equal to the length of the edge being split. When Use Equal Multiplier is on the length of the shortest edge is used to determine the height of the offset.
Specifies that the start and end of inserted edge loop profile protrudes or recedes in a direction that is based on the direction of the face normal instead of the edge normal. The start and end of the edge loop profile expands or contracts in a tapered manner otherwise. This setting is useful when inserting partial edge loops on a mesh.
The following attributes control the appearance of the graph which in turn affects the profile shape of the inserted edge loop.
Interpolation
Controls the appearance of the profile curve as it passes through the position markers. More specifically, when it leaves one position marker and enters the next.
Specifies an offset value from which the profile curve is based. The default setting is 0 (no offset). You can set the offset using either positive or negative values. The Profile Curve default settings do not easily let you create receding profiles, so the Input Offset is useful in those situations.