All but one of the following options display a menu that lets you choose a custom or static attribute as input. It is most common to use an expression to set the value of a custom attribute being used as input to the options. The options themselves are not attributes.
Not all static attributes in the menus have a practical application. For instance, using worldVelocity as the input to the object’s Rotation might not have a useful effect. The validity of each input attribute depends on the context.
Except for the first three of the following options, you can set the input attributes with per particle attribute values. You therefore can set values differently for each particle.
The Conserve value controls how much of a particle object’s velocity is retained from frame to frame. Specifically, Conserve scales a particle’s velocity attribute at the beginning of each frame’s execution. After scaling the velocity, Maya applies any applicable dynamics to the particles to create the final positioning at the end of the frame.
Conserve doesn’t affect motion created by keyframes. Keyframes affect only a particle object’s worldVelocity attribute, not its local velocity attribute.
If you set Conserve to 0, none of the velocity attribute value is retained. The velocity is reset to 0 before each frame. At the end of each frame, the velocity is entirely the result of dynamics applied during that frame.
If you set Conserve to 1, the entire velocity attribute value is retained. This is the real-world physical response.
If you set Conserve to a value between 0 and 1, a percentage of the velocity attribute value is retained. For example, if you set Conserve to 0.75, each frame Maya first reduces the velocity attribute 25%, then it calculates any dynamic or expression effects on the object.
For example, suppose you create a particle falling with the acceleration of gravity, 9.8 units per second per second. The following table compares how Conserve values of 1 (default), 0.5, and 0 affect the velocity attribute after several frames execute.
With Conserve set to 1, velocity increases each frame at the exact acceleration rate of gravity.
With Conserve set to 0, velocity stays a constant value—the particles do not accelerate. At the beginning of each frame, velocity is reset to 0. The gravity field’s acceleration is then added to the velocity of 0, which results in the same number <<0,-0.41,0>> being used at the end of each frame.
With Conserve set to 0.5, velocity increases each frame at a much slower rate than gravity. At the beginning of each frame, velocity is scaled to 50% of the value it had at the end of the prior frame. The acceleration of gravity is then added to this scaled value to create the slowly increasing velocity used at the end of the frame.
If you prefer that a field affect a particle object in its local space, select the particles, display the Attribute Editor, and turn off Forces In World.
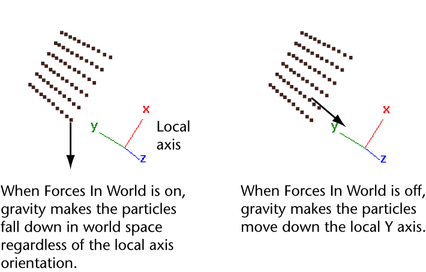
Note that the orientation of the local axes of a particle object matches the orientation of the world space axes unless you rotate the object.
You can alternatively turn memory caching on or off in the Attribute Editor by turning off the Cache Data attribute. The location of the attribute in the Attribute Editor depends on the type of object. If you turn caching on for a rigid body, Maya also turns caching on for all rigid bodies in that rigid body’s solver.
If you cache data in memory for emitted particles and later change the rate or another attribute of the emitter or emitted particles, you must disable the cache to see the effect of the attribute change.
This boolean attribute tells the particle object to assume that particles created from emission are in world space, and to transform them into object space before adding them to the particle array. This makes the particles respond as if they were in the same space as the emitter when they are in some non-identity hierarchy.
This attribute is used only if lifespanMode is set to “Random Range”.
The attribute identifies a range of random variation for the lifespan of each particle. If set to a non-zero value, each particle’s lifespan varies randomly up to plus or minus lifespanRandom/2, with the “lifespan” attribute as the mean (the average lifespan). For example, lifespan 5 and lifespanRandom 2 will make the lifespans vary between 4 and 6.
In Constant or Random Range Mode, the finalLifespanPP attribute stores the values generated from lifespan and lifespanRandom.
Lets you offset the position of the current particle when it collides with the surface specified in the Collision Object field. Offset also prevents the current particle from penetrating the surface of the specified collision object. For example, with Offset, you can control the size of your particle collision offset when going from a macro-level shot to a micro-level shot of your particle’s collisions in a single take. Offset is 0.01 by default. See also particle in the Node and Attributes Reference.
This attribute is only available when the current particle has a collision object.
(Available when multiple UV sets are available.)
Use this drop-down list to specify which UV set is used to compute goal point positions from a particle’s collision U/V attribute values. By default, the collision object's current UV set is used. This setting persists.
The ability to explicitly specify which UV set is used for collisionU/V values is useful to lock down the UV set that will be used. When texture artists work on an object and introduce multiple UV sets, they will frequently change back and forth between sets, and leave the object's “current” UV set attribute set to different values.
For more information, see Soft bodies.
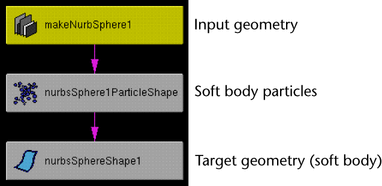
Input Geo Space
This attribute lets you choose which coordinate space Maya uses to position point data provided by the input geometry to the particle shape. The original geometry is the geometry being converted to a soft body. The input geometry refers to the node in Maya that creates the original geometry. An example of input geometry for a NURBS sphere is the Make Sphere node:
Provides the point positioning data from the particle object’s local space. The point positioning data from the geometry are transformed into world space as above, then into the particle object’s local space using the inverse of the particle object’s world space transformation. This puts the points in the same space as the particle object’s position attribute.
Target Geo Space
This attribute lets you choose the coordinate space Maya uses to position point data provided by the particle shape to the target geometry.
Takes positions from the particle object’s position attribute and transforms them into the target geometry’s local space. It uses both the particle object’s world space transformation and the target geometry’s inverse world space transformation before setting them into the target geometry. Wherever the particle object or target geometry is transformed in the scene, the points in the target geometry will have the same world space positions as the particles.
If this attribute is turned on and you change the original geometry’s construction history in a way that alters the number of CVs, vertices, or lattice points, Maya updates the corresponding number of particles of the soft body.
For example, if you add spans or sections to a NURBS surface soft body, Maya adds CVs to the surface and corresponding particles to the soft body. The updating of particles ensures the soft body deforms correctly according to the new points added or removed.
In some instances, you won’t want this updating to occur. For instance, if you connect a soft body’s particles to an emitter, you can emit the soft body into view.
Makes the goal active. You must first create a goal object ( Particles > Goal) to see this and the rest of the goal weight attributes.
When the particle system is being attracted to goal objects, these attributes are filled with data about the specific point on each goal object to which each particle is being attracted. You can view this information in the Particles tab of the Component Editor.
For the remaining attributes in this section, click the Create button to create them. The button changes to Delete. Then click Delete to delete.
Provides per-particle goal weights for the Nth goal object. Goal objects are numbered according to their indices in the particle system's sparse goalGeometry array. This ensures that per-particle goal weights will be preserved while goal objects are being added to and removed from the particle system.
If no per-particle goal weight is found for a particular goal object, then the standard goal weight value for that object (specified by the slider next to the object's name in the particle Attribute Editor) is applied to all particles. The dynamically generated goalPP attribute then acts as a weighting factor for the sum of all goal forces acting on each particle.
Instancer (Geometry Replacement)
When on, this expands the list of attributes you can choose as input to the options in the following pages. The expanded list includes attributes whose data type differs from the option’s data type.
If the data type of an input attribute differs from the receiving option, Maya converts the data type to the receiving option’s data type. (See Expressions for details on data types.) For example, if you select an integer attribute as input to a vector array option, Maya uses the integer value in each of the three vector components for each element of the array.
When Allow All Data Types is off, only attributes whose data type is the same as the receiving option’s are included as possible selections.
Position of the instanced objects. The default setting is worldPosition. Maya interprets the values of the selected attribute in the local space of the Instancer node, not in world space. So if you move the Instancer node, you move the instances also.
If you are an API developer, note that you can write an API to send point data to the Instancer.
If you set the Cycle option of the Instancer to None, this option sets which object from the Instanced Objects list is instanced for each particle. If you set Cycle to Sequence, ObjectIndex is ignored.
There are a few common techniques for using this option. In each case you select a custom attribute as input to ObjectIndex, then write expressions to control the attribute.
One technique is to use a creation expression to assign different values for each particle to the custom attribute. Each value selects a different object in the Instanced Objects list. The value 0 selects the first object in the list, 1 selects the second, 2 selects the third, and so on.
Another expression-writing technique is to assign specific numbers from the Instanced Objects list or use a random number function such as rand( ) to assign each particle a different random object from the list.
You can alternatively use a creation expression and runtime expression to increment a custom attribute through an unusual object sequence, for instance, 2-4-6-8.
The default setting is None, which sets the value to 0, the first object on the list.
For the instanced objects, you can choose one of three methods to set their orientation: Rotation, AimDirection, and AimPosition. Though typically you’ll select the same method for all instanced objects, you can select a different method for each object by using a per particle expression to set the RotationType attribute.
To set the RotationType attribute, use a value of 0 for Rotation, 1 for AimDirection, or 2 for AimPosition.
If you don’t provide a number, Maya uses whichever of the Rotation, AimDirection, and AimPosition options that has an attribute input selected. For instance, if you select an attribute input for AimPosition, Maya uses AimPosition as the default.
If you select an attribute input for two or three of the RotationTypes, Maya uses the first from this list: Rotation, AimDirection, and AimPosition. For instance, if you select an input to both AimPosition and AimDirection, Maya uses AimDirection. If you select an input to Rotation, AimPosition, and AimDirection, Maya uses Rotation.
If you select no attribute inputs to Rotation, AimPosition, and AimDirection, Maya uses Rotation.
Sets the orientation of the instanced objects by specifying the direction along which each instanced object points relative to the original position of its local origin. The default setting is None, which uses the value of 1, 0, 0. Also see RotationType.
Note that you can make an object point in the direction the particles are moving by selecting velocity. See Aim instanced geometry for more information.
Specifies the object axis that points up (as much as possible) relative to how the AimAxis points at the AimDirection or AimPosition.
In this context, up is the direction the world up-axis points (see AimWorldUp). AimUpAxis is a vector attribute that works only with AimDirection and AimPosition rotation types. The default setting is None, which uses the value of 0, 1, 0.
For example, suppose the AimPosition is set to the origin of the workspace, and the world space Y-axis (0, 1, 0) is the AimWorldUp value. An instanced object’s X-axis (1, 0, 0) is the AimAxis value, and the object’s Y-axis (0, 1, 0) is the AimUpAxis value. As the instanced object moves from left to right in the workspace, the object has the following orientation:
The object’s X-axis points directly at the origin wherever the object moves in the workspace. The object is rolled around its X-axis as necessary to keep its Y-axis aiming up as much as possible. Up is defined by the AimWorldUp setting, which in this case is set to the world’s Y-axis.
Sets, in world coordinates, the axis that indicates the up direction used by the AimUpAxis. AimWorldUp is a vector attribute that works only with AimDirection and AimPosition rotation types. The default setting is None, which uses the value of 0, 1, 0. This attribute is unaffected by the setting for the World Coordinate System’s Up Axis found in the Window > Settings/Preferences > Preferences window, in the Settings section.
If you set the Cycle option of the Instancer to Sequence, CycleStartObject specifies the cycle’s starting object from the Instanced Objects list. For example, suppose the list has four objects. If the attribute that provides input to CycleStartObject is set to 3 for each particle, each particle cycles through objects 3-0-1-2 repeatedly. The default value is 0.
If you set the Cycle option of the Instancer to Sequence, Age works with the Instancer’s Cycle Step setting to set how often Maya changes from one object to another.
For example, you can create an attribute named myAge, select it as input to the Age option, then write a runtime expression to control myAge as follows:
This causes the particle with particleId 1 to cycle through the objects twice as quickly as particleId 0. The particle with particleId 2 cycles four times as fast as particleId 0.
For details on working with this option, see Work with emission randomness.
Click the Current Render Type button to display additional attributes for the particle type that you have chosen. See Add Attributes For Current Render Type button for more information.
Per Particle (Array) Attributes
Details on particle expressions can be found in the MEL and Expressions book.
These attributes are present only when a clip effect (such as Fireworks) is being created or modified.
For information on the ghosting attributes, see the Ghost Selected options window section of the Animation guide.


