


Instance geometry to particles
(single and animated)
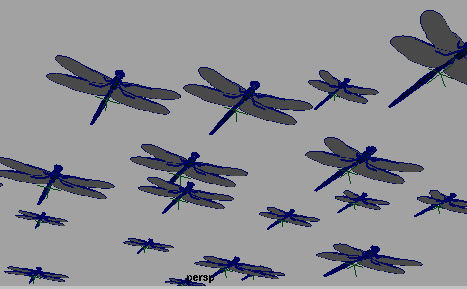
Maya’s particle instancing feature saves you time when you need to animate many identical objects in a scene. For example, suppose you want to create a group of flying bugs where only the placement and orientation of the bugs differ. With Maya, you can animate a single bug, then create instances of the bugs that move with the position and orientation of animated particles.
The instances are not copies. They are references to the original object. Any changes you make to the original object changes the instanced objects. You can control the motion of the individual instanced objects by animating the per particle attributes that control them.
The instanced geometry object, called the source geometry, can be:
You can use object hierarchies instead of individual objects as the source geometry. Do not instance lights; they’ll have no effect in rendering.
You can instance a single object to a particle shape or a sequence of objects to a particle shape.
Before creating the instance, you create the source geometry and apply shading groups to it. You can animate the source geometry and the particles either before or after instancing, and you can place the source geometry anywhere in the workspace. You can optionally hide it as described in the procedure. You cannot control the color of the instanced geometry on a per particle basis.
To instance a single object to particles
To instance a sequence of objects to particles
 .
.
The Particle Instancer Options window appears. The selected source geometry is listed in the Instanced Objects list.
To instance a sequence of objects, list the objects in the order you want them to appear in the sequence.
Use the Move Up and Move Down buttons to change the order of the objects. Use Add Selection if you want to add selected objects to the list. Use Remove Items to remove objects from the list.
For example, suppose you create four birds in different flapping positions:
An appropriate ordering for the objects in the Instanced Objects list is:
0: birdWingsHigh 1: birdWingsMid 2: birdWingsLow 3: birdWingsMidCopy
The number to the left of the object indicates the sequence position. The 0 indicates the first object in the sequence.
Note that you can use emitted particles as the animated particles. When the particles emit, the instanced geometry appears with the particles.
Maya creates an instancer node that controls the instanced objects. This node is where you can alter the attribute settings you made in the Particle Instancer Options window.
You might also choose to hide the particle object being instanced. The instancer doesn’t make the particles invisible. Note, however, that you don’t need to hide the particles if you will software render the animation. Particles don’t appear in software rendered images.
The following general procedure is a way to aim instanced geometry.
For example, set AimDirection to Velocity to aim the instanced objects in the direction of movement. See particleShape node for information.
The choices in the General Options popup menus include all the per particle attributes. You can control the motion of the individual instanced objects by animating the per particle attributes that control them.
Command-line instancing limitations
The runup command may fail to create instanced geometry when rendering arbitrary frames in an animation. Adding a currentTime setting before the runup creates the instanced geometry properly; that is, if something like runup -mxf 60; does not create the proper results when rendering with instanced geometry, use:
currentTime -e 1;
runup -mxf 60;