View > Camera settings
If on, the camera is a perspective camera. For more information on perspective cameras, see Maya camera types.
If on, all camera movements, such as tumble, track, and zoom, are written to the Script Editor (MEL journal) which lets you undo or redo camera movements or copy camera movements to use them for other cameras or scenes.
Undoable Movements is off by default, but you can still use [ and ] to undo and redo camera moves.
Turns off the Film Gate and Resolution Gate display.
Displays no frustum (viewable volume) when not you are not looking through the camera. This is the default.
The frustum is the area or space the camera can see. Any object within the camera’s frustum shows up in images rendered from that camera’s view. See Clipping planes for an diagram of the frustum.
Displays a border indicating the area of the camera’s view a real-world camera records on film. The dimensions of the film gate represent the dimensions of the camera aperture.
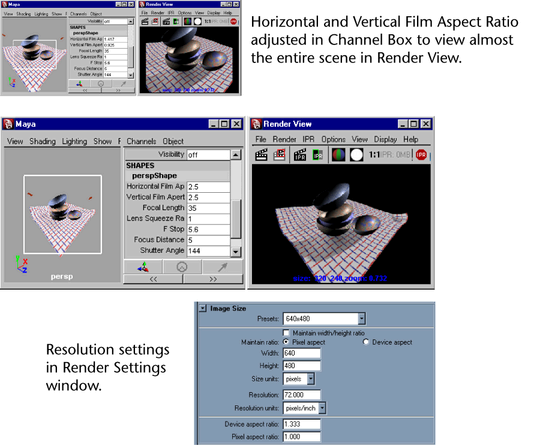
The film gate does not represent the render region. You can customize the render region using the Camera Aperture and Film Fit attributes in the camera Attribute Editor. You can also set the rendering resolution using the Image Size options in the Render Settings window, and choose to lock the Device aspect ratio, or set the Device aspect ratio attribute.
The film gate view guide indicates the area of the camera’s view that renders only if the aspect ratios of the camera aperture and rendering resolution are the same.
Displays the viewable frustum according to the film back size. The aspect ratio of the window (or rendering resolution) determines what you actually see. Also sets the camera Overscan attribute to 1.5. The following illustration shows the film gate representing the maximum viewable (or renderable) area.

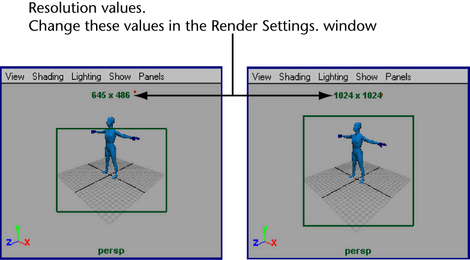
The dimensions of the Resolution Gate represent the rendering resolution (the region to be rendered). The rendering resolution values are displayed above the Resolution Gate in the view. You can change these dimensions in the Image Size section of the Render Settings window.
Enabling this option displays the renderable area for the current resolution specified in Render Settings window. This often specifies a more exact rendered image than the Film Gate option. Also sets the camera Overscan attribute to 2.0, so that more area outside the specified resolution can be viewed.
Turn this option on to display a box defining the region that you should keep all of your scene’s action within if you plan to display the rendered images on a television screen.
For more information on Safe Action, see Safe display regions for TV production.
Turn this option on to display a box defining the region that you should keep all of your scene’s text (titles) within if you plan to display the rendered images on a television screen.
Render Resolution must be set to NTSC or PAL dimensions for this option to be meaningful.
For more information on Safe Title, see Safe display regions for TV production.
Fill, Horizontal, Vertical, Overscan (for advanced users)
The following options control the size of the Resolution Gate relative to the Film Gate. If the resolution gate and the film gate have the same aspect ratio, these settings have no effect. The default setting is Fill.