User Guide > Rendering and Render Setup > Rendering > Rendering Windows and Editors > Render Settings >
Render Settings: mental
ray tabs

For information on other render settings, see Render Settings window.
The mental ray tabs consists of five tabs: Passes tab, Features tab, Quality tab, Indirect Lighting tab, and Options tab.

Use this tab to do the following:
Render Passes
Use the  and
and  buttons
to add a new render pass or a new render pass set to the current
layer.
buttons
to add a new render pass or a new render pass set to the current
layer.
Click to open the Create Render Passes window. See Create Render Passes window for more information.


Lists all the render passes and render pass sets that are available to be assigned to the current layer. After a render pass or render pass set is assigned to the render layer, it no longer belongs to the Scene Passes list. In other words, this list shows only passes that not assigned to the current render layer.
Use this section to manage the render passes for each pass contribution map. Select the pass contribution map that you want to manage from the drop-down list. See Render Layer Editor and Render pass contribution mapsfor more information regarding pass contribution maps.


Toxik
Use this section for Toxik pre-compositing. Each render layer can have an optional toxik pre-compositing template file associated with it. This pre-compositing file (enter a file path and file name) is used when Render > Export Pre-Compositing is selected. If this field is left empty, a Toxik composite is constructed without a template and provides only the passes that have been rendered. The user must then wire the render passes to create a composite. A default template is provided which covers all render passes available in Maya. See Exporting the multi-render passes for compositing in Toxikfor more information.
Render Mode
Select one of the following options:
Performs final gather computation only. Use this mode to create or update an final gather map file associated with the render layer. It can also be used to create a final gather map file for each frame or for specific frames. Once the final gather map has been created, the user can switch back to Normal mode, and reuse the pre-computed final gather map files for final gather rendering.
Each light can, optionally, enable shadow maps (normal or detailed). During a normal render, shadow maps are computed "on demand" for the portion of the shadow map required. The Shadow Map Only mode is designed to pre-compute shadow map files without triggering any other rendering process. This can greatly help rendering speed since the pre-computed shadow maps can be used by several other machines on the render farm. A shadow map is dependent on light position and object position; if any of these elements are to be moved, the shadow map is most likely to require a recomputation. This mode does not detect which lights needs to be updated, but instead systematically re-computes all lights with shadow map statements.
Light maps are used for two purposes: custom baking (requires a special shading network for each object) and for subsurface scattering. The Light Map Only mode is most useful for forcing all lights maps to be computed without triggering any other rendering process. By doing so, this mode allows you to precompute light map based shading such as sub-surface scattering. The user can precompute all light maps and subsurface scattering maps as pre-render passes. Rendering on the farm is therefore much more efficient, since the sub-surface scattering maps have already been computed.
Primary Renderer
Select one of the following options:
A substantially faster motion blur algorithm alternative. Formerly named Rapid Scanline.
The rasterizer offers a much greater control over rendering quality without impacting rendering times. For example, if you render using scanline rendering with the Min Sample Level and Max Sample Level set to 0 and 1, then, if there are artifacts due to bad aliasing, you would increase the min and max sample level to 1 and 2. Doing so quadruples the number of samples in each pixel. The rasterizer has greater control over quality. It increases quality without systematically quadrupling rendering time; instead rendering time increases linearly.
Turn off the scanline renderer and force mental ray to use raytracing for the primary rays.
Secondary Effects
Select one of the following options:
Turns importons on or off. Importons can be used when raytracing is enabled and in combination with global illumination, caustics and irradiance particles. See Importonsfor more information regarding importons.
Turns ambient occlusion on or off.
Turn these options off, to globally disable the following features in your scene:
Enables pre-computation of displacement maps to find optimal bounding boxes.
Quality Presets
When you select a Preset here, settings in the applicable sections in the mental ray tabs are automatically set (for example, Preview: Global Illumination turns on Global Illumination and sets other defaults in the Caustics and Global Illumination section).
Use these settings as a starting point for rendering your image at a given quality and with a certain effect.
Controls how mental ray for Maya anti-aliases objects during rendering.
For more information about anti-aliasing and image quality, see Anti-aliasing and flicker.
Sampling Mode
Select one of the following options:
The number of samples used per pixel varies depending on the contrast of your scene.
Custom Sampling allows you to tune the Min Sample Level and Max Sample Level independently, while retaining true adaptive sampling (unless the min and max sample level are set to the same value). Custom Sampling also allows you to set the min and max sample level to greater than two. In general, the min and max sample level should not differ by more than 3.
This is the guaranteed minimum number of samples per pixel used when processing an image. Based on Anti-aliasing Contrast settings, mental ray for Maya will increase these samples as needed.
You can enter a negative value for this field. Instead of super sampling, infra-sampling is performed, where 1 pixel is sampled for each N pixels, depending on your Min Sample Level.
Shows how spatial supersamples were placed in the rendered image, by producing a grayscale image signifying sample density. This is useful when tuning the level and the contrast threshold for spatial supersampling. More diagnostic attributes are available in the Diagnostics section under the Options tab.
Use the slider to set your contrast threshold. Lowering this value increases sampling (up to the Max Sample Level), which results in higher quality but longer processing time. Depending on the actual contrast of the image, you may not be able to get better results (that is, results are limited by the amount of contrast).
Filter
This is processing performed on the results of the sampling to blend pixels into a coherent entity. Black and white = noisy. Filtering looks at neighboring info and unifies the two.
It is better to apply filtering in the renderer, since there is more information (samples) to work with and filtering can offer better control when applied to samples than as a post-process and applied to pixels.
More processor intensive than box, but offers even better results. Samples at the center of the pixel will have the highest contribution weight. As samples move further away from the center of the pixel, their contribution weight fall off linearly. This causes samples and details at the center of the pixel to be more "present" in the final computed pixel in the framebuffer.
Produces the best results, but is the slowest to render. Gauss uses a curved fall-off for sample contributions. Almost all samples at the center of the pixel have virtually the same contribution weight, but rapidly falloff (smooth). Gauss requires a minimum filter size of 3 and this filter mode is know to make the images more blurry.
Mitchell (clip) and Lanczos (clip) are alternatives to Gaussian that offers slight variations in contrast (tends to increase). Mitchell increases less than Lanczos.
Because “plain” Lanczos and Mitchell may produce negative values the new filter types are “clipped” variants to ensure positive values. The filtered result samples are clipped to the min/max range of input samples. The final pixel in the image will therefore not contain any out-of-range values _produced by the filter_, as might be the case for regular Mitchell and Lanczos filters.
These filters tends to sharpen the final computed pixels. Therefore, if you want to enhance the image details, choose Mitchell and Lanczos as your filter method.
Controls the filter size used to interpolate each pixel in the rendered image. The larger the value, the more info from neighboring pixels. The larger the value, the more the image is blurred. The value should be at least 1,1.
Filter size and filter mode are disabled whenever the Min Sample Level and Max Sample Level settings are below -1 0. mental ray for Maya does not filter when rendering using a Min Sample Level and Max Sample Level below these threshold values.
Locks the location in which you sample within pixels. When turned on, this option ensures that the sub-pixel samples occur at the same location within in each pixel, which is important to help eliminate noise and flickering results. Turn it off only if you get sampling problems, such as moire patterns.
Select raytracing as the secondary renderer so that, when the primary renderer (scanline or rasterizeror raytracing) detects that refractions or reflections are needed, it will switch to raytracing only mode. Raytracing can produce the most physically accurate reflections, refractions, shadows, global illumination, caustics and final gather.
The maximum number of times a ray can be reflected off reflective surfaces.
See also Max Trace Depth.
While the Reflections setting and Refractions setting each set the maximum number of times a ray can reflect or refract (respectively), this setting sets total number of penetrations that can occur regardless of whether the penetration is a result of reflection or refraction. For example, if reflections = 5, refractions = 5, but max depth trace = 4, then any combination of reflection and refraction bounces can take place, up to a maximum of 4.
The maximum number of times a shadow ray will penetrate a transparent or refracting object.
Consider, as an example, a glass sphere and a metal sphere. The shadow of the glass sphere is not as dark as the shadow of the metal sphere because some light passes through the glass sphere.
In mental ray, this model is represented by a shadow ray penetrating the glass sphere. The shadow ray only stops when one of the following is reached: 1) all light is blocked, 2) the number of times that the ray has penetrated the sphere is equal to the value of this attribute.
Acceleration Method
Select one of the following options:
This is the default. BSP2 stands for Binary Space Partition, second generation. It enables a new BSP raytracing acceleration designed to cope with large scenes. BSP2 does not need to adjust any attributes like the old generation BSP and Large BSP, which frees the user from the tedious tuning required to achieve optimal rendering performance. BSP2 can be used whenever instances are heavily used in a scene. If you choose the grid acceleration method, which is no longer exposed in mental ray for Maya but is still accessible from the mental ray standalone command line, mental ray defaults back to BSP2 internally.
Shows the cost of creating and traversing the BSP tree used for raytracing. Both the depth and the leaf size can be visualized. If the diagnostic image shows that mental ray has been operating near the limit in large parts of the image (indicated by red or white pixels), this helps tuning the BSP parameters in the options block.
If set to a positive value, then the transparency compositing for the rasterizer ends at the specified depth. This can be used to tune performance for scenes where it is known that the main color information is provided by the first few depth layers.
It also allows you to limit the amount of hair/fur being rendered. You should exercise caution as you lower the transparency depth, since it is possible for the final pixel intensity to shift as less surfaces are contributing to the final pixel.
Shadow Method
Select one of the following options:
Enables simple shadows, which are standard for the provided libraries. This is the most efficient of the three shadow modes.
If shadows overlap because multiple objects obscure the light source, the order in which these objects are considered (and their shadow shaders are called) is undefined. If one object completely obscures the light, no other obscuring objects are considered.
Similar to Simple, it ensures that the shadow shaders of obscuring objects are called in the correct order, object closest to the illuminated point first. This mode is slightly slower but allows custom shadow shaders to record information about obscuring objects. If no such custom shader is used, this mode offers no advantage over simple shadow on.
Like Sorted, the shadow shaders are called in order. Shadow rays are traced much like regular rays, passing from one obscuring object to the next, from the light source to the illuminated point; each such ray is a shadow segment.
Use this mode if you want volume effects (like fluids, particles, fur and smoke) to cast shadows.
This mode requires support from the shadow shader, which must use the mi_trace_shadow_seg function to cast the next shadow ray segment.
For more information about the mi_trace_shadow_seg node, see the mental ray Shaders Guide in the Maya Help.
You can reduce the rendering time required for your scene by linking lights with surfaces so that only the specified surfaces are included in the calculation of shadows (shadow linking) or illumination (light linking) by a given light.
Use the drop-down list to select one of the three choices available with this option:
The shadows in your scene can obey only one of light linking or shadow linking and not both. Therefore, you must decide whether to incorporate light linking or shadow linking in your scene and make your selection from the drop-down list accordingly.
You can also render part of your scene using the default settings (instead of obeying the links that you have created). Select Off so that all links that you have established using shadow linking or light linking are ignored.
The default is set to Obeys Light Linking.
See Shadow linking for more information regarding shadow linking. See Light linking for more information regarding light linking.
Format
Select one of the following options:
Causes mental ray for Maya to use OpenGL acceleration (if available with your graphics hardware) when rendering shadow maps.
The same limitations apply as mentioned with the Scanlineoption. Shadow maps rendered with this option contain slightly different information from those generated with the regular (On) algorithm, and the soft areas of shadows tend to be smaller. Some areas may incorrectly be determined to not be in shadow.
When OpenGL rendering of shadow maps is enabled, only the local workstation (master) participates since the computation cost of the map is so small that the networking overhead would be more costly.
The Detail shadow map option is a combination of features from regular shadow maps and raytraced shadows, meaning that it collects more information about shadow-casting objects.
Unlike the regular shadow map, a detail shadow map also takes into account surface and lighting properties, such as transparency. Detail shadow maps store a list of depth values together with the light transmission coefficients at each depth. This provides similar quality shadows as raytraced shadows, but at processing times similar to depth map shadows.
Detail shadow maps may require more time to calculate because they compute and store more per-pixel information.
Rebuild Mode
Determines whether all shadow maps are recomputed.
Specifies that shadow maps should be loaded from files, if available. The default shadow map calculations are still performed and the existing points are overwritten by the recomputed points, but only if the new points are closer to the light source.
This option is useful for building shadow maps for use in multi-pass rendering because it allows shadow maps from a previous render pass to be reused for the current pass. Only shadow map changes are recalculated, not the entire shadow map.
See also mental ray for Maya motion blur.
Motion Blur
Select one of the following options:
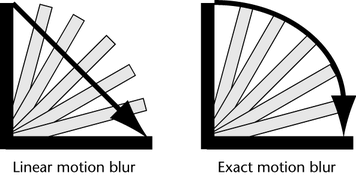
Full is slower to render, but gives true (that is, exact) motion blur results. Each deformed surface is being translated "per vertex", instead of per object transform. Select this method for motion blur of objects being deformed by animation, such as jiggling arms and jello-like motions, where the vertices are moving and jiggling as the animation occurs.
Defines the point in time at which the shutter opens and closes within the frame interval to control motion blurring.
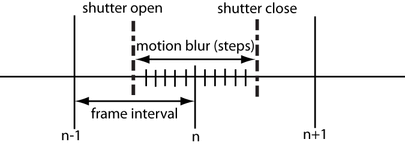
The defaults for Shutter Open and Shutter Close are 0.0 and 1.0, respectively. If the values for Shutter Open and Shutter Close are equal, motion blurring is disabled; if Shutter Close is greater than Shutter Open, motion blurring is enabled. The normal range is (0, 1), which uses the full length of the motion vectors or motion vector paths. It can be useful to set both to 0.5, which disables motion blurring but renders with an offset of one half frame, which allows bidirectional post-blurring in an output shader.
See also mental ray for Maya motion blur.
Controls the fine displacement quality according to the amount of visual motion. Allows a reduction in tesselation density as objects move faster. This option is compatible with all renderer types: raytracing, scanline and rasterizer. For moving polygonal objects with displacement, this attribute automatically controls the quality of displacement according to the amount of visual motion.
For fast moving objects, images with comparable visual quality may require fewer displacement tessellation details as compared to static or slow moving objects. Although it is also possible to tweak displacement approximation on a per-object basis, this process is tedious and is rarely done in practice. Per-object granularity may also not be fine enough to accommodate objects with different amount of motion in different parts.
This attribute provides an automatic way of adjusting the displacement quality according to the amount of motion for a given object part. For view-dependent fine poly displacement, the adaptive subdivision checks for the motion length in screen space. The measured motion length is used to modify the use of the approximation constant. Geometry is reduced only in the areas of the object with strong motion.
This attribute modifies the amount of geometry reduction as compared to the static case. A value of 0 disables the feature. 1 is the default and higher values provide more reduction. The simplification of geometry has an effect on motion of approximately 16 pixels. For slower motion, higher values should be used. For example, the factor value of 8 reduces geometry in areas with objects moving at the speed of 2 pixels per frame.
When you use the rasterizer with motion blur, you must decide between using higher values, which yield better quality, and lower values, which yield a faster render. Setting this attribute to values larger than 0.0 automatically lowers shading samples for fast-moving objects, at a rate proportional to the magnitude of the setting and the speed of the instance in screen-space. You should exercise caution when tuning this value, but 1.0 (the default) provides a good starting point. A value of 0.0 disables the setting.
See also diagram in Shutter Open, Shutter Close.
If motion blurring is enabled, mental ray can create motion paths from motion transforms, much like multiple motion vectors on vertices can create motion paths.
This option specifies how many motion path segments should be created for all motion transforms in the scene. The number must be in the range 1 to 15. The default is 1.
Primary control for the quality of motion blur. This attribute defines the number of temporal shading samples per spatial sample. Increasing the number of samples gives better quality of motion blur. However, increasing the number of samples also increases rendering times.
Spatial samples are samples taken from the perspective of the xy plane of the image. For still images, spatial samples are affected by the Anti-Aliasing Quality controls. At each spatial sample location, mental ray can take a number of temporal samples. Temporal samples are samples that are taken at different times between shutter open and close and add an extra dimension, time, to the x and y dimensions of spatial samples. Each spatial sample at location x,y is a combination of multiple temporal samples, each taken at a different time.
Select the kind of information the framebuffer contains.
Each image file format supports one or more data types. In addition, each file format is associated with a default data type. If you select a data type that is not supported by the file format that you have chosen, then mental ray for Maya will use the default data type associated with the file format instead. For example, if you have chosen to save the image as a tif file, but you have selected RGBA (Half) 4x16 Bit as your data type, then mental ray for Maya will render as an 8-bit RGBA (the default data type) instead, since RGBA (Half) 4x16 Bit is not supported by the tif format. For a list of data types supported by each file format, refer to the mental ray documentation.
Use this setting to apply gamma correction to rendered color pixels to compensate for output devices with a nonlinear color response. Inverse gamma is applied to textures as well. The reverse correction is applied to all quantized texture images.
All R, G, B, and alpha component values are raised to 1overgamma_factor. The default gamma factor is 1.0, which turns gamma correction off.
Colorclip
Controls how colors are clipped into a valid range [0, 1] before being written to a non-floating point frame buffer or file.
In all modes, the RGB components are clipped as specified by the desaturate option. The RGB and alpha modes ensure that the resulting color is a valid premultiplied color.
Clipping occurs only in 8-bit integer and 16-bit integer frame buffers. if you are using float and half-float, no clipping occurs.
This option causes mental ray for Maya to interpolate sample values between two known pixel sample values. If interpolation is turned off, the last sample value in each pixel is stored, and pixels without samples get a copy of a neighboring pixel. When this option is turned on, the resulting image has a higher quality, but takes more time to process.
If a color is output to a frame buffer that does not have 32-bit (floating-point) and half-float (16-bit float) precision, and its RGB components are outside the range [0, max], mental ray clips the color to this legal range.
If desaturation is turned off (on by default), the individual components are simply clipped into range. Otherwise, mental ray tries to maintain the brightness of the color by moving it towards the grayscale axis of the color cube, until the RGB components are in the legal range. The max is determined by the colorclip mode.
If this option is on (default), premultiplication takes place (see Premultiplied images).
If on, mental ray for Maya renders objects so that they are not anti-aliased against the background. For example, a pixel on the edge of an object is not mixed with the background color. (In TIFF terms, Maya generates unassociated alpha.)
The premultiply off option instructs mental ray to always store colors unpremultiplied into frame buffers and files. When this option is off, mental ray does not premultiply the textures or the output frame buffers. This option is ignored if the colorclip raw mode is in effect.
mental ray for Maya supports 8, 16, or 32 bits per color component. In some cases, 8 bits per pixel, as supported by all popular picture file formats, can cause visible banding when the floating-point color values calculated by the material shader are quantized to the 8-bit values used in the picture file. Dithering mitigates the problem by introducing noise into the pixel such that the round-off errors are evened out. Note that this can cause run-length encoded picture files to be larger than without dithering. Dithering is turned off by default.
When using the rasterizer, enabling this setting enforces transparency/opacity compositing to be performed on all color user framebuffers (in other words, non-primary color buffers) regardless of the individual setting on the framebuffer. By default, only the primary color frame buffer and explicitly marked user buffers are considered for rasterizer compositing. This option may be used in combination with the user framebuffer interface in Maya 2008 or below.
You must enable this option to ensure that the rasterizer renders passes that are identical to those rendered using raytracing/scanline (primary renderer).
Use in conjunction with the multi-render passes feature. See Multi-render passesfor more information.
Occasionally, you may notice aliasing on the edges of your render passes that does not exist in your overall beauty pass. Mental Ray's adaptive sampling algorithm analyzes the local contrast in the rendered image to determine whether or not a given image region requires finer sampling. This is a performance optimization technique that allows mental ray to sample the image more coarsely in regions of uniform color, and finely in areas that contain detail, such as object edges and intricate textures. Therefore, this algorithm may yield aliasing in render passes that contain high contrast detail in areas where the master beauty pass is smooth. Enable this option so that the adaptive sampling algorithm analyzes the contrast in all color frame buffers being rendered, rather than for just the master beauty pass.
The render may be faster when the option is turned off, at the risk of compromising image quality when the multi-render pass workflow is used.
When you click the Create button, a new IBL node is created, replacing any currently connected node. (Though multiple IBL environments can exist in a scene, only one can be used at a time.)
For more information, see Image-based lighting (sky-like illumination) and also Render infinitely distant (sky-like) illumination and reflection in the Lighting guide.
For descriptions of the attributes in the IBL node, see Image based lighting node attributes in the Lighting guide.
When you click the Create button, a network containing the mia_physicalsky, mia physicalsun, mia_exposure_simple and directionalLight is created. Maya automatically connects all the necessary attributes from the four nodes for you. This network is connected to all existing renderable cameras.
The Attribute Editor for the mia_physicalsky shader also contains two buttons that allow you to edit your camera connections. Choose between Update Camera Connections and Remove Camera Connections.
For more information, see Simulating the sun and sky and Adding sun and sky to your scene of the Lighting guide.
Controls the maximum distance at which mental ray for Maya considers photons for global illumination. When left at 0 (the default), mental ray for Maya calculates an appropriate amount of radius, based on the bounding box size of the scene. If the result is too noisy, increasing this value (to 1 to start, then by small increments up to 2) decreases noise but gives a more blurry result. To reduce the blur, you must increase the number of global illumination photons (Global illumination Accuracy) emitted by the light source.
Controls the maximum distance at which mental ray for Maya considers photons for caustics. When left at 0 (the default), mental ray for Maya calculates an appropriate amount of radius, based on the bounding box size of the scene. If the result is too noisy, increasing this value (to 1 to start, then by small increments up to 2) decreases noise but gives a more blurry result. To reduce the blur, you must increase the number of caustic photons (Accuracy) emitted by the light source.
Use this to limit the number of times a photon will reflect in a scene (after the first bounce, which is taken care of by direct illumination). It works in conjunction with Max Photon Depth.
Use this to limit the number of times a photon will refract in a scene (after the first bounce, which is taken care of by direct illumination). It works in conjunction with Max Photon Depth.
Use this to limit the number of times a photon will bounce around (reflect or refract) after the first bounce (which is taken care of by direct illumination) in a scene.
Default is 5, but correct value depends on how many surfaces the photon must go through or bounce off of before hitting a diffuse surface to stop. For example, if a photon goes through 6 transparent surfaces, the default 5 would produce incorrect results. After the depth trace limit has been met, photons are not re-emitted and instead are absorbed.
If a filename is specified for the photon map (in Photon Map File), the map is loaded and used (providing the file exists). If this option is turned on, any existing file will be ignored, and the photon map will be recomputed and an existing file will be overwritten. The default is off. In other words, if you want to build a map, turn this option on; if not, turn this option off and specify the file to be used in Photon Map File.
Causes Maya to create a visualization of stored photon and final gather maps. The visualization appears in the scene view immediately after rendering is complete. See Final Gathering Map.
This should be turned ON if you use transparent shadows with Global illumination and, or caustics.
The attribute does not affect performance if the scene does not use any shadow effects (for example, material shaders setting shadow attenuation).
By default, mental ray automatically detects if additional shadow shaders should be exported to render shadow effects such as attenuation and colored shadows.
For global illumination, this procedure is disabled by default, since shadowing should already result from indirect lighting and caustics with photons. But the shadow attenuation effect through transparent objects is not easily achievable with global illumination.
This option enables shadow effects detection, and produces shadow effects from direct lights in addition to indirect shadowing from photons.
Enable this option to turn on importon emission.Importons are particles similar to photons. However, they are shot from the camera and traverse the scene in the opposite order. Instead of energy, they hold a quality which is an importance of the contribution to the final image. The information from importons is used by the kernel for distribution of rendering efforts according to the final contribution to the rendered image, in other words, importance-driven sampling. Importons are thus a foundation for new view-dependent indirect illumination techniques.
Enable this attribute so that importons are not blocked by even completely opaque geometry. Instead, they are stored for all intersections with geometry on the ray from the camera to infinity. This leads to a significantly higher number of importons stored in the scene. However, it removes the discontinuity in the distribution of the importons originated from the visibility to the camera function.
Use this to turn Final Gathering for global illumination on or off. The default is off. Final gathering is a different means of calculating indirect illumination. For more information, see Final gather in the Lighting guide.
Controls how many rays are shot in each final gathering step to compute the indirect illumination. The default is 100 per sample point. Higher values are required for final renders. Increasing the value reduces noise but also increases the rendering time.
You can see, in the Output window, when this happens:
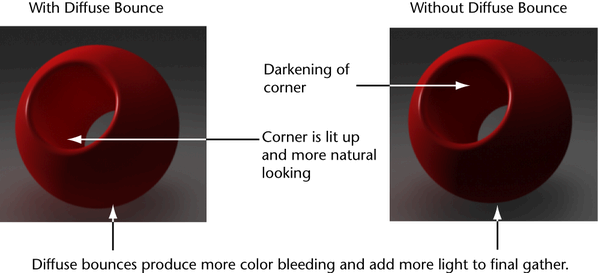
Use this attribute to set multiple diffuse bounces for final gathering. This option controls whether indirect diffuse lighting contributes to final gather, up to a sum of the Final Gather Reflection and Final Gather Refraction values. Use this attribute to add more light and color bleeding to your final gather results. Also, use this option to prevent unnatural darkening of corners in your scene. The higher the value, the longer the final gather computation process.
Rebuild
If this is on (default), any previously generated Final Gather file is ignored and all final gather points are recomputed. See Primary Final Gather Filefor more information about the file.
If this file is off, Final Gather is forced to use the results from a previous Final Gather render. Existing final gather points are not recalculated, and any new final gather points are appended to the existing file.
The Freeze option stops any new data from being written to the final gather file. It is useful to reduce light flickering in your animation. See Troubleshoot final gather causes flicker.
This is the file that stores the Final Gather results that mental ray for Maya can use for irradiance lookups. You can reuse Final Gather results from a frame rendered earlier, or from a previous scene render:
You can provide several final gather map files as lookup map files for the rendering. You can therefore use the final gather map rendered from different cameras and combine the lookups at render time. Also, a secondary final gather map can be used to lookup final gather map files from different frames. For example, you can make the primary final gather map file lookup the final gather map file for the current frame T, and the secondary final gather map file to look up other final gather map files from other frames such as T+1 and T-1 (assuming that you have pre-generated a final gather map file using the Render Mode Final Gathering Only).
Causes Maya to create a visualization of stored photon and final gather maps. The visualization appears in the scene view immediately after rendering is complete. See Photon Map.
This option (which also turns on Final Gather) causes photon tracing to compute and store an estimate of the local irradiance at every photon location. This means that far fewer final gathering points are required because the photon map carried a good approximation of the irradiance in the scene—mental ray for Maya can estimate irradiance with a single lookup, instead of many photons. In this case, photon tracing takes longer than before and requires slightly more memory, but rendering is faster.
This option allows you to render by final gathering points in green for initial raster-space, and in red for render-time final gathering points. This is useful in fine tuning final gather settings to distinguish between view dependant and non-view dependant results to better distribute final gather points. This option is off by default.
Use this to control how Final Gather uses a speckle elimination filter to prevent samples with extreme brightness from skewing the overall energy stored in a Final Gather sampling region.
Neighboring samples are filtered so that extreme values are discarded in the filter size. By default, the filter size is 1. Setting this to 0 disables speckle elimination, which can add speckles but will better converge towards the correct total image brightness for extremely low accuracy settings. Size values greater than 1 eliminate more speckles and soften sample contrasts. Sizes greater than 4 or so are not normally useful.
Use these settings to limit the reach of indirect light for Final Gather (but not photons). If no object is found within a distance of start, the ray defaults to the environment color. Objects farther away than stop from the illuminated point will not cast light. An extra advantage is that this speeds up final gather computation, since final gather does not evaluate all visible surfaces, but only the ones visible within defined ranges.
Use this to limit the number of times subrays will reflect in a scene. It works in conjunction with Max Trace Depth.
Use this to limit the number of times subrays will refract in a scene. It works in conjunction with Max Trace Depth.
Use this option to specify the number of subrays for the final gather render. The default is 0, which means that indirect illumination computed by final gathering cannot pass through glass or bounce off mirrors, for example. A depth of 1 would allow a single refraction or reflection. Typically, a depth greater than 2 is not necessary.
Enable multi-frame final gather mode to reduce flickering in animation. The accuracy of the render may suffer in some parts of the animation because a constant number of final gather points is used for the entire animation and therefore some parts of the scene may not contain the sufficient number of points.
This option sets the final gather mode to multiframe. See Final Gathering Modes in the mental ray for Maya reference guide for more information.
Max Radius and Min Radius control the size of the sampling region within which Final Gather rays search for irradiance information from other surfaces.
With the default values, Maya calculates values that seem appropriate based on scene dimensions to speed up the render, but this calculation doesn’t allow for complex geometry. Generally, enter a value that is 10% of scene’s overall dimension for the Max Radius, then enter 10% of that for Min Radius. Make further adjustments based on scene geometry detail, how the geometry is arranged in the scene, and how the render looks. For example, use these settings to achieve better diffuse detailing in nooks and crannies in your scene.
Irradiance particles is a global illumination technique which is sometimes superior to final gather and/or photon mapping in terms of image quality, usability and performance.
Before rendering, importons are shot to the scene from the camera. Data regarding their hit positions with information on the amount of direct (and possibly indirect) illumination coming at their position (hence the name "irradiance particles") are combined into a map. One or more passes of indirect illumination can be computed.
During rendering, Irradiance Particles are used to estimate the irradiance for every shading point. If only direct illumination is collected for irradiance particles, then this is equivalent to one bounce of indirect lighting. Irradiance can also be interpolated from precomputed values at particle positions.
Irradiance Particles cannot be used in combination with global illumination and final gathering However, Irradiance Particles are compatible with caustic photons.
The number of rays shot while estimating the irradiance. This attribute is similar to the number of rays used for final gathering, but instead, it specifies the maximum number of rays and delivers better quality than final gathering does with the same number of rays. The minimum value is 2 and the default value is 256.
The number of possible passes of indirect lighting. If >0, then a sequence of passes is computed to collect the irradiance coming from multiple indirect illumination bounces and irradiance Particles would have both direct illumination and indirect illumination information. If =0, then Irradiance Particles will only have direct illumination information. The default value is 0.
Global scale factor applied to the irradiance contribution of the environment. The scaling factor is relative because it applies to the environment irradiance only. The environment irradiance can be further scaled (multiplicatively) if the user specifies a global scaling factor with the Scale option. The default value 1.
If enabled, mental ray for Maya computes the irradiance particle map even if a file with the specified name already exists. If disabled, mental ray reads the irradiance particle map from the specified file, or, it reuses the irradiance particle map that comes from the previous frame rendered.
Disabling this feature is useful for animations, which are flicker-free. However, the irradiance particle map may lose quality if the objects and camera are moving, so this is only recommended for fly-throughs. In addition, since the particle map is view dependent, inaccuracies may show up on the frame image borders. This option is enabled by default.
Specifies the map file for the irradiance particle map.
If the specified file exists, mental ray for Maya tries to read the irradiance particle map from this file (unless Rebuild is enabled). If the irradiance particle map is not successfully read from the file, mental ray for Maya computes it and saves it to a file with the given name. This behavior is consistent with the photon maps option.
Enable ambient occlusion support. Computation is performed on demand of shaders only.
Shows the cost of creating and traversing the BSP tree used for raytracing. Both the depth and the leaf size can be visualized. If the diagnostic image shows that mental ray has been operating near the limit in large parts of the image (indicated by red or white pixels), this helps tuning the BSP parameters in the options block
This option allows you to render by final gathering points in green for initial raster-space, and in red for render-time final gathering points. This is useful in fine tuning final gather settings to distinguish between view dependant and non-view dependant results to better distribute final gather points. This option is off by default.
Contains options for specifying what to include in a preview render in Render View.
Please refer to the mental ray User Manual, available from the Maya help, for more information about this setting.
This option enables a plug-in conversion procedure for previewing image tiles when the primary framebuffer type is of a type that is not supported by Maya’s Render View (for example, floating point framebuffers, or color framebuffers with components larger than 8 bit).
The conversion procedure involves the clipping and rescaling (desaturation) of colors for display. This option is on by default.
The Preview Tonemap Tiles option previews image tiles for floating-point framebuffer types where the color values exceed the typical 0-1 range (because the color values are RGB). This option is on by default.
The Tonemap Scale value is used to rescale the color data of image tiles prior to clipping. This is useful when rendering high dynamic range images. The final rendered image is not affected by this value. The default value is 1.
Specifies the maximum displacement applied to object control points in a normal direction. This provides control over the otherwise automated displacement range to better focus tessellation where most needed. Set this value if you have any displaced objects in your scene.
A Max Displace value that is too large results in a correct image, but takes more time and uses more memory. If the Max Displace value is too small, parts of the displaced object may be clipped. The default value of 0 means the setting is not active.
A warning message appears if a displacement shader returns a value greater than the Max Displace value. This can result in rendered geometry appearing clipped.
This option applies the specified Shadow Map Bias value to all light sources that do not have their own biases. This adds a slight offset to the shadow depths, resulting in a slightly shifted shadow. This option is useful in tuning shadows in specific cases, such as when rendering Fur.
The bias value should be smaller than the smallest distance between a shadow caster and a shadow receiver. However, bias values that are too small may cause self-shadowing.
Contains options for specifying the settings and items to be included when rendering a Maya scene with mental ray for Maya.
Tries to preserve the DAG hierarchy during processing. This produces additional mental ray instgroup entities. There are certain unresolved material inheritance issues in this mode, but it works well in the general case. Deeply nested DAG hierarchies may be translated much faster compared to the standard Maya iterator mode that always flattens the DAG. Default is off.
Uses the full DAG path names instead of the shortest possible name for mental ray scene entities. This is not required to generate a valid scene, but ensures reproducible names even if DAG entity names are reused in Maya. On the other hand, with deeply nested DAG hierarchy names, you may exceed the maximum supported name length in mental ray. Default is off.
Collects all file texture references in the scene first. This ensures that missing texture files are reported early in the process, but may slow down scene processing depending on the number of file textures being used. It may also write out textures references that are never used in the shading graph, because it doesn't perform a complete scene graph traversal for performance reasons. Default is on.
(Performance options are within the Translation section.)
When this option is turned on, the processing of non-animated geometry is significantly optimized because mental ray for Maya detects animated nodes prior to processing the scene. This is especially useful for scenes that contain many static objects and only a few simply animated objects. This option is on by default.
Select this option to render the proxies in your scene instead of the placeholder geometry that you used. For more information regarding render proxies, see Using render proxies in your scene.
This option enables detection and translation of motion vector segments of shape nodes, a method to render non-linear motion paths from shape animations with mental ray.
If this option is enabled, then the Motion Stepsoption triggers this number of extra evaluations of the scene at equi-distant times within the Maya shutter interval (render camera shutter * motion blur by). Any shape deformation appearing in these time steps is expressed as a motion segment vector in mental ray. The resulting motion trail when rendering with motion blur matches the actual shape animation more closely, since it approximates any non-linear movement with a set of linear segments (up to 15).
This option forces the computation of motion transform and per vertex motion vector. Normally, this is automatically done when you enable motion blur; however, if you do not want mental ray to render the motion blur effect, but you want the motion vectors and motion transforms to be available during rendering (without blurring the image), you can enable this option so that mental ray for Maya provides the motion data. For example, you must enable this option if you creating the motion vector type passes (2D Motion Vector, 3D Motion Vector, Normalized 2D Motion Vector).
Use the Export Objects On Demand option to control the processing of objects in your scene. This option is particularly effective in scenes that have objects beyond the view of the camera. In this case, mental ray does not process the objects beyond the camera view, therefore reducing processing time.
When Export Objects On Demand is on, it includes a Threshold value that lets you tune on demand translation for objects. Objects with a number of vertices or controlled vertices greater than the threshold value are not translated until a ray hits the bounding box. A value of 0 results in all objects processed on demand. In this case, translation is quick, but render time may not improve. You can select larger objects for on demand translation by raising the Threshold value. For polygons, the Threshold value relates to the number of vertices. For NURBS, the Threshold value relates to the number of control points. For Hair, the Threshold value relates to the number of hair.
(Customization options are within the Translation section.)
Please refer to the mental ray User Manual, available from the Maya help, for more information about this setting.
This option causes mental ray shaders to perform filtering in individual shaders. This option reduces texture and bump mapping artifacts, and is on by default.
Render Shaders With Filtering requires that the Export Polygon Derivatives option be turned on (Render Settings window, Options tab, Translation > Performance section).
Common mental ray shaders often use 4-component RGBA color parameters instead of the usual 3-component Maya color compounds. With this option enabled all custom nodes are provided with full RGBA colors, with the alpha component set to 1.0 (fully opaque). Default is off.
If this option is disabled, then mental ray shaders should ensure that they can set the alpha component explicitly to reasonable values, away from mental ray’s default, which is 0 (fully transparent).
This option enables recognition of an optional miCustomMotion boolean dynamic attribute on geometry shape nodes. If such an attribute has been found then motion vectors are always generated and exported, even if they are of zero length. This is required for certain mental ray shaders that are allowed to perform motion blur calculation in the shader, for example for displacement motion blur.
Contains controls for creating and managing custom global text, textures, and scene element text. Use these options to take advantage of alternate channel computations when writing custom shaders.
These allow for the customized output of version, link, and include statements. If these text boxes are empty, mental ray for Maya generates the usual default statements that are required for rendering Maya scenes. Otherwise, it expects a space separated list of entries, which are exported in the appropriate section of the mi stream instead of the defaults.
In the Versions text box, the first entry is written as the min version, the second entry as the max version statement.
base.mi mayabase.mi
$include "base.mi"
$include "mayabase.mi"
The global text control is especially useful for adding custom link, $include and code statements. It can also be used to add texture and shader declarations.
Within a scene many types of text nodes can be created, but just the selected one gets exported. The contained text is written once at the beginning of the .mi stream right before the first option block gets written. Certain modes are available which determine how the custom text should be applied to the generated output.
Note that incorrect .mi text could be introduced that cannot be recognized nor corrected by mental ray for Maya processing.
These enable custom text on certain sequentially exported sections like lights section, camera section, and scene section, in this order. Those sections can be extended or completely replaced, similar to the Global Text. For example, custom lights can be appended to the generated output. This would require that the scene section be extended with the incremental change of the new root instance group including the new light.