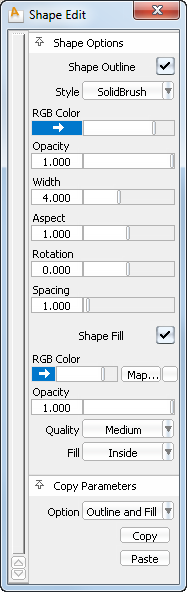
Shows or hides the Shape Editor, which lets you modify the parameters of a shape (both the outline and fill) as well as copy and paste the parameters from one shape to another.
This window opens automatically when one of the Paint > Shape tools is selected.
The same options are contained in the Paint control panel and the values are kept synchronized between the two.
The values the Shape Editor displays depend on whether a Shape tool or an existing shape is active.
When this option is turned on (checked), the shape’s outline is visible and the Shape Outline properties are displayed. When it is off (unchecked), the outline disappears and the Shape Outline properties are hidden. The Shape Outline properties control how the shape’s outline looks.
Click to choose whether the outline is Solid Brush (highly defined) or Airbrush (a softer, more undefined brush).
Click the color swatch to set the color, or drag the slider to change the color's brightness.
Slide to control the outline’s opacity. Opacity is a way of representing how “see-through” a brush's paint is. (Opacity is the opposite of transparency.) You cannot see anything underneath paint that has an opacity of 1. The lower the opacity, the more you can see through the paint. Paint that has an opacity of 0 is invisible.
Defines the width of the brush in pixels from 0.01 to 50.
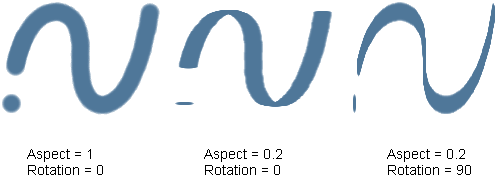
Aspect controls how flat or circular the brush stamp is. An aspect ratio of 1 means the brush stamp is circular. The lower the aspect ratio, the flatter the brush stamp. The angle of a flat stamp is based on the brush Rotation.
Rotation is the angle (measured in degrees) of the brush stamp. If Aspect is less than 1, changing Rotation makes the brush stamp more horizontal (0) or more vertical (90). The range is 0 to 360.
Brushes apply paint to a canvas plane in strokes. A stroke consists of a series of closely spaced stamps. If you click a brush onto a canvas plane, instead of dragging the stylus, you apply a single stamp of paint. You can control how strokes are generated from stamps.
The Spacing slider controls the space between stamps in a stroke. Low values produce smooth strokes with no spaces between stamps. Higher values produce strokes that appear as a series of dots. The valid range is 0 to 255.
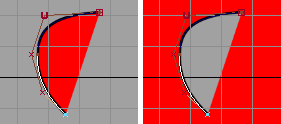
When this option is turned on (checked), the shape fill is visible and the Shape Fill properties are displayed. When it is off (unchecked), the shapefill disappears and the Shape Fill properties are hidden. The Shape Fill properties control how the interior of the shape looks.
Click the color swatch to set the color, or drag the slider to change the color's brightness.
Click the Map button to select a texture.
Slide to control the outline’s opacity. Opacity is a way of representing how “see-through” a brush's paint is. (Opacity is the opposite of transparency.) You cannot see anything underneath paint that has an opacity of 1. The lower the opacity, the more you can see through the paint. Paint that has an opacity of 0 is invisible.
These options let you copy and paste properties (both outline and fill) between shapes.
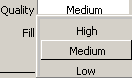
Choose what parts of the shape are copied and pasted: Outline and Fill, just Fill or just Outline.
Click this button to copy the shape parameters from a shape, or Shape tool instance, to the Alias clipboard.
Click this button to apply the shape parameters previously copied using the Copy button to the currently selected shape, or Shape tool instance.