Lets you integrate digitized clay model data with modeled surfaces, or offset a group of surface while maintaining continuity between them.
Change the function of the tool to create offset copies of the surfaces you pick, and maintain the continuity between them.
When you turn this option on and click Go, the parameters available in the Claymate Control window change.
Turn this option on to keep the original surfaces in addition to the new surfaces created by the Claymate tool.
Turn this option off to delete the original surfaces after the Claymate tool creates the surfaces.
When Claymate Offset if off, the following control window appears.

Turn on this option to update the surfaces automatically whenever you change an option in the Claymate Control window.
Off – Do not perform any surface evaluation on the surface.
Cross Section – Calculate and display cross-section lines on the new surface. For more information, see Create or view cross sections.
The maximum number of edit points the Claymate tool is allowed to add to each span of the modified surface.
For example, if you set Subdivision Density to 3, the new surface can have up to three times as many edit points as the original surface.
Enter a value from 0 to 1000. The default is 0 (do not insert any new edit points).
Sampling On Surfaces To Modify
The number of samples per span or per surface (depending on the setting of the Sampling Type option) to take on the surfaces to be modified.
The time required increases with the square of the number of samples on the surfaces to be modified.
Per Span – The number of samples is taken for every span.
Per Obj – The number of samples is taken for every surface.
The number of samples per span or per object (depending on the setting of the Sampling Type option) to take on the modifier curves or surfaces.
The time required increases linearly with the number of samples on the modifier objects.
Per Span – The number of samples is taken for every span.
Per Obj – The number of samples is taken for every object.
A number of CVs affect every point on a surface. For example, on a bicubic surface (a surface which is degree 3 in both U and V directions), up to 16 CVs control each point.
Each of those CVs exerts a certain amount of influence over the point on the surface, measured from 0 through 1. The CVs closest to the selected point on the surface have the greatest effect on that point. For example, if the influence of a CV on a point is 0.5, then moving that CV 5 units moves the surface point 2.5 units. If the influence is 1.0, then moving the CV 5 units moves the surface point 5 units.
This value controls which CVs the Claymate tool moves. For each sampled point on the surface, the Claymate tool only moves CVs whose influence is greater than this value.
Enter a value from 0.000 to 1.000. The default is 0.000. You can set the value to less than 0.001, but it is not recommended.
If the value you enter cuts off all CVs affecting a point, a value of 0.001 is used instead.
The minimum and maximum distance between a point on the surfaces to be modified and the corresponding point on the modifier curves.
If the distance is less than the minimum or greater than the maximum at a point, the modifier is ignored at that point.
Enter values greater or equal to 0 for the Min, greater than 0 for the Max.
Default – Modify surface boundaries and internals. Do not modify tangents. This is the recommended option for closed (periodic) surfaces.
Exclusive – Modify surface boundaries only. Do not modify internals or tangents.
Fix Position – Keep position of surface boundaries locked.
Fix Tangent – Keep position and tangents of surface boundaries locked.
The Fix Position and Fix Tangent options only work on actual surface boundaries, and do not affect trim edges. We do not recommend using Fix Position or Fix Tangent when you have more than one surface to modify.
The amount of resistance to modification, from 0.0 to 1.0. At 0.0, the surfaces are free to change shape to fit the modifier curves. At 1.0, the shape of the original surfaces is maintained.
Use this option to “dampen” the modification of the original surfaces if the changes caused by the modifier curves are too radical.
Update the surfaces after changing options.
If the Auto Recalculate option at the top of the window is on, the surfaces are updated automatically whenever you change an option.
Undo the most recent changes made by the Claymate tool.
Finish with the current surfaces and prompt for new surfaces.
When Claymate Offset is on, the following control window appears.
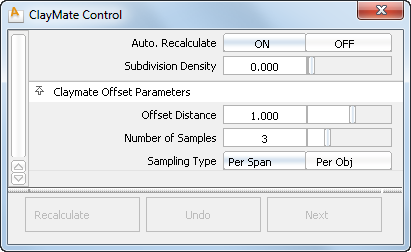
Turn on this option to update the surfaces automatically whenever you change an option in the Claymate Control window.
The maximum number of edit points the Claymate tool is allowed to add to each span of the modified surface.
For example, if you set Subdivision Density to 3, the new surface can have up to three times as many edit points as the original surface.
Enter a value from 0 to 1000. The default is 0 (do not insert any new edit points).
Modify the surfaces using a set of points at this distance from the surface along the surface normals.
The number of samples per span or per surface (depending on the setting of the Sampling Type option) to take on the surfaces to be offset.
The time required increases with the square of the number of samples on the surfaces to be offset.
Per Span – the number of samples is taken for every span.
Per Obj – the number of samples is taken for every surface.


