Combines the functionality of several color correction tools (, , , ) in one easy to use interface.
In addition, it lets you:
- Apply successive modifications to the active image layer without having to exit the tool
- Modify only certain colors from the image without the need to use masks or marquees
- Delimit parts of the image to be unaffected by using the current marquee or linked masks, before entering the tool
- Preview the modifications made to the active image layer in conjunction with the other visible layers
- Switch the display between the preview and the original image
- Preserve the capability to zoom and pan in the active window while in the tool
- Undo, while within the tool, modifications being previewed
- Undo, immediately after exiting the tool, modifications which have been accepted
The has three tabs: , , and .
The check box, available in all three tabs, lets you compare the current state of the image with the original one, by switching
between them in the modeling window.
Color Manipulation Editor
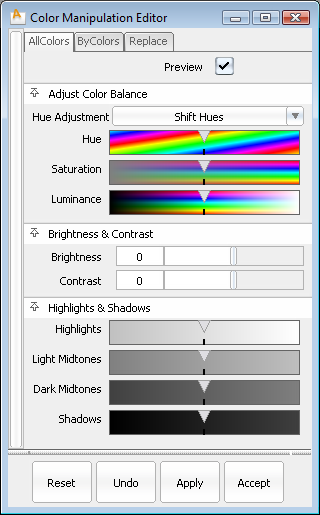
AllColors tab
Sliders in this tab affect the entire image (all colors). You can control the Hue, Saturation, Luminance, Brightness, and
Contrast for all colors simultaneously. You can adjust the Highlights, Shadows, Light Midtones and Dark Midtones independently,
to be brighter or darker.
Note
If is set to (or ), the slider must be set to a value greater than 0.0 for the slider to have an effect. The slider acts as a blending factor between the selected hue and the current colors.
-
-
– Shifts all colors by the same hue value.
– Changes all colors to the selected value. Gray areas (without hue) remain gray.
– Changes all colors to the selected value, including gray areas.
-
-
When this slider is set to 1.0, the Hue setting takes precedence over the current hue. When it is set to 0.0, the Hue setting
has no effect. Intermediate values blend the Hue setting with the current colors.
NoteThis option only appears if is set to or
-
-
When Hue Adjustment is set to Shift Hues, this slider adjusts the magnitude of the shift in hue. Otherwise, it lets you select
a specific hue which is blended with the original colors according to the value of Hue Strength.
-
-
Move the slider to the right to increase the saturation, and to the left to decrease it. This change affects all colors in
the image.
-
-
Move the slider to the right to increase the luminance, and to the left to decrease it. This change affects all colors in
the image
-
-
This slider increases or decreases the brightness of the entire image, regardless of color.
-
-
This slider increases or decreases the contrast of the entire image, regardless of color.
-
-
Makes the highlights brighter or darker.
-
-
Makes the light midtones brighter or darker.
-
-
Makes the dark midtones brighter or darker.
-
-
Makes the shadows brighter or darker.
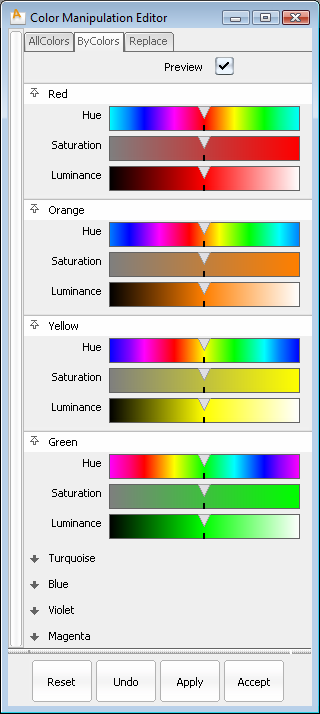
ByColors tab
Sliders in this tab affect predefined portion of the image based on colors. It is useful to change one general color quickly
into another.
The full-color spectrum has been divided into eight overlapping colors which can be simultaneously manipulated. The colors
are overlapping so hard breaks are not created in the resulting image.
You can change the , , and individually for each of the eight colors: Red, Orange, Yellow, Green, Turquoise, Blue, Violet, Magenta.
Replace tab
This tab lets you select the color that you want to replace (), as well as the color you want to replace it with ().
The color can be specified as a range by adding several colors using the color picker.
These controls are used to refine the modifications made using the tab.
-
-
Use this slider to increase or decrease the tolerance for the selected colors.
-
-
-
-
Select the replacement color by clicking the color picker  , then clicking the color you want. Or click the color wheel icon and select the color from the .
Buttons
The four buttons at the bottom of the window behave as follows:
-
-
Undoes all the modifications since the last “Apply”.
Note
To reset individual sliders, drag the mouse to the small black mark in the center of the slider, and click the white line
that appears.
-
-
Undoes the last modification. You can click this button multiple times to revert modifications all the way back to the beginning.
-
-
Applies successive modifications without having to exit the tool. It bakes the resulting image and resets all the sliders to their neutral position.
Clicking on another tab at the top of the window also applies the last modification.
-
-
Applies the modifications as with the button, but it also exits the tool. The last brush tool used becomes the active tool.
Note
To undo a modification after clicking the or button, use Edit > Undo or  +Z (Windows) or
  +Z (Mac).
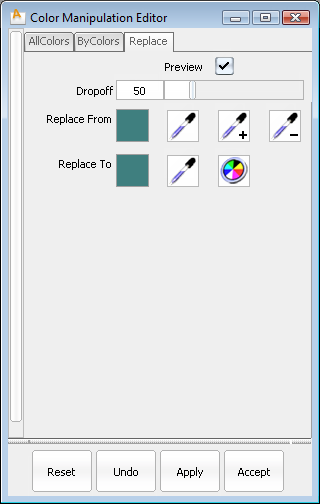


 icon to add additional colors to the selection. Use the
  icon to subtract colors from the selection.