Show in Contents
Add to Favorites
Home: Alias Help
Modify attributes of shaders
Apply shading to surfaces
Change colors
How to...
>
Render
>
Apply shading to surfaces
>
Layer shaders onto a surface
To create a layered shader
Pick the objects in the modeling window.
Click the
Create Layered Shader
icon in the
Visualization control panel
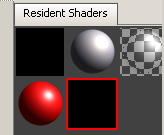
. A black shader highlighted in red appears in the Resident Shaders section.
Double-click the black shader highlighted in red. The
Layered Shader
window appears.
Select the shader in
Resident Shaders
you want to layer another shader on top of. Click once to highlight the selected shader in red.
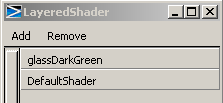
Click
Add
on the Layered Shader window. The Shader’s name is listed in the window, and the black shader now displays your first shader choice.
Pick the shader in Resident Shaders that you want layered on top of the first shader. Click once to highlight the selected shader in red.
Click
Add
in the Layered Shader window. The Shader’s name is listed in the window and the shader displays a preview of the layers you have chosen.
Click the Assign Current Shader
icon to assign the layered shader to your picked object.
Click the
Hardware Shade
icon to shade the object.
 icon in the Visualization control panel. A black shader highlighted in red appears in the Resident Shaders section.
 icon to assign the layered shader to your picked object.
 icon to shade the object.


