A CATMuscle is a non-rendering multi-segmented helper object that is best used for broad areas, such as the shoulders and pectorals, that need relatively consistent stretching and deforming.
After creating a CATMuscle, you can modify how it is segmented, its collision-detection properties, and so on.

 (Select And Link), and then drag from a corner handle on the CATMuscle to the bone to which it should be attached.
The CATMuscle structure comprises the muscle itself, made up of a rectangular array of flat panels, as well as handles at each corner, for setting the overall muscle shape. Each corner handle also has two subsidiary handles, like those found on knots in Bezier curves, for additional control in shaping the sides. In addition, you can add middle handles for shaping the muscle interior. You can select and move all of these handles at the object level; the CATMuscle has no sub-object levels.
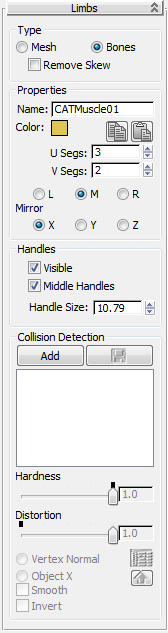
Choose Mesh or Bones. Both types have in common the ability to move the handles to reshape the muscle, with each handle having its own name while remaining a part of the muscle. The differences are as follows:
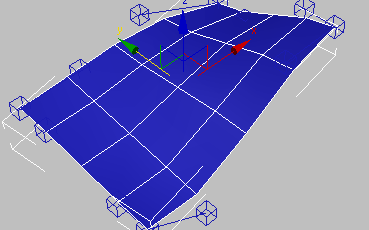
CATMuscle set to Mesh
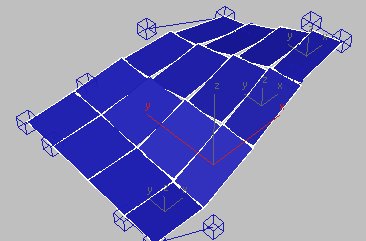
CATMuscle set to Bones (Remove Skew off)
When Type is set to Bones, the panel corners can form angles other than 90 degrees when the muscle is deformed by moving the handles. To force the panel corners to always assume right angles, turn on Remove Skew. Available only when Type is set to Bones.
This option is intended primarily for exporting to a game engine that does not support skewed bones.
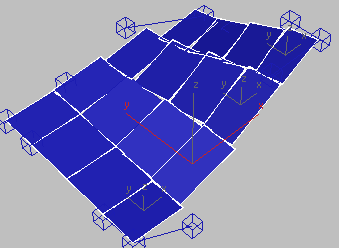
CATMuscle set to Bones (Remove Skew on)
The base name for the muscle components. CAT uses this name as a basis for the various components
For example, if you name a mesh CATMuscle Lats, the muscle itself is named LatsM and the corner handles are named LatsM_A, LatsM_B, etc., and the subsidiary handles (attached to the corner handles) are named LatsM_AB and so on.
Each panel in the bones-type CATMuscle has its own name, created by appending the base name with M and a number derived from the panel’s row and column, with the counts starting at 0. For example, in a 20 x 20 (U Segs x V Segs) muscle, the tenth panel in the first row would be LatsM09, and the twelfth panel in row 15 would be LatsM1411. The naming of the handles is the same as for mesh muscles (see preceding).
 Copy Muscle Settings
 Paste Muscle Settings
Each CATMuscle has a handle at each corner, and each of those handles has two subsidiary handles that act like handles of Bezier-curve knots. You can alter the muscle shape by moving these handles, and you can also link any handle as the child of another object, such as a bone in a character rig. Thereafter, moving the parent object (the bone) also moves the handle, causing the muscle to deform accordingly.
Toggles display of the muscle handles.
Normally, handles are depicted in the viewports as wireframe cubes surrounding the muscle; to disable the display of the handles, turn off Visible.
This can be useful for simplifying the viewport display after connecting the muscles to their bones, and selecting the handles is no longer necessary.
In addition to being able to shape the CATMuscle by moving its handles, you can specify collision objects around which the muscle deforms when in proximity to them. For example, if you use a sphere as a collision object and move it around while intersecting the CATMuscle, the part of the muscle nearest the sphere forms a raised section. The deformation is greatest at the center of the collision object, and falls off toward its exterior. You can specify collision attributes for each collision object separately.

CATMuscle reshaped by Muscle Strand and sphere. The sphere is set to See-Through display so the full deformation is visible.
Choose the direction of deformation caused by the collision object. Available only when a collision object is highlighted in the list.
This setting makes it possible to have a tubular piece of skin, like an arm, with collision objects inside, and have CATMuscles colliding with them. At the edge where two CATMuscles meet, you usually want to avoid tearing due to the points at the joining edges on the muscles moving in different directions because of distortion. If you choose Object X, the points along the edges of the two muscles will move in the same direction because both are being deformed by the same object.


 Create panel
 (Helpers)