The Skin Wrap modifier allows one or more objects to deform another. While Skin Wrap is flexible enough to serve a variety of needs, it's primarily intended for animating a high-resolution object, such as a character mesh, with a low-resolution one.
The low-resolution object doing the deforming is called a control object, and the high-resolution object it's affecting (that is, the one with the Skin Wrap modifier) is the base object. A base object can be any type of deformable object. Also, in this topic, control vertex refers to a vertex on the control object, and point refers to a vertex on the base object.
With Skin Wrap, you can modify the structure and topology of the high-resolution object after setting up the animation. The animation remains intact because it is actually contained in the control object.
In most cases, when using Skin Wrap, the control object is positioned near the modified base object, and then bound to the latter using the modifier's Add function. By default, moving a vertex in the control object affects nearby vertices in the base object. Additional options allow faces in the control object to affect the nearest points in the base object instead (Blend To Base Object). Conversely, points in the control object can affect faces in the base object (Face Deformation).
Skin Wrap offers a great deal of control in that you can set a different strength value for each control vertex, as well as the shape of its volume of influence. You can also convert the Skin Wrap effect to a Skin modifier applied to the high-res model, suitable for use with game engines. And the ability to animate with multiple control objects lets a technical director assign animation of different parts of a complex character mesh to various artists.
To use Skin Wrap (basic method):
 Parameters rollout, use Add to assign the control object(s).

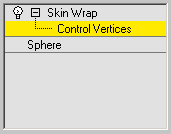
At the Control Vertices sub-object level, you can view and select vertices on the control object(s), and set local parameters for any selected vertices. By default, each selected vertex is surrounded by loops that depict its volume of influence. This sub-object level also uses color coding on affected points in the base object to show each selected vertex's relative effect on points within the volume of influence. Colors range from orange for the strongest influence to blue for the weakest influence. Red is for vertices that are within its range of influence but that it's not influencing.
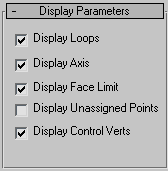
By default, at this level, control vertices appear as small orange squares. To prevent this, turn off Display Parameters rollout
 Display Control Vertices.

Adds control objects to the list. Click Add, and then click each control object in turn. To stop adding, right-click in the viewport or click Add again.
You can use as a control object anything that can be converted to a triangle mesh, such as a mesh, patch, or a NURBS object. However, avoid using objects that change topology, such as a deforming NURBS object with adaptive tessellation.
Determines which engine drives the deformation. Default=Vertex Deformation.
Determines the extent to which the control vertices affect nearby points in the base object. This is a global setting. Default=1.0. Range=0.001 to 10.0.
Higher values pull nearby points closer to the control vertex. In Face Deformation mode, setting Falloff to the lowest value, 0.001, causes rigid deformation so that there's no falloff; the control vertex either affects the base-object face or it doesn't. For best results, use Falloff values between 1.0 and 2.0, or with Face Deformation, 0.001 for rigid mode.
Determines the distance of influence, in system units, of control vertices in the control object. This is a global setting, and is available only in Vertex Deformation mode. Default=1.2. Range=0.001 to 10.0.
Distance Influence is a multiplier. It looks at the length of each edge that touches each control vertex. For each vertex, it averages all the lengths and then multiplies the average by the Distance Influence value. This lets vertices that are touching only small faces to affect a small area, and vice-versa. The higher the influence value, the smoother the deformation, but the less individual control each vertex has. For best results, keep this value between 1.0 and 2.0.
Determines the extent of influence, in control-object faces, of control vertices in the control object. This is a global setting, and is available only in Vertex Deformation mode. Default=3. Range=0 to 30.0.
Beyond this limit, no base-object points can be influenced by the control vertex, even if they're within the Distance Influence radius.
Face Limit is useful for preventing the control-object influence from bridging gaps in the mesh; for example, between fingers in a character mesh.
Determines the relative distance between control-object faces and vertices in the base object for deformation to take effect. Available only when Blend To Base Mesh is on. Default=5.0.
Increasing this setting effectively causes a stronger deformation effect and broadens the area on the control that affects the base object.
The Local parameters are available only at the Control Vertices sub-object level (see Skin Wrap modifier stack), and affect only selected points. If you select a single point, the numeric fields reflect its current parameter values. If you select multiple points, 3ds Max displays only those values common to all selected points; parameters with differing values are blank. With multiple points selected, changing a value sets all selected points to that value.
Resets all control-object vertices' local values to 1.0 and resamples the mesh. It recalculates the control vertices' influence on the base object using the current modifier settings.
Use Reset if you alter a parameter but don't see any change in the deformation. For example, always use Reset after changing the Threshold value. Or, if you want the control object to affect a different part of the base object, move the former, and then use Reset so the modifier accounts for the change in positional relationship between the two. You might also need to reset after changing the topology of the base object or a control object.
Forces all base-object points to have weights. Each weight is calculated from a combination of three factors: control vertex scale, control vertex strength, and base-object point position.
By default, not all base-object points are necessarily influenced by the control object. Turning on Weight All Vertices causes all points to be influenced by one or more control vertices. If a large number of base-object points are unassigned, this can take a long time to calculate.
Applies a new Skin modifier to the base object that replicates the animation in the Skin Wrap modifier. Using this function requires that a Skin modifier already be applied to each control object.
Basically, Convert To Skin intelligently “bakes” the animation from skinned low-res control objects to the high-res base object. The Skin modifier that it creates contains all the bone assignments from the original Skin modifier, but with completely rebuilt weight settings based on the base-object weights created by the Skin Wrap modifier.
This function is useful in game-development settings where the game engine recognizes the Skin modifier settings but not the Skin Wrap modifier.

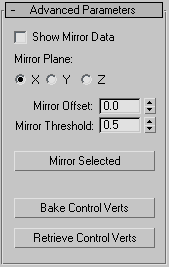
The Mirror tools in Skin Wrap let you apply local settings (Strength and Scale) from control vertices on one side of a control object to the other, mirroring them across a plane aligned with the X, Y, or Z axis. This is useful for setting up character meshes.
The Bake/Retrieve Control Vertices functions let you store control-vertex settings into the base object and then retrieve them. This is useful for sharing data among artists working on the same project.

These settings determine whether or not 3ds Max displays different elements in the Skin Wrap modifier.
Shows all base-object points that the selected control vertex or vertices can affect. This is a visualization of the Face Limit setting. Default=on.
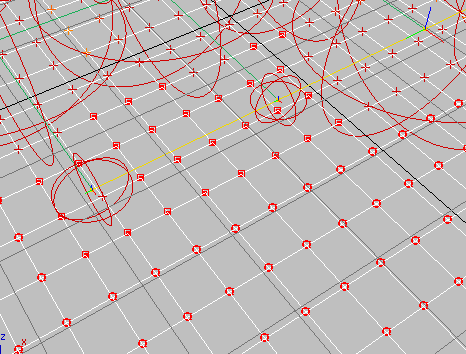
Draws a red circle around each base-object point that the system did not find a closest face for and draws a red box around each point that has a closest face but is not weighted by any control vertex. Default=off.

Unassigned points: The circled points (bottom) have no closest face, while the points with red boxes (center) have a closest face but aren't weighted by control vertices.
This is an important debugging tool because any vertex that is not assigned a closest face will never be weighted. To do so, you need to increase the Threshold value and click Reset, or turn on Weight All Points. Any points that are not weighted to a control vertex can be fixed by increasing the Local Scale of a control vertex near that point.