Components of the railing object include rails, posts, and fencing. Fencing includes either pickets (balusters) or solid-filled material, such as glass or wood strip.

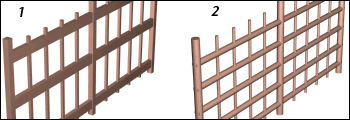
Railings used to create fences in a field.
You can create a railing object either by specifying the orientation and height of the railing, or by picking a spline path and applying the railing to that path. When 3ds Max applies railing to a spline path, the latter is called a rail path. Later, if you edit the rail path, the railing object automatically updates to follow the changes you made. You can use three-dimensional splines as rail paths.
When you create the lower rails, posts, and fencing components of a railing, you use the Spacing tool to specify the spacing of those components. 3ds Max names the Spacing tool dialog for each railing component: Lower Rail Spacing, Post Spacing, or Picket Spacing.
By default, 3ds Max assigns five different material IDs to railings. The aectemplates.mat material library includes Rail-Template, a Multi/Sub-Object material designed to be used with railings. Each component of the railing/material is listed below along with its corresponding Material ID.
| Material ID | Railing/Material Component |
|---|---|
| 1 | Lower rails |
| 2 | Posts of the railing |
| 3 | Solid fill of the railing |
| 4 | Top of the railing |
| 5 | Pickets of the railing |
The following procedures describe how to create railings combining each of the components: upper rail, lower rails, posts, picket fencing, and solid filled fencing.
You can create a railing object in any viewport, but for best results, use a Perspective, Camera, or Top viewport.
By default, 3ds Max creates the top rail along with two posts, a lower rail at half the railing height, and two evenly spaced pickets.
 Profile list.
 (Spacing).
Type list Pickets. The Solid Fill options will be unavailable.
(Spacing).
Type list Solid Fill. (The options under Picket are unavailable).
(Spacing).
(Spacing).
Type list Pickets. The Solid Fill options will be unavailable.
(Spacing).
Type list Solid Fill. (The options under Picket are unavailable).
To create railings along a spline path:
Before you can create railings along a spline path, you need to create a spline, or use an existing spline from your scene.
 Create panel
  (Geometry) AEC Extended Railing.
Since the number of segments is 1 by default, the upper rail extends for one segment between the start and end of the spline.
Segment setting.
The higher the segment value, the more closely the railing approximates the spline shape.
Thereafter, the spline is associated with the railing; any changes you make to the spline shape are reflected in the railing.
This rollout lets you set the selected railing's name and color. For detailed information, see Object Name and Wireframe Color.
Click this, and then click a spline in the viewport to use as the railing path. 3ds Max uses the spline as the path along which to apply the railing object.
If you edit the spline you’ve used as a railing path, the railing adjusts to the changes you make. 3ds Max doesn’t immediately recognize 2D Shapes from a linked AutoCAD drawing. To recognize Shapes from a linked AutoCAD drawing, edit the Shape with Edit Spline in the Modify panel.
Sets the number of segments of the railing object. Available only when you’re using a railing path.
For a close approximation to a railing path, increase the number of segments. Be aware that a high number of segments increases file size and slows down the rendering speed. You might use fewer segments when the spline path has a low curvature (or none) and fewer segments provide an adequate approximation.
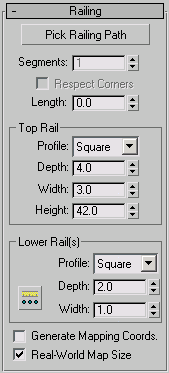
The defaults produce a top rail component, consisting of one segment by the length you specify, a square profile, four units deep, three units wide, and the height you specify.
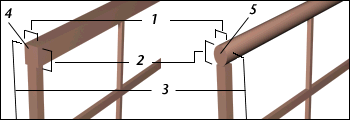
1. Width
2. Depth
3. Height
4. Profile for the square top rail
5. Profile for the round top rail
Controls the profile, depth, width, and spacing between the lower rails. You specify how many lower rails you want using the Lower Rail Spacing button.
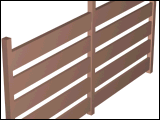
A railing with the rails defined by their profile, depth, and width as planks.
Lower Rail SpacingSets the spacing of the lower rails. When you click this button, the Lower Rail Spacing dialog displays. Specify the number of lower rails you want using the Count option. For more information on spacing options in this dialog, see Spacing Tool.
Assigns mapping coordinates to the railing object.
Controls the scaling method used for texture mapped materials that are applied to the object. The scaling values are controlled by the Use Real-World Scale settings found in the applied material's Coordinates rollout. Default=off.
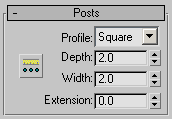
Controls the profile, depth, width, extension, and spacing between the posts. You specify how many posts you want using the Post Spacing button.
Post SpacingSets the spacing of the posts. When you click this button, the Post Spacing dialog displays. Specify the number of posts you want using the Count option. For more information on spacing options in this dialog, see Spacing Tool.
Controls the profile, depth, width, and spacing between the pickets. Specify how many pickets you want using the Picket Spacing button. Available only when you set Type to Pickets.
1. A railing with pickets using a square profile
2. A railing with pickets using a round profile
Picket SpacingSets the spacing of the pickets. When you click this button, the Picket Spacing dialog displays. Specify the number of pickets you want using the Count option. For more information on spacing options in this dialog, see Spacing Tool.


