Command entry:Views menu
  Viewport Configuration Viewport Configuration dialog Display Performance tab (Nitrous viewports) or Adaptive Degradation tab (legacy viewport drivers)
Command entry:Click or right-click the General viewport label (“[ + ]”) . General viewport label menu Configure Viewport Configuration dialog Display Performance tab (Nitrous viewports) or Adaptive Degradation tab (legacy viewport drivers)
Viewport Configuration Viewport Configuration dialog Display Performance tab (Nitrous viewports) or Adaptive Degradation tab (legacy viewport drivers)
Command entry:Click or right-click the General viewport label (“[ + ]”) . General viewport label menu Configure Viewport Configuration dialog Display Performance tab (Nitrous viewports) or Adaptive Degradation tab (legacy viewport drivers)
For Nitrous viewports, you adjust the adaptive viewport redraw methods on the Display Performance panel of the Viewport Configuration dialog. For legacy viewports (Direct3D, OpenGL, and so on) a similar set of options appears on the Adaptive Degradation panel.
The adaptive degradation settings are saved with your MAX scene file.
To toggle adaptive degradation, click the Adaptive Degradation button on the prompt line, or press O. This is handy when you're adjusting lights and want to see their effect, real time, in a shaded viewport. Or you might be adjusting the camera and need to see complex geometry exactly as it is.
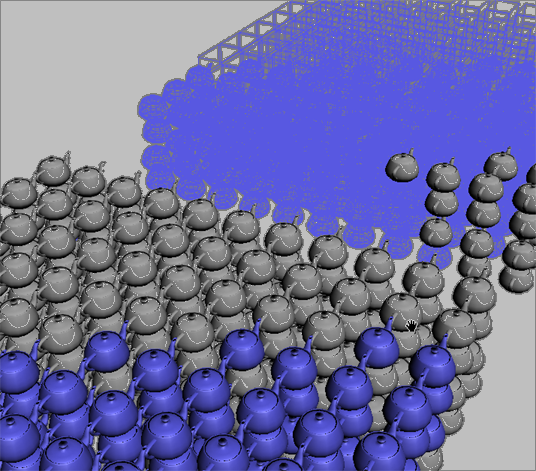
Example showing four degrees of adaptive degradation, depending on distance from camera
 Display Performance panel (Nitrous viewports)

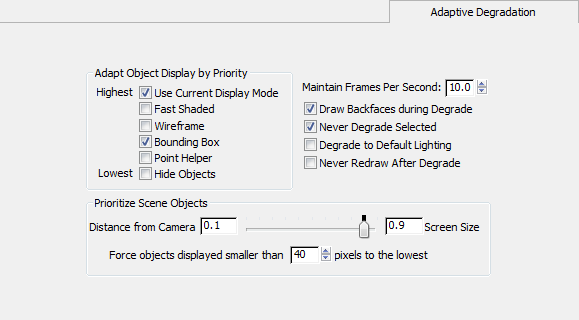
Adapt Object Display by Priority group
Turn on check boxes to indicate the rendering modes to step through during necessary degradation. As the viewport redraw demands increase, the amount of degradation increases through the active options from highest to lowest. Objects with higher priority (based on the Prioritize Scene Objects settings) will use the higher, more faithful display settings, while lower-priority objects, typically smaller and/or farther from the point of view, will use the lower display settings.
Lets you set the frame rate in frames per second that adaptive display will attempt to maintain. If the frame rate drops below this, 3ds Max will increase the amount of degradation based on the other settings on this panel.
When on, selected objects are not subject to degradation.
When off, viewport display will restore as frame rate improves, redrawing all degraded objects. If this takes too long, turn it on. When on, objects will degrade but never redraw on mouse up, always displaying at the most recent level of degradation.
 As viewport degradation occurs, the Adaptive Degradation button on the status bar turns aqua, as shown here. Normally, when
the degradation stops, the color returns to gold, but when Never Redraw After Degrade is on, the background remains aqua,
even when active degradation is not happening. To resolve this, either turn off Adaptive Degradation or turn off Never Redraw
After Degrade. Then, to redraw the screen, press ~.
Improve Quality Progressively
As viewport degradation occurs, the Adaptive Degradation button on the status bar turns aqua, as shown here. Normally, when
the degradation stops, the color returns to gold, but when Never Redraw After Degrade is on, the background remains aqua,
even when active degradation is not happening. To resolve this, either turn off Adaptive Degradation or turn off Never Redraw
After Degrade. Then, to redraw the screen, press ~.
Improve Quality ProgressivelyPrioritize Scene Objects group
Use this slider to specify whether 3ds Max gives higher priority to objects based on their distance from the camera or their screen size, regardless of distance from the camera. The two criteria, represented by either end of the scale, are defined as follows:
If you move the slider all the way to either end of the scale, 3ds Max sets priorities based exclusively on that criterion. However, because it’s a sliding scale, you can use both criteria on a weighted basis. For example, if you set one end to 0.66, the other is set to 0.34, meaning that 3ds Max takes both criteria into account in determining priorities, but gives the criterion set to 0.66 about twice as much weight as the other.
To return this parameter to its default setting (0.10 to 0.9), indicated by the tick mark on the scale, right-click the slider.
Viewport Images And Texture Quality group
As the note in the dialog indicates, by default regular 2D bitmaps display in viewports at their highest resolution: If you want to improve performance by reducing this resolution, you can use the Asset Tracker's bitmap proxy settings.
Bitmap Management for Nitrous Viewports
By default, Nitrous viewports load texture bitmaps at their full size. You can set a limit to the size that is loaded into memory. Enter one of the following MAXScript calls in the MAXScript Mini Listener:
You can also set these limits in the 3dsmax.ini file. In the section headed "[Nitrous]", add one of these pairs of lines:
ViewportTextureSizeLimitEnabled=1
ViewportTextureSizeLimit=512
ViewportTextureSizeLimitEnabled=1
ViewportTextureSizeLimit=1024
Limiting the bitmap size overrides the bitmap proxy settings.
To remove an active size limit, set the option to false (MAXScript) or 0 (INI file). Or in the INI file, just remove the lines of code.
Whether you use MAXScript to change this setting or you edit the 3dsmax.ini file, you must exit 3ds Max and then restart it for the change to take effect
 (Progressive Display / Adaptive Degradation).