 Command entry:
 Material Editor
  Arch & Design material
  General Maps rollout
  Main Maps group
  Refraction Color button
You can use a bitmap file or a procedural map such as Reflect/Refract to control an object’s refraction.

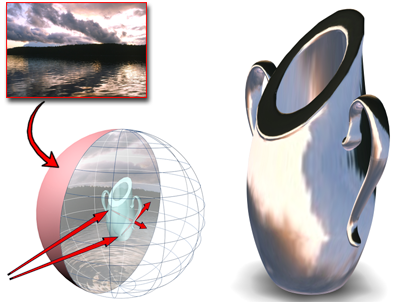
Refractions show the scene or background through a refractive object.
Usage of Refraction maps is similar to that of Reflection maps. Refraction maps the view onto the surface in such a way that the image looks like you're seeing it through the surface, rather than being reflected off it.
Like a Reflection map, a Refraction map does not require mapping coordinates because its orientation is locked to the world coordinate system rather than to the object. That is, as you move or rotate the object, the position of the refracted image remains fixed.
Setting the Index of Refraction
The physical properties of refractive objects often distort the image. This parameter is controlled by the parent material.
The index of refraction (IOR) controls the amount by which the material refracts transmitted light. The IOR of air, 1.0, causes no distortion of objects behind the transparent object. At 1.5 the object behind distorts greatly (like a glass marble). At an IOR slightly less than 1.0, the object reflects along its edges, like a bubble seen from under water. Default=1.5 (the IOR of typical glass).
Common IOR values (assuming the camera is in air or a vacuum) are:
| Material | IOR Value |
|---|---|
| Vacuum | 1.0 (exactly) |
| Air | 1.0003 |
| Water | 1.333 |
| Glass | 1.5 to 1.7 |
| Diamond | 2.418 |
In the physical world, the IOR results from the relative speeds of light through the transparent material and the medium the eye or the camera is in. Typically this is related to the object's density. The higher the IOR, the denser the object.
You can also use a map to control the index of refraction. IOR maps always interpolate between 1.0 (the IOR of air) and the setting in the IOR parameter. For example, if you set the IOR to 3.55 and use a black-and-white Noise map to control IOR, the IORs rendered on the object will be set to values between 1.0 and 3.55; the object will appear denser than air. If, on the other hand, you set the IOR to 0.5, then the same map values will render between 0.5 and 1.0: As if the camera is under water and the object is less dense than the water.
Here are some more IOR values for various materials:
| Material | IOR Value |
|---|---|
| Carbon Dioxide, Liquid | 1.200 |
| Ice | 1.309 |
| Acetone | 1.360 |
| Ethyl Alcohol | 1.360 |
| Sugar Solution 30% | 1.380 |
| Alcohol | 1.329 |
| Flourite | 1.434 |
| Quartz, Fused | 1.460 |
| Calspar2 | 1.486 |
| Sugar Solution 80% | 1.490 |
| Glass | 1.500 |
| Glass, Zinc Crown | 1.517 |
| Glass, Crown | 1.520 |
| Sodium Chloride | 1.530 |
| Sodium Chloride (Salt) 1 | 1.544 |
| Polystyrene | 1.550 |
| Quartz 2 | 1.553 |
| Emerald | 1.570 |
| Glass, Light Flint | 1.575 |
| Lapis Lazuli | 1.610 |
| Topaz | 1.610 |
| Carbon Bisulfide | 1.630 |
| Quartz 1 | 1.644 |
| Sodium Chloride (Salt) 2 | 1.644 |
| Glass, Heavy Flint | 1.650 |
| Methylene Iodide | 1.740 |
| Ruby | 1.770 |
| Sapphire | 1.770 |
| Glass, Heaviest Flint | 1.890 |
| Crystal | 2.000 |
| Diamond | 2.418 |
| Chromium Oxide | 2.705 |
| Copper Oxide | 2.705 |
| Amorphous Selenium | 2.920 |
| Iodine Crystal | 3.340 |
To create an automatic refraction:
3ds Max opens the Material/Map Browser.
 Standard
  Reflect/Refract, and then click OK.
Alternatively, you can use the  Slate Material Editor to wire a Reflect/Refract map node to the Refraction component.
At a Refraction Amount of 100 percent, the material is extremely refractive, regardless of the material's Opacity setting. At a Refraction Amount of 0 percent, the map is turned off. When the Amount is less than 100 percent, both the Reflect/Refract map and the Opacity setting control transparency.
To assign a bitmap as a refraction map:
3ds Max opens the Material/Map Browser.
 Standard
  Bitmap, and then click OK.
Alternatively, you can use the  Slate Material Editor to wire a Bitmap node to the Refraction component.
For bitmapped refractions, you don't necessarily want to reduce the map Amount.