Command entry:
Main toolbar


(Align to View), on Align flyout
Command entry:Tools menu
Align to View
Align to View, available from the Align flyout, displays the Align To View dialog, which lets you align the local axis of an object or sub-object selection with the current
viewport.
You can use Align to View with any selection that can be transformed.
Other alignment tools on the Align flyout are Align, Quick Align , Normal Align, Place Highlight, and Align to Camera.
Procedures
To align the local axis of a selection with the current viewport:
-
 Select the objects or sub-objects to align.
- Do one of the following:
- On the main toolbar, click (Align To View), which is on the Align flyout.
- On the Tools menu, choose Align Align To View.
3ds Max opens the Align To Viewdialog.
- Specify the local axis of the selected object to align with the current viewport's Z axis.
- Select the Flip check box when you switch the direction of the alignment.
The alignment takes place while the dialog is displayed.
- Click OK to complete the process.
Interface
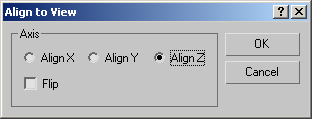
The Align to View dialog contains the following options:
- Align X, Align Y, Align Z
-
Specifies which local axis of the selected object will be aligned with the current viewport's Z axis.
- Flip
-
Switches the direction of the alignment.