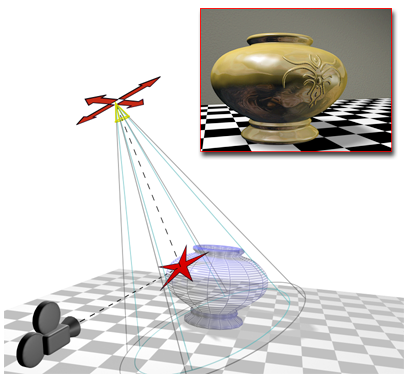
Place Highlight, available from the Align flyout, enables you to align a light or object to another object so that its highlight or reflection can be precisely positioned.
In Place Highlight mode, you can click and drag the mouse around in any viewport. Place Highlight is a viewport-dependent function, so use the viewport that you're going to be rendering. As you drag the mouse in the scene, a ray is shot from the mouse cursor into the scene. If it hits a surface, you see the surface normal at that point on the surface.
When you designate a surface, any selected objects are positioned along a line that represents the ray reflected off the surface about the surface normal. The objects are positioned along this line based on their original distance from the surface point. For example, if the object is 100 units from the surface point before being moved, it will be positioned 100 units from the surface point along the reflected ray.
If the object is a light, the position of the highlight on the surface of the object will be the surface point that you've chosen.

Place Highlight aligns a camera and a spotlight to the same face.
Other alignment tools on the Align flyout are Align, Quick Align , Normal Align, Align to Camera, and Align to View.
To position a light to highlight a face:
The result of Place Highlight depends on what is visible in the viewport.
 Select a light object.
 (Place Highlight), which is on the Align flyout.
 Place Highlight.
When you place an omni, free spot, or directional light, 3ds Max displays a face normal for the face the mouse indicates.
When you place a target spotlight, 3ds Max displays the light's target and the base of its cone.
The light now has a new position and orientation. You can see the highlight illumination in shaded viewports that show the face you chose, and when you render those views.