The Flex modifier simulates soft-body dynamics using virtual springs between an object's vertices. You can set the springs' stiffness, or how actively they keep vertices from coming close to each other, as well as stretch, or how far apart they can move. At its simplest, this system causes vertices to lag behind an object as it moves. At a more advanced level, you can also control the sway, or how much the spring angle can change.
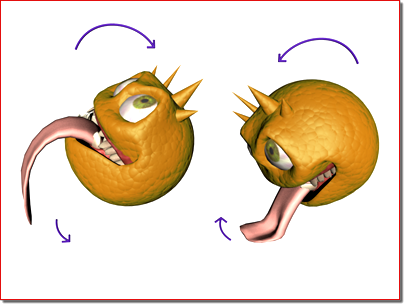
Flex causes the tongue to wag as the head rotates.
Flex works with NURBS, patches, polygon and mesh objects, shapes, FFD space warps, and any plug-in-based object types that can be deformed. You can combine Flex with space warps such as Gravity, Wind, Motor, Push, and PBomb to add realistic, physically based animation to an object. In addition, you can apply deflectors to soft-body objects to simulate collision.


The antennae, with the Flex modifier applied, move around like springs reacting to the motion of the character's head.
Surfaces Influenced by the Flex Modifier
You can apply space warps to the Flex modifier. For example, you can add Wind to animate plants and trees, or a waving flag. In such cases, you don't need to create keyframes to see the effects; the space warp alone can animate the surface.
Use Flex above the Skin modifier to add secondary motion to a character animated with Bones, or above the Physique modifier to add secondary motion to a character animated with Biped.
 (Auto Key) and drag the time slider to frame 50.
 move the sphere to the right side of the viewport.
 (Auto Key).
 Modify panel, click the Modifier List, and then choose Flex.
 (Play Animation).
This enables modification of the Weights & Springs sub-object settings.
The vertex color changes as the vertex weight changes. Yellow vertices are more rigid, blue vertices are less rigid.
(Play Animation).
The sphere wobbles on one side more than the other.
If the Strength setting in the Paint Vertex group is a positive value, you paint rigidity. If the values are negative, you paint flexibility.
Example: To use wind as a force:
 Create panel, click
  (Space Warps), and then, if necessary, choose Forces from the drop-down list.
 Select the Sphere.
Modify panel, and apply a Flex modifier.
Select the Sphere.
Modify panel, and apply a Flex modifier.
 Parameters rollout, set Samples to 1.
Forces group, click the Add button, and then select the Wind gizmo in the viewports.
(Play Animation).
Parameters rollout, set Samples to 1.
Forces group, click the Add button, and then select the Wind gizmo in the viewports.
(Play Animation).
The sphere undulates in the wind. The Advanced Parameters rollout Reference Frame setting determines the frame where the force(s) in the list take effect.
You can also use this example to see how the Chase Springs option works.
(Play Animation) again.
The sphere keeps moving in the direction the wind is blowing without "bouncing" back. That's because the chase springs, which attempt to return the object to its original shape, are no longer in effect.
The Flex vertices appear at object vertices in the viewports.
For instance, if you want to add one Hold Shape spring between two vertices, select both vertices.
The new spring or springs appear. Edge springs are blue and Hold Shape springs are red.
Example: To create a swinging rope:
Space Warps to add a Drag and a Gravity space warp in the Top viewport.
Shapes Line to create a line with ten vertices spaced evenly in the top viewport.
Modify panel, turn on  (Vertex) and select all the vertices except the first vertex.
select all the points on the spline.
(Play Animation).
(Vertex) and select all the vertices except the first vertex.
select all the points on the spline.
(Play Animation).
Example: To create cloth draping on a sphere:
Space Warps to add a Drag and a Gravity space warp in the Top viewport.
Space Warps Deflectors SDeflector to create a spherical deflector. Set Bounce to 0 and Friction to 100. Place the deflector below Z=0.
Geometry Standard Primitives Plane to create a 20 x 20 plane in the Top viewport. It should be above the spherical deflector.
select all the vertices except for the leftmost column.
(Play Animation).
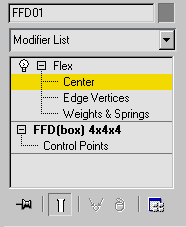
These modifier sub-object levels are available in the stack display by opening the modifier hierarchy (click the + icon to the left of the modifier name).
Use the Weights And Painting rollout controls to select and deselect vertices for subsequent operations on the Weights And Painting rollout and the Advanced Springs rollout.
You can paint weights at any sub-object level, and add and remove springs at any sub-object level (or even at the Flex modifier object level), but while a Weights & Springs selection is active, only the selected vertices are affected.
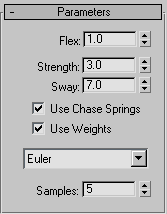
Sets the amount of flex and bend. Range=0.0 to 1000.0; Default=1.0.
This value represents the amount of the flexed animation that is used; the flexed animation is determined by other factors such as motion and vertex weighting. The default setting of 1.0 causes the flexed animation to occur unmodified; higher settings cause unnaturally high amounts of stretching, and lower settings cause diminished stretching.
When on, enables chase springs, which force the object to return to its original shape. When off, no chase springs are used, and the amount by which vertices move depends only on their weights. Default=on.
Typically, for soft-body simulations when you want objects to be influenced by forces and deflectors, you would turn off Use Chase Springs.
When on, Flex recognizes the different weights assigned to an object's vertices, applying different amounts of flexing accordingly. When off, the flex effect applies itself to the object as a monolithic whole. Default=on.
Typically, for soft-body simulations when you want objects to be influenced by forces and deflectors, you would turn off Use Weights.
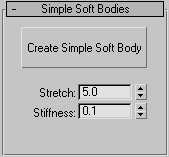
Lets 3ds Max determine spring settings for the entire object automatically. Alternatively, you can use the Advanced Springs rollout settings to specify spring settings between each pair of vertices.
Determines how rigid the object is. When Advanced Springs rollout Enable Advanced Springs is off, the Stretch setting is linked to the Advanced Springs rollout Shape Str. and Shape Sway settings.
The differences between Stretch and Stiffness are subtle, and understanding them is further complicated by the fact the two affect each other. In addition, how they work depends on object topology.
For example, say you create a box, add a Flex modifier, apply Create Simple Soft Body, and then set a high Stretch value and a low Stiffness value. If you use the box in a Flex-based dynamics simulation, such as dropping it onto a surface (deflector) with gravity, you might expect the box to fall over and flatten out. But instead, because of the box's topology, which causes Create Simple Soft Body to apply a relatively small number of shape springs, you'd actually get better results with a low Stretch value and a high Stiffness value. However, if you use a sphere of eight segments instead, you'll get the collapsing behavior with the default Stretch and Stiffness settings, and as expected, increasing rigidity with higher Stiffness settings.
In soft-body simulations, such as the preceding example of dropping an object onto a surface, particularly with dense meshes, you might get better results by applying the mesh to an FFD space warp that's bound to the object. If the object's shape isn't suitable for use with the space warp, you might have to instead use the Advanced Springs rollout settings to apply springs manually. In such cases, you should create shape springs between opposite vertices rather than adjacent ones.
Cloth-like animation usually works best with a high Stretch setting and a low Stiffness setting. For soft bodies, you would usually use high settings for both Stretch and Stiffness, depending on how "squishy" you want the object to be.
When you first apply Flex to an object, the modifier automatically sets a weight for each vertex based on its distance from the modifier's center. The higher a vertex weight, the less prone it is to being affected by Flex effects. The modifier applies the highest weights to vertices closest to its center, and the lowest weights to vertices farthest from the center. So, for example, with a cylinder whose pivot point is at the base, you'll get the greatest amount of flexing at the top. But with a sphere, all of whose vertices are equidistant from the pivot point (center), all vertices have, by default, equal weight values.
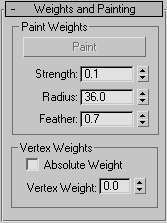
The Paint Weights controls let you use a spherical brush with adjustable radius and falloff to change vertex weights in the viewports, thus controlling the amount of lag. The Vertex Weights controls let you apply absolute or relative weighting to single vertices or groups of vertices.
At any sub-object level, click Paint, and then drag the cursor over the mesh in the viewports to "paint" vertex weights using the current Strength and Feather settings. Vertex colors changes to reflect the new vertex weight.
Painting changes vertex weights relative to their current values; it does not apply an absolute weight. Longer strokes over an area of the mesh will increase or decrease vertex weights more than short strokes, and repeated strokes over the same area will cause incremental changes in weight values unless they're already at their extremes.
The vertex coloring shown at any Flex sub-object level provides an approximate indication of weighting. The colors are determined
by the settings in Customize menu Customize User Interface Colors tab Elements: Geometry. In this list are three color entries: Subselection Hard, used to display vertices with the highest Weight
values; Subselection Medium, used to display vertices with medium Weight values; and Subselection Soft, used to display vertices
with low Weight values.
Sets the falloff in strength from the center of the brush to its edge. Default=0.7. Range=0.001 to 1.0.
Vertices at the center of the brush are always changed by the full amount of the Strength setting, but the higher the Feather setting, the less vertices closer to the edge change. At the lowest setting, all vertices inside the radius are changed equally.
Sets vertex weighting manually. At the Weights & Springs sub-object level, select vertices in the viewports, and then change the value of the Vertex Weight parameter. Alternatively, turn on Absolute Weight, set the desired Vertex Weight, and then select vertices to set; changes are immediate.
Assigns weight to selected vertices.
Depending on the state of the Absolute Weight parameter, weight assignment is either absolute or relative.
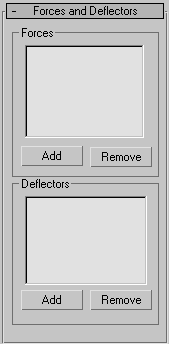
Use these controls to add space warps in the Forces category to the Flex modifier. Supported space warps are:
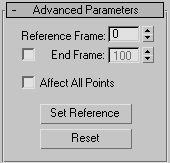
When on, sets the last frame at which Flex is to take effect. After this frame, the object snaps back to its shape as currently defined by the stack. For instance, if you animate a Bend modifier in the stack under Flex, then when Flex stops, the object's shape is altered only by the Bend modifier settings as of that frame.
Use these settings when you need a more precise springs setup than is provided by the Simple Soft Body feature. Flex uses two types of spring: edge springs, which create springs only along existing edges, and shape springs, which can exist between any two vertices in the object that are not connected by an edge. In general, add edge springs along existing edges and shape springs between vertices that don't share an edge.
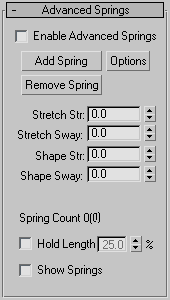
Adds one or more springs to the object based on the vertex selection at the Weights & Springs sub-object level and the Spring Option dialog settings.
Opens the Spring Option dialog for determining how springs are added with the Add Spring function.
Use the Spring Option dialog to determine how springs are added in the Flex modifier when you click the Advanced Springs rollout Add Spring button.


