The Motion Mixer window contains an editor where you manage everything that is added to the mix: bipeds, trackgroups, tracks, clips, and transitions.

The editor contains three sections:
Biped/Trackgroup/Track Controls
The left-most section of the editor is the Biped/Trackgroup/Track Controls section. The Biped/Trackgroup/Track Controls set the number, order, display, and characteristics of those features in the mix. Bipeds and trackgroups can be selected, added, removed and repositioned.

The “-” and “+” buttons collapse and expand the display of bipeds and trackgroups. The “m” button mutes a track, taking its influence out of the mix. The “s” button sets a track to solo mode, making it the only active track in the mix.
The center section of the editor, Interactive Clip Controls, lets you manipulate the scale, time, timing, and trimming of clips and transitions.
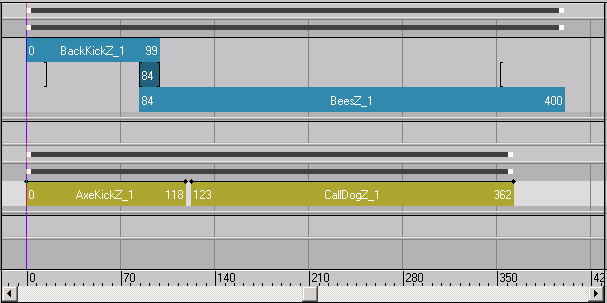
The overall length of all clips and transitions in a track can be stretched or squeezed by dragging the white ends of the gray range bars along the top of each trackgroup. Drag from the middle of the range bar if the entire mix of a trackgroup needs to be moved. Likewise, clips can be moved by dragging from the middle of a clip. Clips and transitions can be shortened or lengthened by dragging either end.
The range bar for each biped can also be moved or scaled to move or scale the entire mix for the biped.
Transition brackets appear in Transition tracks. Where a transition exists, the brackets indicate the start and end point of the transition. If there is no transition at the end of the clip, the bracket indicates where the transition will be placed when a new clip is loaded into the track.
The current time in the scene can be changed by dragging the vertical, purple timeline, a change which is reflected on the 3ds Max time slider.

The vertical timeline.
If a clip has a time warp applied, time can be distorted interactively in Time Warp mode: first create seams in the clip, then drag the seams to stretch or squeeze time.

Note the corresponding changes in the frequency of the time ticks down the center of the clip. Time warps are used to speed up or slow down a motion.
The weighting controls at the rightmost end of the editor let you set the weight with which a clip or track will be blended with other tracks within the same trackgroup.
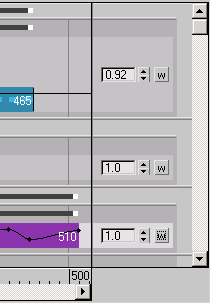
 When Weight Mode is turned on, weights can be adjusted with a red weight curve on a clip or track.
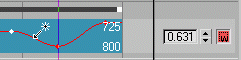
On a Layer track, each clip has its own weight curve. Each Transition track has one weight curve for the entire track. By default, each weight curve has a node at each end that can be moved to change the weight at that point. Click on the weight curve to add more nodes, and drag a node to move it.
Weights can range from 0.0 (no weight) to 1.0 (full weight). The weight for the currently selected node appears to the left of the Weight Mode button. You can change the weight by moving the node or by changing the spinner value.
When you have mulitple weight nodes selected, and you use the spinner to set a new value, weight node values are changed relative to their original values. In this case, you cannot spin the spinner lower than 0 or higher than 1 on any one spin. If you have more than one weight node selected and you type in a weight, the weights of all nodes are changed to the new value.
Weighting is evaluated across tracks in a single trackgroup. If a trackgroup has two or more tracks, the topmost track's weight is evaluated at each frame. If the weight at any frame is less than 1.0, the motion on the track is only partially used, and next track down is evaluated for its weight. If the total weight is still less than 1.0, the next track down is evaluated, and so on. In this way, motion from multiple tracks can be mixed at the same frame for the same set of body parts.
The Weight Mode button at the right end of the main toolbar turns on this mode for all tracks in the Motion Mixer. For more information, see Motion Mixer Toolbar.
 On a balance track, the Balance Weight Mode button appears rather than the Weight Mode button. When in Balance Weight mode,
you can adjust the weight curve for the balance track. To find out how to use Balance Weight mode, see Adjusting Biped Balance in the Mixer.
On a balance track, the Balance Weight Mode button appears rather than the Weight Mode button. When in Balance Weight mode,
you can adjust the weight curve for the balance track. To find out how to use Balance Weight mode, see Adjusting Biped Balance in the Mixer.


 Motion panel